The BEST Healthy Granola! is one of those recipes I reach for when I want something simple, wholesome, and totally reliable. I make it almost every Sunday, and it fills the kitchen with warm, toasty cinnamon notes that feel like a small celebration. I love how flexible The BEST Healthy Granola! is—swap nuts, add fruit, or go chocolatey and it still sings. If you want a crunchy, customizable breakfast or snack that holds up all week, this is the one to try.
How This Granola Became My Rainy-Day Comfort
I remember the first time I baked The BEST Healthy Granola! during a steady spring rain. The tiny kitchen felt cozy and aromatic; every stir released a cloud of cinnamon, coconut and maple-sweet warmth that made me slow down. I pressed the spatula into the glossy, syrup-coated oats and felt the mixture begin to clump in satisfying little clusters. When it came out of the oven, the edges had caramelized in the best way and the coconut flakes toasted to a pale gold. I poured it into a jar and kept sneaking spoonfuls, warm or cold, while watching the rain trace patterns on the window. That batch became my ritual: a small, crunchy comfort that turned ordinary mornings into something I looked forward to.
What Goes Into The Magic
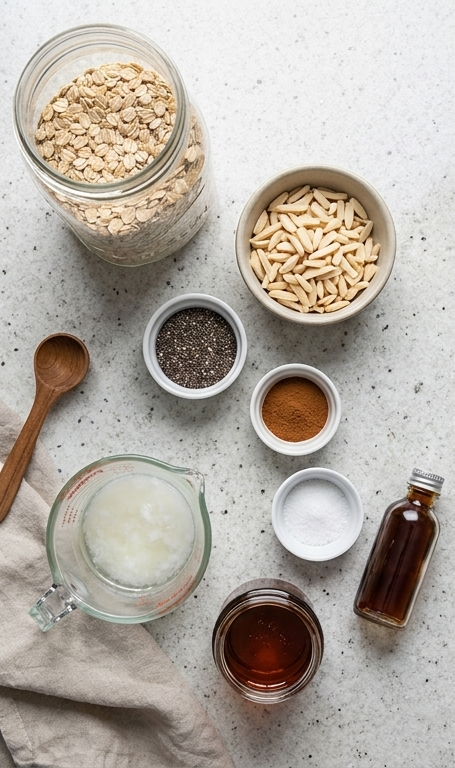
- Old-Fashioned Oats: The structural backbone. Use rolled oats for better clusters; avoid quick oats which can become powdery.
- Slivered Almonds: Add crunch and healthy fats. Substitute walnuts, pecans or pumpkin seeds for variety.
- Chia Seeds: Optional binder and nutrition boost. Use flaxseed if you want similar omega-3 benefits.
- Ground Cinnamon: Warmth and aroma. Freshly ground tastes best; try cardamom for a twist.
- Fine Sea Salt: Balances sweetness. Kosher salt works too—use a pinch more if using coarse salt.
- Melted Coconut Oil: Helps clusters and adds richness. Substitute neutral oil or melted butter if not vegan.
- Maple Syrup: Natural sweetener and glue for clusters. Use honey or agave syrup instead.
- Vanilla Extract: Rounds flavors. Use pure vanilla for depth.
- Coconut Flakes: Toasty finish and texture. Shredded coconut works; unsweetened keeps sugar lower.
- Chopped Dried Fruit or Semisweet Chocolate Chips: Optional finish for sweetness and chew.
Essential Kitchen Tools and Why They Matter
A few simple tools make this recipe effortless and consistent. A sturdy baking sheet and parchment help the granola bake evenly and release cleanly. A large mixing bowl gives you room to fold without spills. A wooden spoon or spatula lifts and mixes without smashing the oats too soon, letting clusters form.
- Large rectangular baking sheet: Ensures an even layer so the granola toasts uniformly.
- Parchment paper: Prevents sticking and makes cleanup easy.
- Large mixing bowl: Gives space to combine dry and wet ingredients without mess.
- Wooden spoon: Gentle folding preserves texture and helps clusters form.
- Clear glass measuring cup and whisk: For warming and mixing the wet ingredients until glossy.
- Wire rack: Lets the granola cool quickly and crisp up.
- Oven: For toasting; if you don’t have one, try a toaster oven in batches.
Step-by-Step Preparation Guide
Step 1: Preheat and prepare the tray
Preheat the oven to 350°F and line a large rectangular baking sheet with parchment paper; set it on the Luna Pearl granite surface so everything stays tidy and within reach. This step is purely prep—no oven or stove should be visible in the images—just the lined baking sheet and a small stack of parchment beside it, a wooden spatula resting nearby as the single active tool.
Step 2: Combine the dry ingredients in a mixing bowl
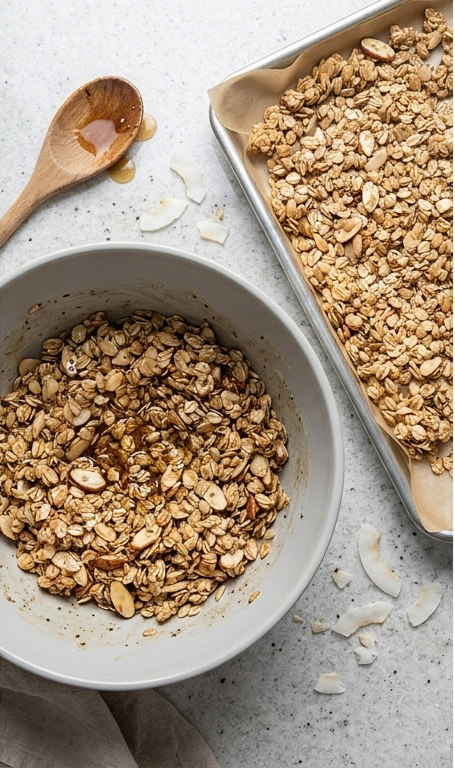
In a large matte light-grey ceramic mixing bowl, stir together the old-fashioned oats, slivered almonds, chia seeds (if using), ground cinnamon and fine sea salt until evenly distributed and fragrant. Use a wooden spoon to fold and lift so the textures—flake, sliver and dusting of spice—are clearly visible in the bowl; leave the spoon resting on the rim to show activity without clutter.
Step 3: Add the wet mix, integrate, and spread before baking
Whisk the melted coconut oil, maple syrup and vanilla in a clear glass measuring cup until glossy and homogenous, then pour the warm liquid over the dry mix and stir thoroughly in the same ceramic bowl until every oat and nut is lightly coated and slightly glossy. Transfer and spread the coated granola evenly across the prepared parchment-lined rectangular baking sheet, smoothing the surface with the wooden spatula so clusters can form while baking.
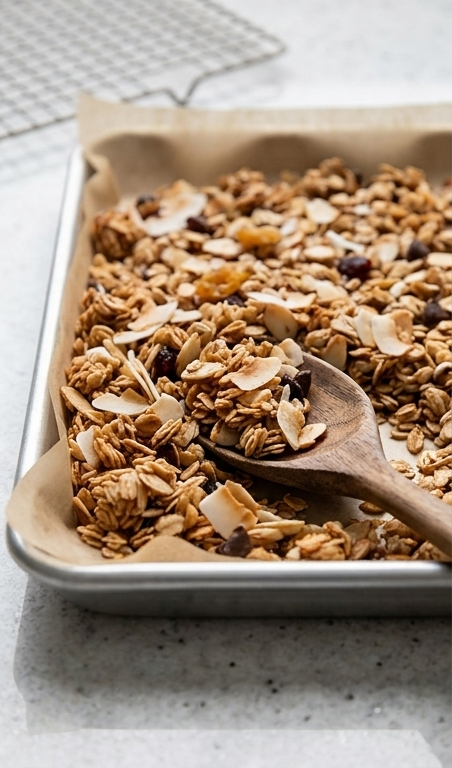
Bake the sheet for 20 minutes, stir once halfway through, then remove briefly to fold in the coconut flakes and redistribute any darker clusters; return to the oven for 5 more minutes until the granola is lightly toasted and golden at the edges.
Step 4: Cool, finish, and store
Slide the warm sheet onto a wire rack to cool until the granola reaches room temperature, allowing clusters to crisp and set; once cool, stir in chopped dried fruit or semisweet chocolate chips if using, breaking any oversized pieces into bite-sized clusters. Serve directly from the rectangular tray or transfer to an airtight container for storage at room temperature for up to one month.
Making It Your Own
Try swapping the almonds for walnuts and adding a pinch of nutmeg for a cozy fall version. I once added grated orange zest and chopped candied ginger for a bright, slightly spicy twist that paired beautifully with morning yogurt. For a nut-free pantry-friendly option, double the seeds and add sunflower and pumpkin seeds.
If you like chocolate, stir in cacao nibs or dark chocolate chips after cooling so they don’t melt. To cut sugar, reduce the maple syrup slightly and increase coconut oil by a tablespoon to help clusters hold. I love experimenting by folding in toasted oats after the first bake to boost crunch; it’s an easy tweak that gave me a bigger, crunchier cluster in every spoonful.
How to Serve
If I am hosting a brunch, I lay out a granola bar with jars of The BEST Healthy Granola!, plain and flavored yogurts, sliced fruit, warm milk, and small bowls of toppings so guests can build their own parfaits. For a crowd, double the recipe and display in a large glass dispenser or multiple jars for easy scooping.
For single servings, spoon the granola over Greek yogurt and top with honey and berries. For kids, mix it with a little nut butter and mashed banana as a portable snack. If you want to serve it as a gift, pack it into mason jars, add a handwritten label and a ribbon—homemade granola travels well and feels special.
Storage and Reheating Tips
Store The BEST Healthy Granola! in an airtight container at room temperature to keep it crisp. I find it stays fresh for about three to four weeks, though it often disappears long before then. Keep dried fruit separate until serving to prevent chewiness.
If you like warm granola, spread a portion on a baking sheet and warm in a 300°F oven for 5 minutes, stirring once, to refresh the crunch. Avoid microwaving for long stretches since that can make pieces soft or unevenly heated.
Oops-Proofing: Common Mistakes and How to Fix Them
Too much stirring while baking prevents clusters from forming, so stir only once halfway through. If your granola never clumps, next time slightly increase the maple syrup by a tablespoon or press the mixture gently into the sheet before baking.
If it looks soft straight from the oven, be patient and let it cool completely on a wire rack; it firms as it cools. If some pieces burn, scoop off the darkest bits and use the rest—small toasty notes can be delicious if not bitter.
Final Encouragement
Give The BEST Healthy Granola! a try this weekend—its simple ingredients and flexible flavors make it a breeze to adapt to your pantry and taste. Once you find your favorite mix-ins, it becomes a dependable, delicious staple that makes mornings easier and snacks more satisfying.
Frequently Asked Questions.
- What is the best way to get big clusters in The BEST Healthy Granola!?
Press the mixture gently into the baking sheet before the first bake and avoid over-stirring during baking. Slightly more maple syrup or a tablespoon more coconut oil can help clusters bind.
- Can I make The BEST Healthy Granola! gluten free?
Yes, use certified gluten-free old-fashioned oats to ensure the granola is gluten free and safe for those with sensitivity.
- How long will The BEST Healthy Granola! stay fresh?
Stored airtight at room temperature, it keeps for about three to four weeks; keeping dried fruit separate extends crispness.
- Can I bake this in a toaster oven?
Yes, bake in batches at the same temperature and watch closely since toaster ovens can toast faster and unevenly.
- What are good substitutes for coconut oil in this recipe?
Use melted butter for a richer flavor or a neutral oil like avocado or light olive oil if you prefer; texture will be similar.
The BEST Healthy Granola!
Make The BEST Healthy Granola! for crunchy, customizable breakfasts in 35 minutes. Bake, cool, and enjoy.
Ingredients
Instructions
Step 1: Preheat and prepare the tray
Preheat the oven to 350°F and line a large rectangular baking sheet with parchment paper; set it on the Luna Pearl granite surface so everything stays tidy and within reach. This step is purely prep—no oven or stove should be visible in the images—just the lined baking sheet and a small stack of parchment beside it, a wooden spatula resting nearby as the single active tool.
Step 2: Combine the dry ingredients in a mixing bowl
In a large matte light-grey ceramic mixing bowl, stir together the old-fashioned oats, slivered almonds, chia seeds (if using), ground cinnamon and fine sea salt until evenly distributed and fragrant. Use a wooden spoon to fold and lift so the textures—flake, sliver and dusting of spice—are clearly visible in the bowl; leave the spoon resting on the rim to show activity without clutter.
Step 3: Add the wet mix, integrate, and spread before baking
Whisk the melted coconut oil, maple syrup and vanilla in a clear glass measuring cup until glossy and homogenous, then pour the warm liquid over the dry mix and stir thoroughly in the same ceramic bowl until every oat and nut is lightly coated and slightly glossy. Transfer and spread the coated granola evenly across the prepared parchment-lined rectangular baking sheet, smoothing the surface with the wooden spatula so clusters can form while baking.
Bake the sheet for 20 minutes, stir once halfway through, then remove briefly to fold in the coconut flakes and redistribute any darker clusters; return to the oven for 5 more minutes until the granola is lightly toasted and golden at the edges.
Step 4: Cool, finish, and store
Slide the warm sheet onto a wire rack to cool until the granola reaches room temperature, allowing clusters to crisp and set; once cool, stir in chopped dried fruit or semisweet chocolate chips if using, breaking any oversized pieces into bite-sized clusters. Serve directly from the rectangular tray or transfer to an airtight container for storage at room temperature for up to one month.
Notes
- Press the granola into the sheet before baking to encourage clusters.
- Store in an airtight container at room temperature for up to 3-4 weeks.
- Add dried fruit or chocolate after cooling to prevent melting or softening.
- Swap nuts, seeds or sweeteners to suit dietary needs and pantry items.
- Warm small portions in a 300°F oven for 5 minutes to refresh crispness.