BBQ Brisket in Oven – Beef Brisket Recipe has been my go-to for easy, comforting weekend dinners ever since I figured out how forgiving this method is. I love that you can get a deep, smoky flavor from the oven without a smoker, and the glossy BBQ glaze always feels like a small victory. I first tried this recipe on a chilly Sunday when friends dropped by unexpectedly, and it turned a simple meal into something memorable. If you want true comfort food with minimal fuss, this BBQ Brisket in Oven – Beef Brisket Recipe is a reliable option you can count on.
How This Recipe Became My Rainy-Day Favorite
The first time I made this brisket I remember the rain tapping the windows and the whole house smelling like a backyard cookout despite being indoors. I had a heavy lasagna pan lined with foil and the brisket sat fat-side-up, its raw grain catching the light as I worked the rub into the meat. There was a calm, almost ritual quality to massaging the spices in and covering the pan tightly before the long wait. When it finally came out of the oven the crust was glossy and caramelized, and slicing it revealed a tender interior that seemed to sigh with relief. Watching my friends close their eyes and savor the first bite made me feel proud, like I had brought a little warmth to a rainy evening.
Why Each Ingredient Matters
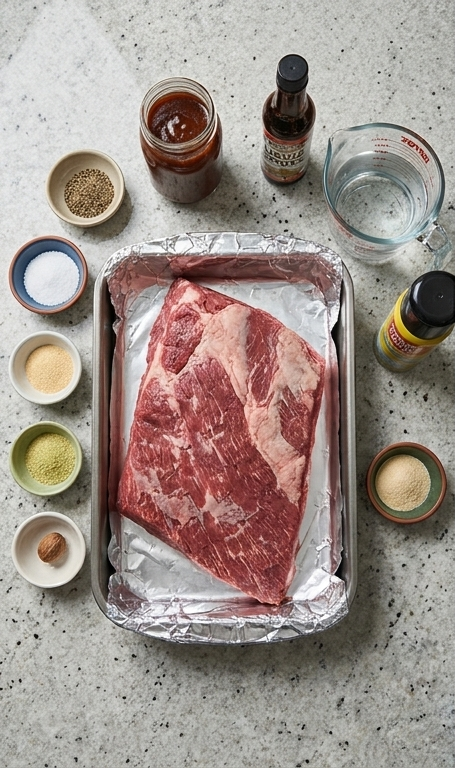
- Beef Brisket: The star of the dish; pick a point cut with a 1/2-inch fat cap for juiciness and even rendering. If unavailable, a flat cut will work but may be leaner.
- Kosher Salt: Crucial for seasoning and drawing out flavor. Use table salt carefully if needed but reduce quantity.
- Freshly Ground Black Pepper: Adds bite and forms a peppery crust. Tellicherry pepper is a nice upgrade.
- Garlic Powder: Delivers savory depth. Fresh garlic is an option but can burn during long cooks.
- Celery Powder: Adds subtle umami and savory backbone; celery salt can substitute with less added salt.
- Onion Powder: Rounds out the rub with sweet, savory notes; powdered forms keep texture even.
- Ground Nutmeg: A whisper of warmth that accentuates the other spices; optional if you prefer classic profiles.
- BBQ Sauce: Provides the glossy finish and sweet tang; swap for a spicy or mustard-based sauce to change the character.
- Liquid Smoke: The oven-friendly shortcut to smoky flavor; omit for a cleaner roast or reduce if you dislike intense smoke.
- Water: Keeps the pan moist during the oven slow-bake and prevents the rub from burning.
Essential Kitchen Tools and Why They Matter
Start with the basics, then add a couple of items that make life easier. These tools keep the cook controlled and the finish reliable.
- Large rectangular lasagna pan: Holds the brisket and liquids; a deep pan prevents spills and accommodates juices.
- Heavy-duty foil: Seals in moisture; use a second layer if your foil is thin.
- Probe thermometer: The best way to know the brisket is done; target 200°F for tender slices.
- Mixing bowl and whisk: For the BBQ and liquid smoke mix; a jar with a lid also works for shaking.
- Nonstick spray: Keeps foil and pan from sticking; oil the brisket lightly if you prefer.
- Sharp slicing knife and cutting board: For clean, thin slices against the grain.
- Cooling rack: Lets steam escape during resting so the crust stays crispish.
Step-by-Step Preparation Guide
Step 1: Trim the Brisket and Prep the Pan
Start by removing any silverskin and trimming the fat cap to a tidy ½-inch so the brisket cooks evenly and the rub can adhere. Line a large rectangular lasagna pan with heavy-duty foil and lightly spray the foil with nonstick cooking spray so nothing sticks. Place the whole raw brisket fat-side-up in the foil-lined pan so the meat’s grain is visible and ready for seasoning.
Step 2: Season Generously and Refrigerate
Generously sprinkle all sides of the brisket with kosher salt, freshly ground black pepper, garlic powder, celery powder, onion powder and a touch of ground nutmeg, massaging the rub into the meat so it forms a visible textured crust. Once seasoned, cover the pan tightly with foil and refrigerate the brisket for at least 8 and up to 24 hours to let the flavors penetrate.
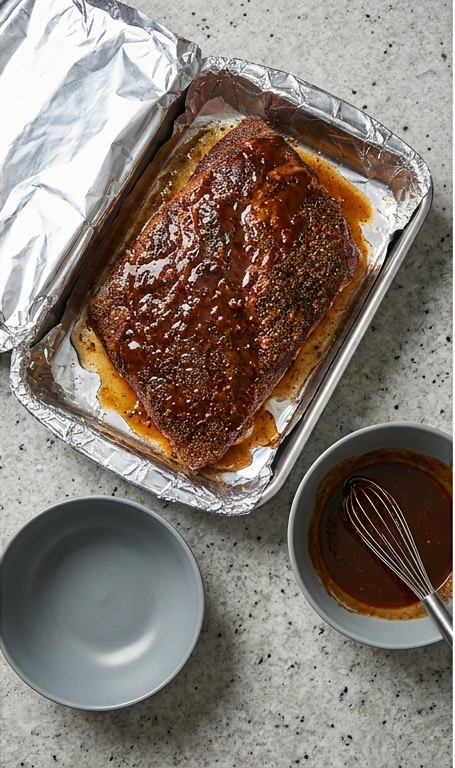
Step 3: Whisk the Sauce and Finish the Pan
In a medium bowl whisk together the BBQ sauce and liquid smoke until glossy and uniform; keep liquids inside a bowl or jar—never poured onto the surface. Remove the pan from the fridge, pour the BBQ/liquid smoke mixture evenly over the top of the seasoned brisket (keeping the rub intact), then pour the measured water around the brisket in the pan but not over the meat. Tightly cover the pan with foil and return it to the fridge until ready to cook.
Step 4: Bring to Temperature and Begin Slow Cooking
Remove the foil-covered pan from the refrigerator 30 minutes before cooking to take the chill off the meat. Preheat the oven to 275°F and position a middle rack. Place the covered rectangular pan on the warm rack and slow-bake; the long, steady heat will gradually break down connective tissue until the brisket becomes tender.
Step 5: Check for Doneness and Rest
After about five hours begin checking internal temperature with a probe until it registers 200°F and the brisket lifts easily in the middle with tongs without breaking apart. If it hasn’t reached 200°F, keep it covered and retest every half hour. When done, transfer the brisket to a cooling rack still in its rectangular shape, open the foil to let steam vent, and let it rest for at least 30 minutes so juices redistribute before slicing.
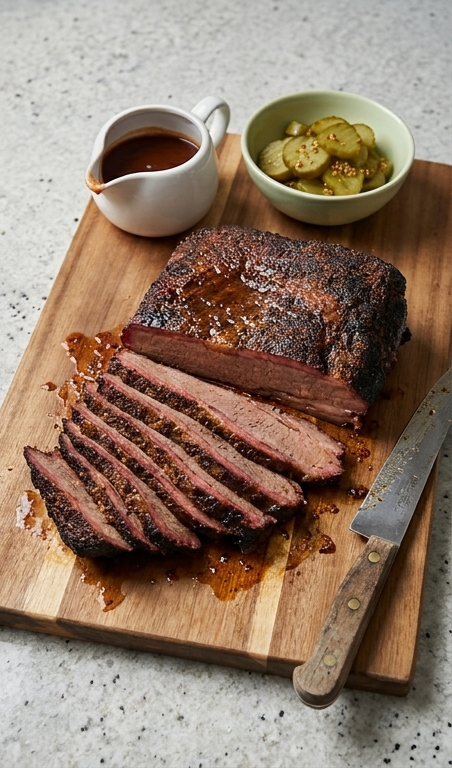
Step 6: Slice Against the Grain and Serve
Move the rested brisket back to a long rectangular cutting board or the same rectangular serving tray and slice thinly against the grain so each slice shows a caramelized dark crust and a tender, slightly pink interior. Discard the cooking liquid, arrange slices neatly in the rectangular vessel, and serve alongside the reserved BBQ sauce in a small sauce boat. Enjoy the deep, glossy glazing and the tender, juicy texture with pickles or your favorite sides.
Making It Your Own
I like to experiment with small swaps to see how the profile changes. For a tangier brisket, I replace half the BBQ sauce with a vinegar-based sauce and add a touch more black pepper. If I want a smoky Texas vibe, I reduce the liquid smoke and add smoked paprika to the rub. For a weeknight, I sometimes skip the 24-hour rest and do an 8-hour chill; it loses a bit of depth but still turns out tender. When friends need a gluten-free option, I check labels on the BBQ sauce and use a gluten-free brand.
How to Serve
When I host, I set up a brisket station. Thin slices go on a long platter, bowls of pickles, sliced onions, and extra BBQ sauce sit nearby, and soft rolls or cornbread are on the side. For a small family dinner, serve 1/2 pound per adult; for parties, plan 1/3 pound per person if there are many sides.
If you want to dress it up, arrange slices in slightly overlapping rows and spoon a little warm sauce over the top. For a casual spread, let guests build sandwiches. Leftover slices are fantastic reheated and served with a crisp slaw.
Storage and Reheating Tips
Cool the brisket completely before storing. Wrap slices tightly in foil or store in an airtight container with a little reserved cooking liquid to keep them moist. Properly stored, the brisket will last 3 to 4 days in the refrigerator.
For longer storage, freeze in portions layered with parchment between slices and sealed in a heavy freezer bag. Thaw in the refrigerator overnight before reheating.
To reheat, place slices in a covered pan with a few tablespoons of cooking liquid or sauce and warm gently at 300°F until just heated through. Avoid microwaving unless you do short bursts and add moisture, because it can dry the meat quickly.
Common Mistakes and How to Avoid Them
One frequent misstep is trimming too much fat. The 1/2-inch fat cap renders and keeps the brisket juicy, so don’t be overzealous. Also, try not to skip the resting time; slicing too soon lets the juices run out and leaves the meat drier.
Another trap is relying on time alone. Brisket is done when it reaches about 200°F and lifts easily, not strictly after a set number of hours. Use a probe thermometer and patience for the best results.
Final Thoughts and Encouragement
If you try this BBQ Brisket in Oven – Beef Brisket Recipe, give yourself the gift of patience and a sharp thermometer. The reward is tender, glossy slices that taste like a full-day effort even when the oven does most of the work. Have fun with small adjustments and enjoy the way this brisket can bring people together.
Frequently Asked Questions.
- Can I use a flat cut brisket instead of point cut? Yes, you can. The flat cut is leaner and slices neatly; expect slightly less marbling and plan for a touch less cook time if the piece is thin.
- How long should I refrigerate the seasoned brisket? Refrigerate at least 8 hours and up to 24 hours. Longer resting helps flavors penetrate but 8 hours will still give good results.
- Is liquid smoke necessary? No, it is not strictly necessary but it adds that smoky profile when you do not have a smoker. Omit or reduce if you prefer a milder smoke note.
- What if my brisket reaches 200°F but is not tender? If the internal temp is 200°F and it still feels tight, keep it covered and continue low-and-slow checking every 20 to 30 minutes; collagen breakdown can vary.
- Can I make this ahead for a party? Yes. Cook a day ahead, slice, and refrigerate with a little cooking liquid. Reheat gently with sauce before serving.
BBQ Brisket in Oven - Beef Brisket Recipe
Make BBQ Brisket in Oven - Beef Brisket Recipe for tender, glossy slices in your oven—easy, oven-friendly comfort food.
Ingredients
Instructions
Step 1: Trim the Brisket and Prep the Pan
Start by removing any silverskin and trimming the fat cap to a tidy ½-inch so the brisket cooks evenly and the rub can adhere. Line a large rectangular lasagna pan with heavy-duty foil and lightly spray the foil with nonstick cooking spray so nothing sticks. Place the whole raw brisket fat-side-up in the foil-lined pan so the meat’s grain is visible and ready for seasoning.
Step 2: Season Generously and Refrigerate
Generously sprinkle all sides of the brisket with kosher salt, freshly ground black pepper, garlic powder, celery powder, onion powder and a touch of ground nutmeg, massaging the rub into the meat so it forms a visible textured crust. Once seasoned, cover the pan tightly with foil and refrigerate the brisket for at least 8 and up to 24 hours to let the flavors penetrate.
Step 3: Whisk the Sauce and Finish the Pan
In a medium bowl whisk together the BBQ sauce and liquid smoke until glossy and uniform; keep liquids inside a bowl or jar—never poured onto the surface. Remove the pan from the fridge, pour the BBQ/liquid smoke mixture evenly over the top of the seasoned brisket (keeping the rub intact), then pour the measured water around the brisket in the pan but not over the meat. Tightly cover the pan with foil and return it to the fridge until ready to cook.
Step 4: Bring to Temperature and Begin Slow Cooking
Remove the foil-covered pan from the refrigerator 30 minutes before cooking to take the chill off the meat. Preheat the oven to 275°F and position a middle rack. Place the covered rectangular pan on the warm rack and slow-bake; the long, steady heat will gradually break down connective tissue until the brisket becomes tender.
Step 5: Check for Doneness and Rest
After about five hours begin checking internal temperature with a probe until it registers 200°F and the brisket lifts easily in the middle with tongs without breaking apart. If it hasn’t reached 200°F, keep it covered and retest every half hour. When done, transfer the brisket to a cooling rack still in its rectangular shape, open the foil to let steam vent, and let it rest for at least 30 minutes so juices redistribute before slicing.
Step 6: Slice Against the Grain and Serve
Move the rested brisket back to a long rectangular cutting board or the same rectangular serving tray and slice thinly against the grain so each slice shows a caramelized dark crust and a tender, slightly pink interior. Discard the cooking liquid, arrange slices neatly in the rectangular vessel, and serve alongside the reserved BBQ sauce in a small sauce boat. Enjoy the deep, glossy glazing and the tender, juicy texture with pickles or your favorite sides.
Notes
- Let the brisket rest 8 to 24 hours after seasoning for best flavor penetration.
- Use a probe thermometer and aim for 200°F internal temperature for tenderness.
- Keep some reserved BBQ sauce for serving; it brightens the slices when reheating.
- Slice against the grain for the most tender mouthfeel.
- Store with a little cooking liquid to prevent drying when reheating.


