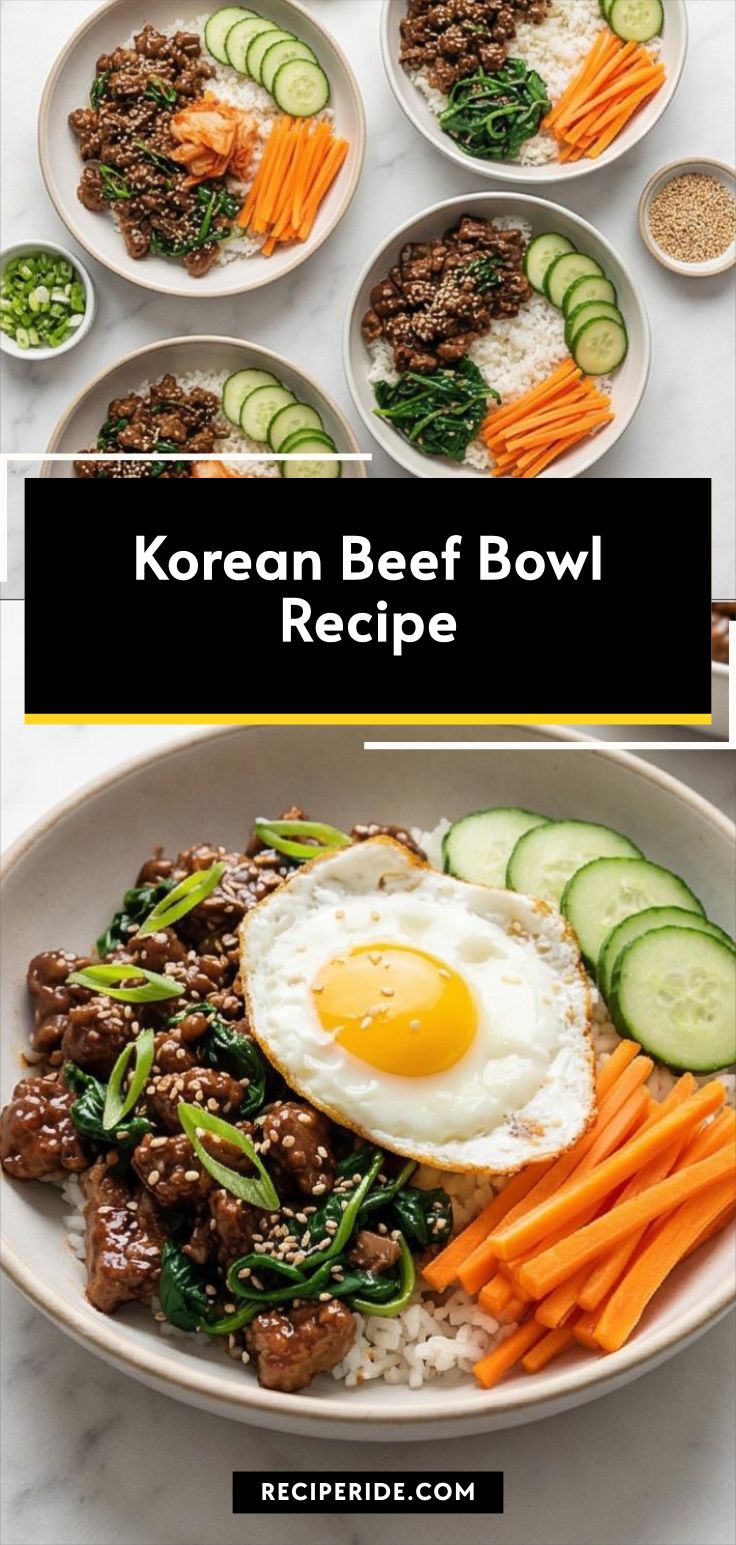
Korean Beef Bowl Recipe — warm, saucy, and exactly the kind of recipe I reach for when I want something comforting that comes together fast. I first learned this Korean Beef Bowl Recipe from a friend who taught me to balance sweet, savory, and spicy in one skillet. Since then I make it when I need a satisfying weeknight dinner or an easy dish to feed guests without stress. The mix of glossy seasoned beef, bright vegetables, and a runny egg makes it feel special with almost no fuss.
How This Bowl Became My Cozy Weeknight Staple
I remember the first time I made the Korean Beef Bowl Recipe in a tiny apartment kitchen with a tired workweek behind me and the urge for something bold and homey. The soy, brown sugar, and gochujang came together like a lightbulb moment — savory and sticky, with just enough heat to make me sit up. I can still picture the steam rising as I fluffed the rice, the sound of the beef sizzling and caramelizing until it smelled like a street vendor’s stall, and the satisfaction of cracking an egg that bled golden yolk into that sauce. It felt like wrapping myself in a blanket that tasted like dinner, and ever since then this bowl has been my fallback when I want food that comforts and excites at the same time.
Key Ingredients and Why They Matter
- Short- or medium-grain rice: The foundation; its slightly sticky texture holds the bowl together. Substitute sushi rice or a short-grain brown rice if you want more chew.
- Ground beef: Provides richness and an umami backbone. Try ground turkey or plant-based crumbles for a lighter or vegetarian option.
- Soy sauce and gochujang: The salty and spicy duo that defines the sauce; low-sodium soy keeps salt in check. Red pepper flakes plus a touch of miso can work if you lack gochujang.
- Garlic and ginger: Aroma agents that brighten the meat. Use powdered ginger only in a pinch.
- Spinach, cucumber, carrots, kimchi: Fresh contrasts that balance the glossy beef; any quick-pickled vegetable adds a nice tang.

Essential Kitchen Tools and Why They Help
A few simple tools make this recipe painless and prettier. A heavy-bottomed skillet lets the beef caramelize without burning, and a medium pot with a tight-fitting lid steams the rice evenly. A small whisk keeps the sauce lump-free, while a fine grater for ginger gives more fragrant results than preground. If you do not have a whisk, a fork will do; a nonstick pan can replace a cast-iron skillet for easier cleanup. A julienne peeler or mandoline speeds up the carrots and cucumber, but a sharp knife works just fine. Good mise en place bowls keep the assembly smooth, especially when guests are helping themselves.
Step-by-Step Preparation Guide
Step 1: Cook and Steam the Rice
Rinse the short- or medium-grain rice until the rinse water runs mostly clear, then combine it with water and a pinch of kosher salt in a covered pot and bring to a gentle boil. Lower the heat to a bare simmer and cook undisturbed until the water is absorbed, then turn off the heat and let the sealed pot rest so the rice finishes steaming for ten minutes. Uncover and gently fluff the grains with a fork so the texture is light, slightly glossy, and individual – not gummy – while keeping it warm for assembly.

Step 2: Whisk the Korean Beef Sauce and Prep Aromatics & Vegetables
Whisk the sauce ingredients until perfectly smooth: low-sodium soy sauce, packed light brown sugar, gochujang to taste, a splash of rice vinegar, toasted sesame oil, a little water, cornstarch, and fresh cracked black pepper; the finished sauce should be syrupy and uniformly glossy with no visible cornstarch lumps. At the same time, prep the aromatics and produce: finely mince the garlic, grate the ginger, thinly slice the scallions on a diagonal, keeping white and green parts separated, julienne the carrots into delicate matchsticks, thinly slice the cucumber into rounds or half-moons, and roughly chop the kimchi if using. Keep liquids in small glass jars and dry items in small ceramic bowls so everything is organized and camera-ready.

Step 3: Brown the Beef, Add Aromatics, Sauce, and Wilt Spinach
Patience here pays off: sear the ground beef in a slick of neutral oil until deep caramelized brown crusts form, then break it into crumbles and continue cooking until the meat has lost its raw pink and any released liquid has mostly evaporated. Reduce heat, add the minced garlic, grated ginger, and the white parts of the scallions and stir just until fragrant and softened. Stir the prepared sauce, pour it over the beef, and simmer gently until the sauce reduces to a glossy coating that clings to the crumbles; finish by tossing in the baby spinach for just 30-60 seconds until it brightens and wilts into the meat. Turn off the heat and leave the sauced beef resting in its vessel while you prepare eggs and bowls.

Step 4: Fry Eggs and Stage the Components for Assembly
In a separate pan, fry eggs to preference – sunny-side-up with set whites and runny yolks is lovely here – seasoning the eggs lightly with the reserved salt and black pepper. Fluff and portion the warm rice into a serving bowl for staging, and arrange small piles of the prepared carrots, cucumber, kimchi, sliced green onion tops, and toasted sesame seeds nearby in shallow dishes so each bowl can be composed cleanly. Keep the eggs warm and the components visually separated; this is the moment the mise en place becomes a composed palette ready for the final build.

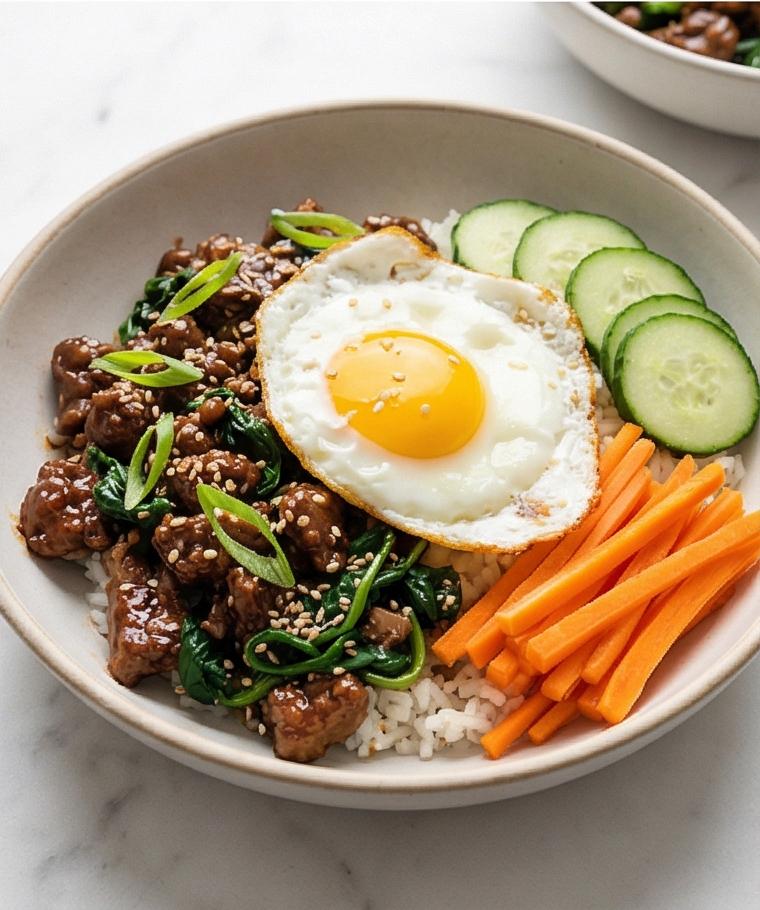
Step 5: Assemble, Garnish, and Serve
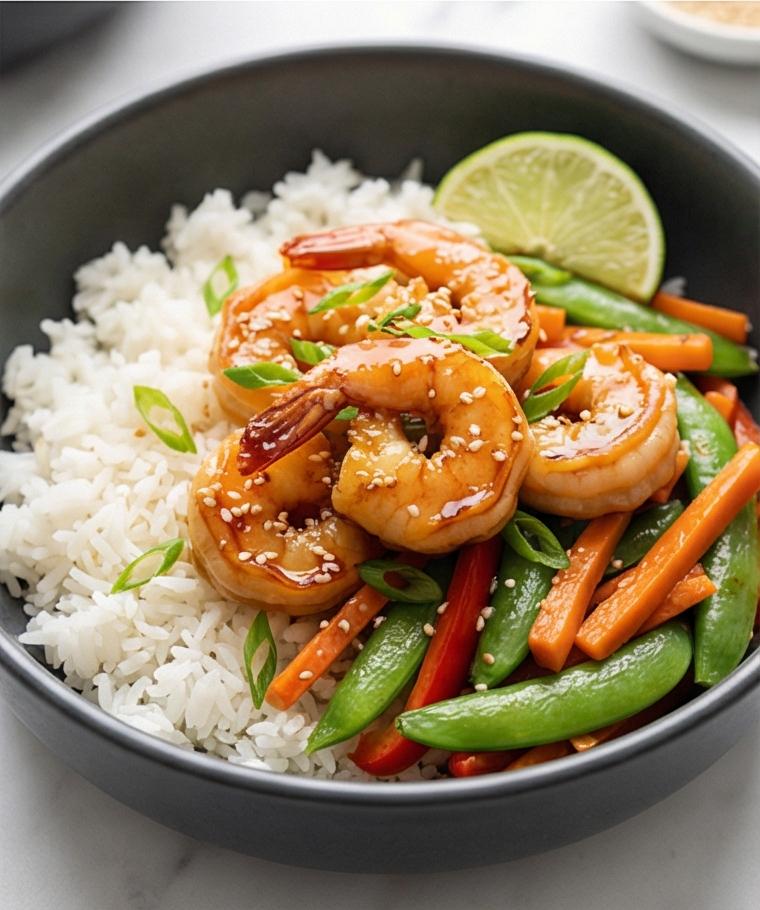
Divide the fluffy rice across four shallow serving bowls, spoon a generous quarter of the glossy Korean beef and wilted spinach over each mound, and arrange neat bundles of carrot matchsticks and cucumber slices at the edges. Add a quarter-cup of kimchi if using, then crown each bowl with a fried egg – letting the yolk sit glossy atop the meat. Finish with a scattering of sliced green scallion tops and a generous pinch of toasted sesame seeds, and offer extra gochujang or sesame oil at the side for adjustments. Serve immediately while hot; the contrast of glossy, savory beef, creamy egg yolk, bright vegetables, and the clean matte Carrara surface completes the composition.
Making It Your Own
I like to treat the Korean Beef Bowl Recipe as a template. For a lighter bowl, I swap half the beef for finely chopped mushrooms and finish with a splash of rice vinegar for brightness. When I want more heat, I stir in extra gochujang and top with sliced fresh chiles; for kids or spice-averse guests I reduce the gochujang and add a drizzle of honey for balance.
Seasonal tweaks are fun: in spring I add quickly blanched asparagus; in fall I swap cucumbers for quick pickled radishes. Going plant-forward, I experimented with marinated tofu cubes and found that pressing the tofu first and pan-searing it gives a similarly satisfying texture. Each small experiment taught me new ways the flavors can sing together.
How to Serve
Think of this as a build-your-own-bowl party. Lay out the warm rice, sauced beef, vegetables, kimchi, sesame seeds, and gochujang in separate dishes so guests can compose their bowls. For a casual dinner for four, keep the protein portions around 1/4 pound of beef per person and present extras like sliced scallions and toasted sesame seeds in small bowls.
If hosting a larger group, keep the beef warm in a low oven or a covered skillet and refill the rice from a thermal pot. For plated service, compose bowls just before sitting and finish with a single sunny-side-up egg so each guest gets that glossy yolk moment.
Storage and Reheating Tips
Store leftover components separately when possible. Keep the sauced beef in an airtight container and the rice in another – this prevents the rice from soaking up sauce and becoming mushy. Vegetables like cucumber and carrots keep best in a separate jar or sealed bag.
To reheat, gently warm the beef in a skillet over low heat with a tablespoon of water to loosen the sauce, then briefly steam or microwave the rice until hot. Re-fry or softly scramble fresh eggs when serving so the texture stays bright and runny.
Common Mistakes and How to Avoid Them
Overcrowding the pan while browning the beef causes steaming instead of caramelization – cook in batches or use a larger skillet. Also, adding the sauce too early can make the meat soggy; wait until the beef is deeply browned and most liquid has evaporated.
Another misstep is oversalting. Because soy sauce is salty, taste as you go and use low-sodium soy sauce. If the sauce becomes too thick, whisk in a tablespoon of warm water to loosen it and bring back shine.
Final Thoughts
Give this Korean Beef Bowl Recipe a try on your next busy weeknight. It rewards a little prep with big flavor, and the components are flexible enough to suit many diets and moods. Once you make it a few times, you will find your favorite ratio of sauce to rice and a gochujang level that feels just right.
Frequently Asked Questions.
- Can I make this Korean Beef Bowl Recipe ahead of time? Yes, you can prep components like the sauce, chopped vegetables, and cooked rice ahead, but assemble and fry eggs just before serving for best texture.
- Is there an easy vegetarian swap? Try crumbled, pressed tofu or a mix of mushrooms and tempeh; sear them until caramelized and use the same sauce.
- How spicy is it with 1-2 tablespoons of gochujang? That range gives medium heat; start with 1 tablespoon if you are unsure and add more at the table.
- Can I use long-grain rice instead of short-grain? You can, but the bowl will be less sticky; jasmine rice works fine for a lighter texture.
- How do I store leftovers? Keep beef, rice, and fresh veggies separately in the fridge for up to 3 days and reheat the beef gently in a skillet before serving.
Korean Beef Bowl Recipe
Make Korean Beef Bowl Recipe tonight: glossy sauced beef, fluffy rice, bright veggies, and a runny egg for a fast, satisfying meal.
Ingredients
Instructions
Step 1: Cook and Steam the Rice
Rinse the short- or medium-grain rice until the rinse water runs mostly clear, then combine it with water and a pinch of kosher salt in a covered pot and bring to a gentle boil. Lower the heat to a bare simmer and cook undisturbed until the water is absorbed, then turn off the heat and let the sealed pot rest so the rice finishes steaming for ten minutes. Uncover and gently fluff the grains with a fork so the texture is light, slightly glossy, and individual — not gummy — while keeping it warm for assembly.
Step 2: Whisk the Korean Beef Sauce and Prep Aromatics & Vegetables
Whisk the sauce ingredients until perfectly smooth: low-sodium soy sauce, packed light brown sugar, gochujang to taste, a splash of rice vinegar, toasted sesame oil, a little water, cornstarch, and fresh cracked black pepper; the finished sauce should be syrupy and uniformly glossy with no visible cornstarch lumps. At the same time, prep the aromatics and produce: finely mince the garlic, grate the ginger, thinly slice the scallions on a diagonal, keeping white and green parts separated, julienne the carrots into delicate matchsticks, thinly slice the cucumber into rounds or half-moons, and roughly chop the kimchi if using. Keep liquids in small glass jars and dry items in small ceramic bowls so everything is organized and camera-ready.
Step 3: Brown the Beef, Add Aromatics, Sauce, and Wilt Spinach
Patience here pays off: sear the ground beef in a slick of neutral oil until deep caramelized brown crusts form, then break it into crumbles and continue cooking until the meat has lost its raw pink and any released liquid has mostly evaporated. Reduce heat, add the minced garlic, grated ginger, and the white parts of the scallions and stir just until fragrant and softened. Stir the prepared sauce, pour it over the beef, and simmer gently until the sauce reduces to a glossy coating that clings to the crumbles; finish by tossing in the baby spinach for just 30–60 seconds until it brightens and wilts into the meat. Turn off the heat and leave the sauced beef resting in its vessel while you prepare eggs and bowls.
Step 4: Fry Eggs and Stage the Components for Assembly
In a separate pan, fry eggs to preference — sunny-side-up with set whites and runny yolks is lovely here — seasoning the eggs lightly with the reserved salt and black pepper. Fluff and portion the warm rice into a serving bowl for staging, and arrange small piles of the prepared carrots, cucumber, kimchi, sliced green onion tops, and toasted sesame seeds nearby in shallow dishes so each bowl can be composed cleanly. Keep the eggs warm and the components visually separated; this is the moment the mise en place becomes a composed palette ready for the final build.
Step 5: Assemble, Garnish, and Serve
Divide the fluffy rice across four shallow serving bowls, spoon a generous quarter of the glossy Korean beef and wilted spinach over each mound, and arrange neat bundles of carrot matchsticks and cucumber slices at the edges. Add a quarter-cup of kimchi if using, then crown each bowl with a fried egg — letting the yolk sit glossy atop the meat. Finish with a scattering of sliced green scallion tops and a generous pinch of toasted sesame seeds, and offer extra gochujang or sesame oil at the side for adjustments. Serve immediately while hot; the contrast of glossy, savory beef, creamy egg yolk, bright vegetables, and the clean matte Carrara surface completes the composition.
Notes
- Use low-sodium soy sauce to control salt and adjust at the end.
- Taste the sauce before adding to the beef; gochujang levels vary by brand.
- Press and sear tofu if using a vegetarian swap for better texture.
- Store components separately to keep rice and vegetables from getting soggy.
- Reheat beef gently in a skillet with a splash of water to restore gloss.

