Spicy Ramen Noodle Soup Recipe has been my go-to when I want big flavor without a ton of fuss. I love how the miso and chili-garlic layers mingle with toasted sesame and jammy eggs to create something deeply comforting yet lively. I learned to balance the heat slowly so the spice sings instead of shouting, and that little trick makes this Spicy Ramen Noodle Soup Recipe truly addictive. If you like bowls with texture and personality, this one will become a fast favorite.
How This Bowl Became My Cozy-Weeknight Ritual
One winter evening I was snowed in and craving something warm that did not require a grocery run. I pulled together whatever I had and leaned into bold flavors: miso, gochujang, a splash of toasted sesame oil and the always-ready ramen bricks. The kitchen filled with fragrant steam and the scent of garlic and ginger; the pot looked like a tiny, spicy planet. When I cracked into the soft-boiled egg and the yolk pooled into the broth, I felt that small, triumphant kind of comfort that only well-made soup can give. Since then, the Spicy Ramen Noodle Soup Recipe has been my answer to late nights, sudden guests and the times I just want to feel wrapped up in a savory hug.
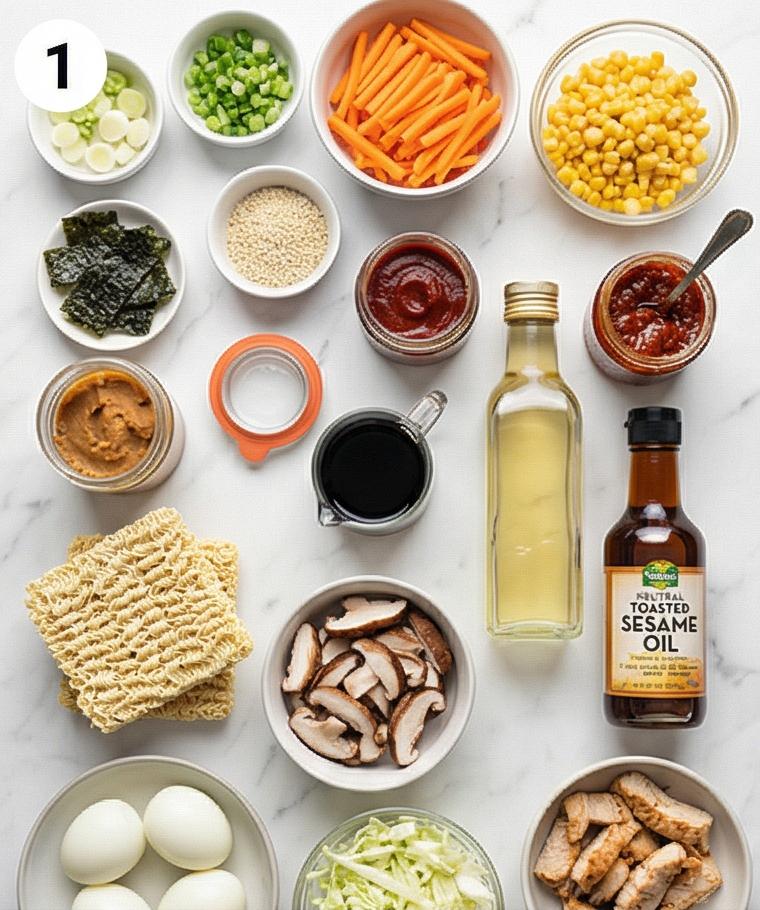
Key Ingredients and Why They Matter
- Miso paste: Provides deep umami and a subtle creaminess; white miso is milder, red miso is stronger. Substitute with tamari plus a touch of tahini in a pinch.
- Gochujang / chili-garlic sauce: Brings heat and fermented complexity; more chili-garlic gives sharper heat. Use sambal or sriracha as alternatives.
- Broth: The backbone of the bowl; low-sodium chicken or vegetable lets you control seasoning. Homemade stock is best for depth.
- Ramen noodles: The texture star. Fresh is ideal, dried is fine. Use udon for a chewier mouthfeel.
Essential Kitchen Tools
A quick note before we start: the right tools make this simple bowl much easier to pull together.
- Heavy-bottomed pot: Helps the aromatic base develop without hot spots.
- Fine mesh strainer or colander: Useful for draining noodles and rinsing vegetables if needed.
- Ladle and wooden spoon: For emulsifying miso and moving the broth gently; a whisk helps dissolve the paste.
- Sharp knife and cutting board: Thin, even slices of mushrooms and matchsticks of carrot make a big visual and textural difference.
If you do not have a heavy pot, a wide saucepan works. No microplane for ginger? Mince it very finely with a knife.
Step-by-Step Preparation Guide
Step 1: Soft‑boil and cool the eggs
Bring the eggs to room temperature, gently cook until the whites are set and the yolks are jammy (7 minutes) or slightly firmer (9 minutes), then shock them in ice water to stop the cooking. Peel carefully so the glossy, slightly sticky surface of the whites remains intact—do not slice yet; keeping them whole preserves the custardy yolk texture for later. Arrange the peeled eggs on a small shallow dish to rest and stay cool while you progress.
Step 2: Build the fragrant aromatic base
Heat neutral oil in a heavy-bottomed pot (or imagine the finished mixture returned to a bowl for this visualization) and sweat together finely minced garlic, minced ginger and the white parts of the green onions until intensely fragrant and softened but not browned. The result should be a glossy, lightly blistered mix of translucent garlic bits, golden threads of ginger and pale scallion pieces suspended in oil, smelling bright, warm and inviting.
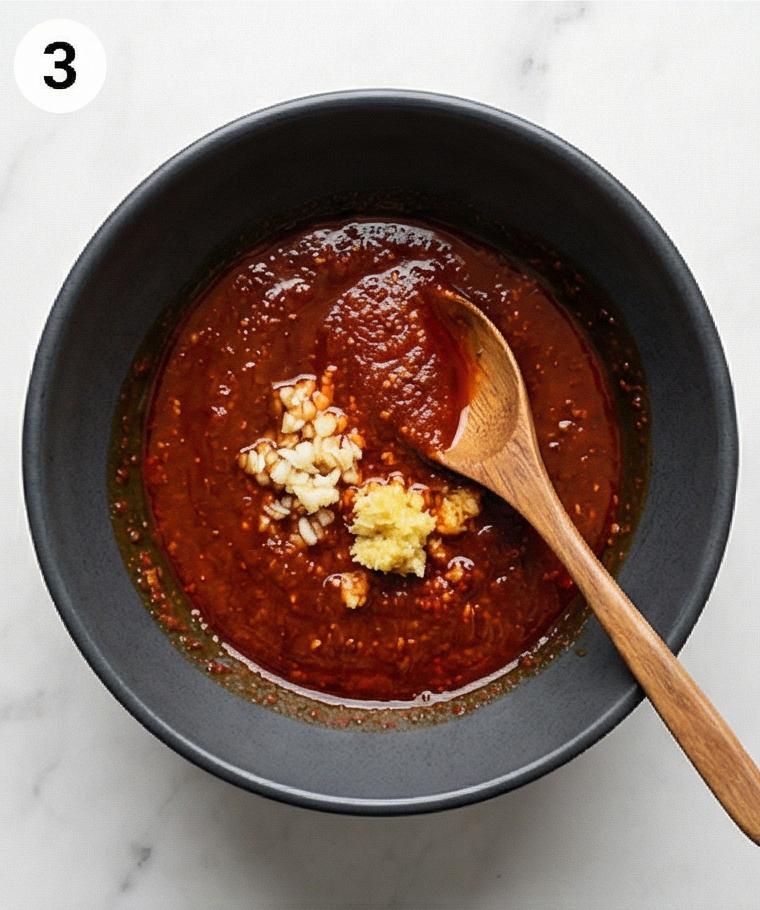
Step 3: Form the spicy miso paste
Reduce the heat and fold in the chili‑garlic sauce and gochujang, stirring until the pastes darken slightly and become a cohesive, deep red‑orange paste. Add the miso and work it in until smooth and slightly loosened by the oil—no burnt edges, just a shiny, emulsified paste with flecks of red pepper and glossy miso sheen.

Step 4: Emulsify and season the broth
Whisk a ladleful of warm broth into the paste to dissolve it, then add the remaining chicken (or vegetable) broth, water, soy sauce, sugar and kosher salt. Bring this mixture just to a lively simmer so it becomes a unified, slightly viscous broth with layered umami and chili heat. The surface should be a deep red‑orange with a subtle oil slick, aromatic steam rising when hot.
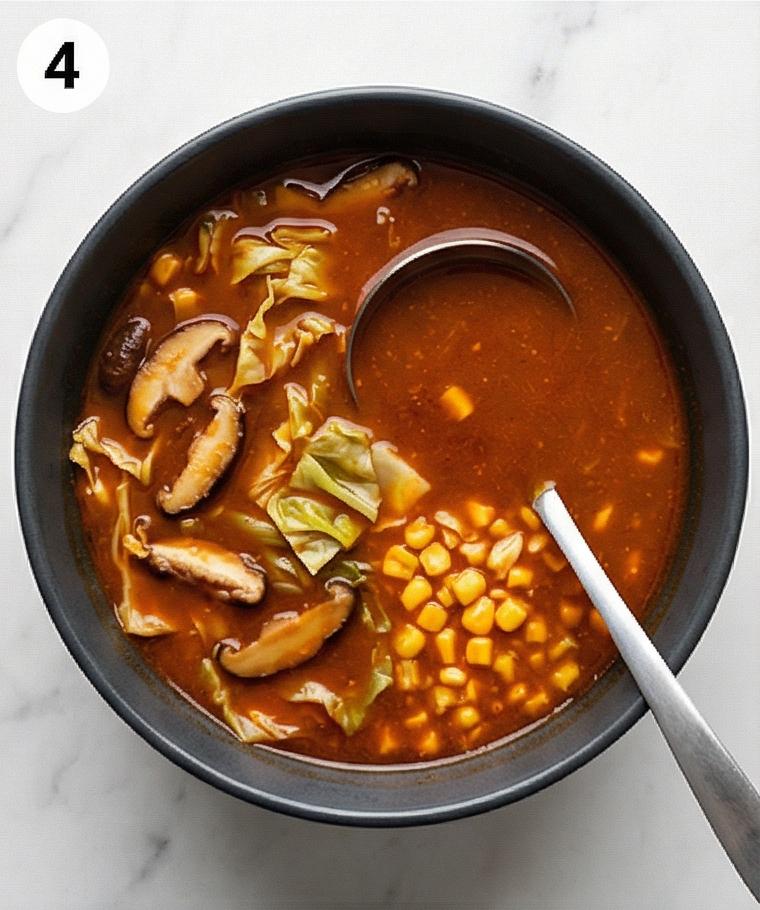
Step 5: Simmer the mushrooms and greens until tender
Add the thinly sliced shiitake and shredded cabbage or baby bok choy and maintain a gentle, steady simmer until the mushrooms are tender and the greens have wilted but still look vibrant. If using corn in the broth, add in the last few minutes so the kernels remain plump and slightly sweet. The broth now reads as a complete, aromatic liquid with visible vegetable textures and glossy mushroom caps.
Step 6: Finish the broth with toasted sesame oil and adjustments
Stir in the toasted sesame oil for a nutty, glossy finish, then taste and tweak with extra salt, soy sauce or chili‑garlic sauce as needed. The final broth should be balanced—salty, spicy, richly savory and slightly creamy from miso—coating the back of a spoon and clinging to vegetables and noodles.
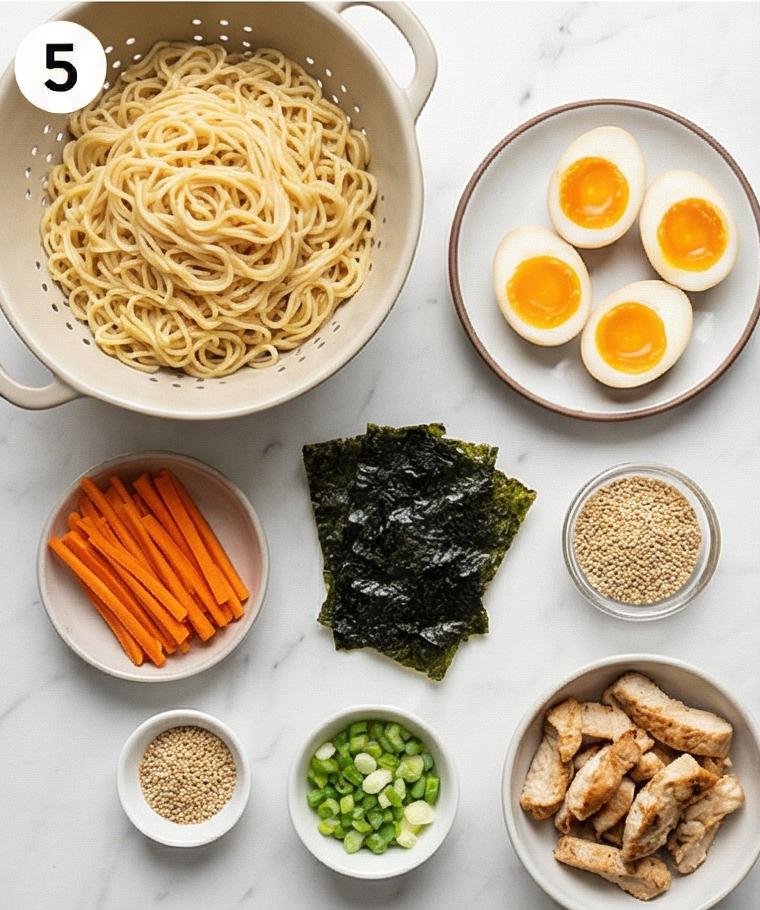
Step 7: Cook and drain the ramen noodles to retain bite
Cook the dried ramen until just al dente so the strands remain springy and bouncy, not mushy. Drain them well but don’t rinse—the residual surface starch helps the broth cling. Transfer the drained noodle nests to a serving vessel to keep their glossy, intertwined texture ready for hot broth.
Step 8: Halve the soft eggs and arrange final toppings
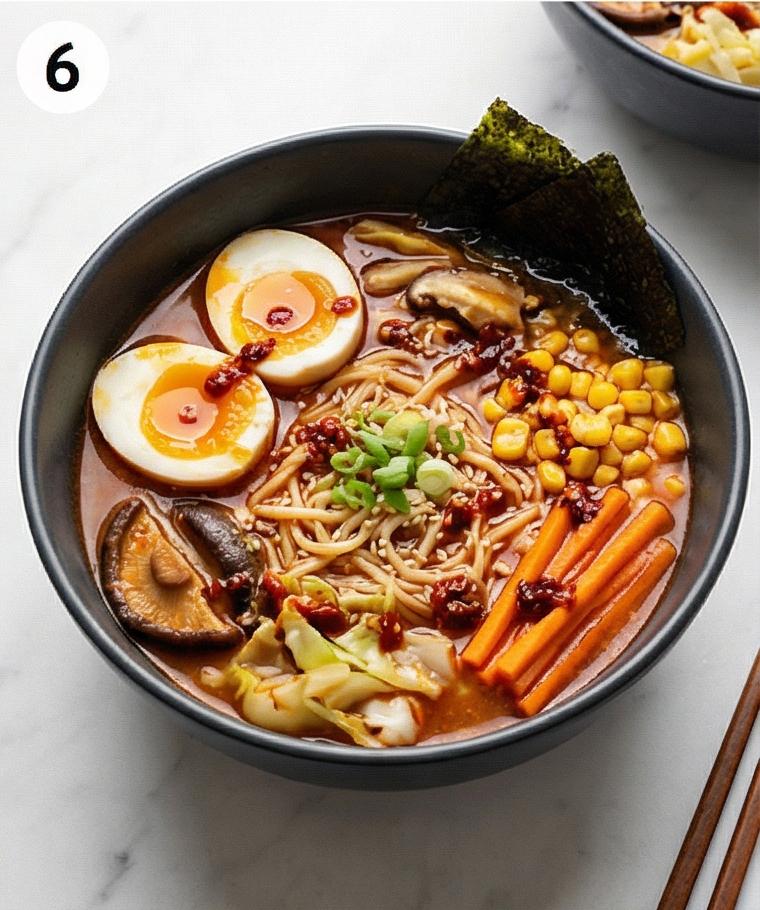
While the noodles are still hot, carefully halve the cooled, peeled eggs lengthwise to reveal custardy, jammy yolks. Lay the halves on a small plate with a sprinkle of sesame seeds so the cut edges remain moist and glossy. Gather the green onion greens, carrot matchsticks, corn, torn nori and toasted sesame seeds nearby for fast assembly.
Step 9: Assemble the bowls with care
Divide the hot noodles among serving bowls, ladle the simmering broth with mushrooms and greens over the nests so the noodles sink and pick up color, and place the egg halves gently on top. Add a small mound of carrot matchsticks, a scattering of corn, torn nori, and a sprinkle of toasted sesame seeds and sliced protein if using—each element should sit with clear texture contrast against the broth.
Step 10: Garnish and serve immediately
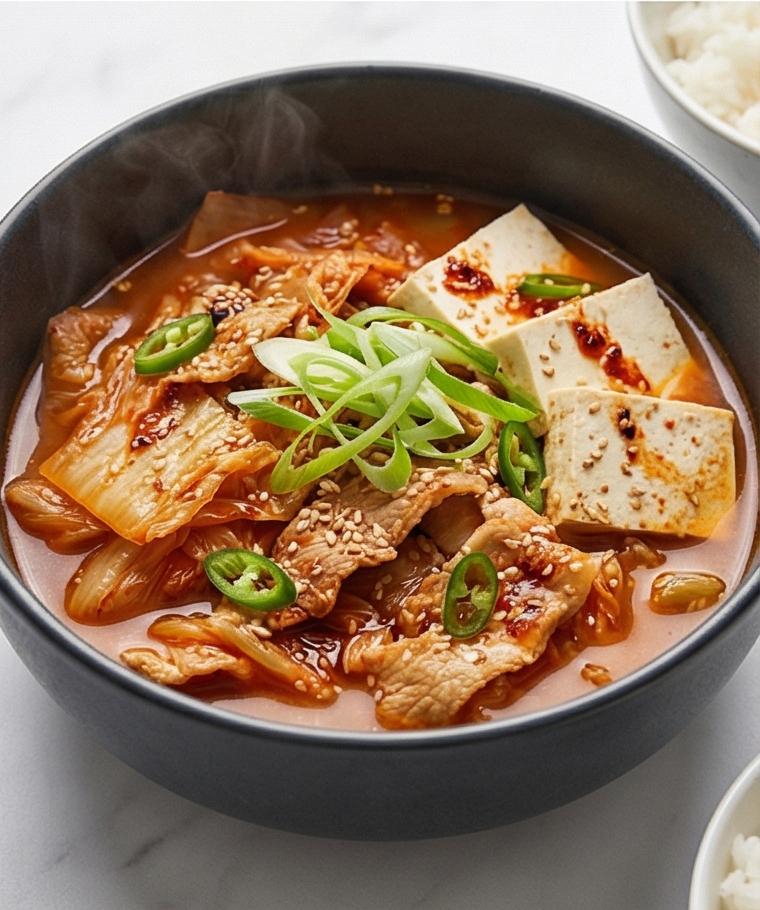
Finish each bowl with a neat pinch of green onion greens and a light drizzle of extra chili‑garlic sauce if you want more heat. The finished ramen should present glossy, bouncy noodles submerged in a deep red‑orange miso‑chili broth, custardy egg halves, tender shiitake, bright wilted greens, sweet corn speckles, crisp carrot matchsticks and matte black nori pieces—serve immediately for optimal texture.
Making It Your Own
Try swapping the protein for pan-seared tofu and add a splash of rice vinegar at the end to brighten the bowl. For a vegetarian or vegan twist, use vegetable broth and omit the miso if it contains fish; replace with white miso labeled vegan. In late summer, fold in fresh corn and a handful of chopped basil for a sweet, herby contrast.
If you like smoky heat, roast the garlic before mincing. To make it more indulgent, finish with a knob of butter stirred into the hot broth.
How to Serve
When hosting, ladle the broth and toppings separately so guests can pick their mix-ins. For a dinner party of four, double the broth and cook noodles in two batches so each bowl is fresh and hot. Serve small plates with extra chili-garlic sauce and toasted sesame seeds so people can customize heat and nuttiness.
Use shallow bowls so toppings are visible and easy to eat. Offer chopsticks and a wide soup spoon for a relaxed, communal vibe.
Storage and Reheating
Store leftover broth and solids in an airtight container in the refrigerator for up to 3 days. Keep cooked noodles and eggs separate if possible to prevent the noodles from soaking up all the liquid.
Reheat broth gently on the stove until simmering, then add noodles and toppings to warm through. If the broth thickens in the fridge, thin with a splash of water and re-season.
Common Slipups and Fixes
Overcooking the eggs is the fastest way to lose that silky yolk; time them carefully and cool in ice water. If your broth tastes flat, it probably needs salt or acid; add soy sauce or a squeeze of lime to wake it up.
Also, avoid boiling the noodles too long. They continue to soften in hot broth, so undercook by a minute if unsure.
Final Thoughts
Give this Spicy Ramen Noodle Soup Recipe a try the next time you need something comforting with a kick. It balances heat, umami and texture in a way that feels both homey and a little adventurous. Once you nail the miso-chili base, you will find it easy to adapt and make it truly your own.
Frequently Asked Questions.
-
Can I make this ramen vegetarian?
Yes. Use vegetable broth, omit any animal protein and choose a vegan miso to keep deep umami without fish or meat. -
How do I get jammy eggs every time?
Bring eggs to room temperature, boil for 7 minutes for jammy yolks, then plunge into ice water for at least 5 minutes before peeling. -
Can I use instant ramen packets?
Skip the seasoning packets. Use the dried noodles only and make the broth from this recipe for much better flavor. -
How spicy is this recipe?
It is moderately spicy but adjustable. Start with less chili-garlic sauce and add more to taste when the broth is finished. -
Can I store leftovers?
Yes. Keep broth separate from noodles and store in the fridge up to 3 days. Reheat broth gently and add fresh noodles or warmed leftovers when serving.
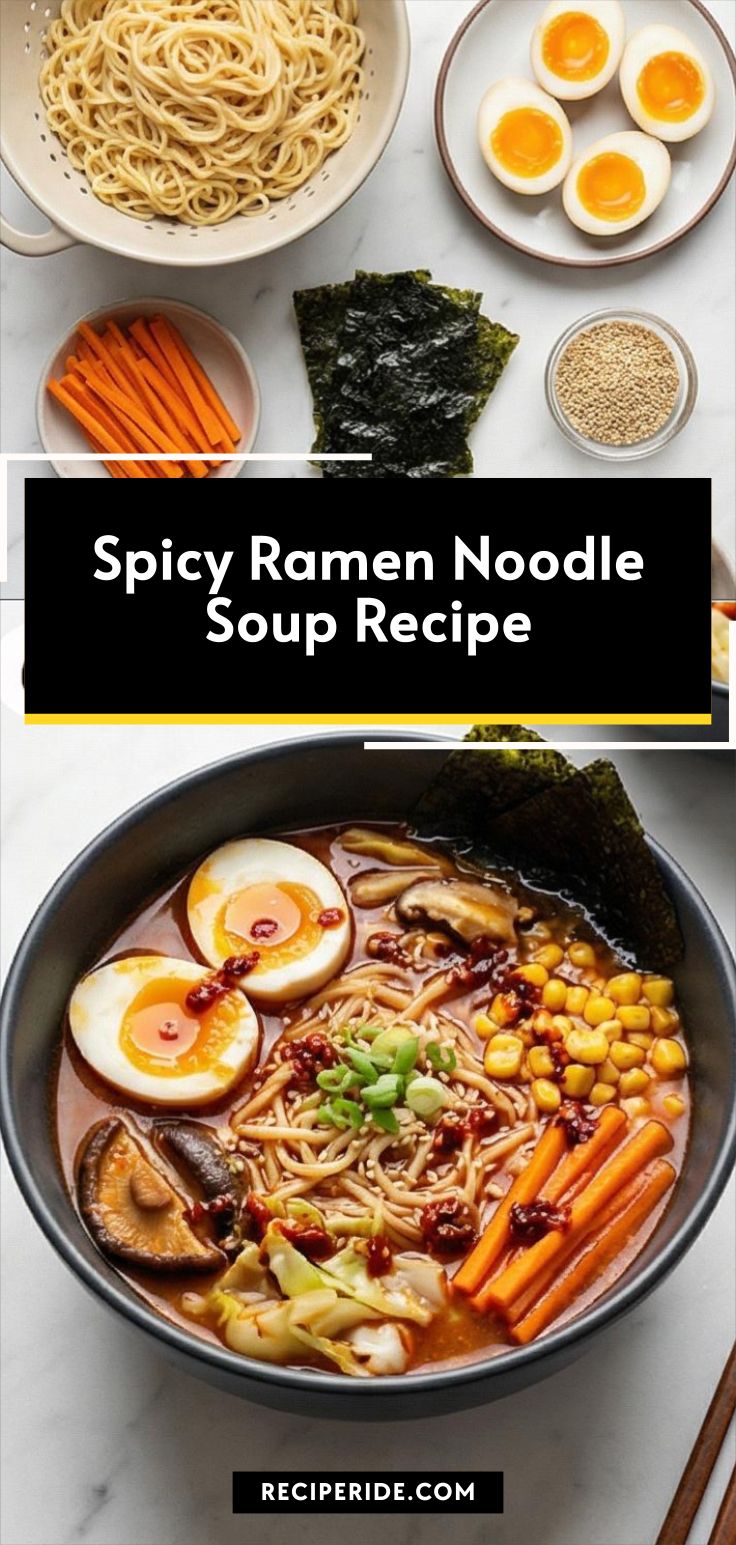
Spicy Ramen Noodle Soup Recipe
Make Spicy Ramen Noodle Soup Recipe: bold miso-chili ramen with jammy eggs and shiitake, ready in about 35 minutes.
Ingredients
Instructions
Step 1: Soft‑boil and cool the eggs
Bring the eggs to room temperature, gently cook until the whites are set and the yolks are jammy (7 minutes) or slightly firmer (9 minutes), then shock them in ice water to stop the cooking. Peel carefully so the glossy, slightly sticky surface of the whites remains intact—do not slice yet; keeping them whole preserves the custardy yolk texture for later. Arrange the peeled eggs on a small shallow dish to rest and stay cool while you progress.
Step 2: Build the fragrant aromatic base
Heat neutral oil in a heavy-bottomed pot (or imagine the finished mixture returned to a bowl for this visualization) and sweat together finely minced garlic, minced ginger and the white parts of the green onions until intensely fragrant and softened but not browned. The result should be a glossy, lightly blistered mix of translucent garlic bits, golden threads of ginger and pale scallion pieces suspended in oil, smelling bright, warm and inviting.
Step 3: Form the spicy miso paste
Reduce the heat and fold in the chili‑garlic sauce and gochujang, stirring until the pastes darken slightly and become a cohesive, deep red‑orange paste. Add the miso and work it in until smooth and slightly loosened by the oil—no burnt edges, just a shiny, emulsified paste with flecks of red pepper and glossy miso sheen.
Step 4: Emulsify and season the broth
Whisk a ladleful of warm broth into the paste to dissolve it, then add the remaining chicken (or vegetable) broth, water, soy sauce, sugar and kosher salt. Bring this mixture just to a lively simmer so it becomes a unified, slightly viscous broth with layered umami and chili heat. The surface should be a deep red‑orange with a subtle oil slick, aromatic steam rising when hot.
Step 5: Simmer the mushrooms and greens until tender
Add the thinly sliced shiitake and shredded cabbage or baby bok choy and maintain a gentle, steady simmer until the mushrooms are tender and the greens have wilted but still look vibrant. If using corn in the broth, add in the last few minutes so the kernels remain plump and slightly sweet. The broth now reads as a complete, aromatic liquid with visible vegetable textures and glossy mushroom caps.
Step 6: Finish the broth with toasted sesame oil and adjustments
Stir in the toasted sesame oil for a nutty, glossy finish, then taste and tweak with extra salt, soy sauce or chili‑garlic sauce as needed. The final broth should be balanced—salty, spicy, richly savory and slightly creamy from miso—coating the back of a spoon and clinging to vegetables and noodles.
Step 7: Cook and drain the ramen noodles to retain bite
Cook the dried ramen until just al dente so the strands remain springy and bouncy, not mushy. Drain them well but don’t rinse—the residual surface starch helps the broth cling. Transfer the drained noodle nests to a serving vessel to keep their glossy, intertwined texture ready for hot broth.
Step 8: Halve the soft eggs and arrange final toppings
While the noodles are still hot, carefully halve the cooled, peeled eggs lengthwise to reveal custardy, jammy yolks. Lay the halves on a small plate with a sprinkle of sesame seeds so the cut edges remain moist and glossy. Gather the green onion greens, carrot matchsticks, corn, torn nori and toasted sesame seeds nearby for fast assembly.
Step 9: Assemble the bowls with care
Divide the hot noodles among serving bowls, ladle the simmering broth with mushrooms and greens over the nests so the noodles sink and pick up color, and place the egg halves gently on top. Add a small mound of carrot matchsticks, a scattering of corn, torn nori, and a sprinkle of toasted sesame seeds and sliced protein if using—each element should sit with clear texture contrast against the broth.
Step 10: Garnish and serve immediately
Finish each bowl with a neat pinch of green onion greens and a light drizzle of extra chili‑garlic sauce if you want more heat. The finished ramen should present glossy, bouncy noodles submerged in a deep red‑orange miso‑chili broth, custardy egg halves, tender shiitake, bright wilted greens, sweet corn speckles, crisp carrot matchsticks and matte black nori pieces—serve immediately for optimal texture.
Notes
- Time the eggs precisely for jammy yolks.
- Keep noodles and broth separate for best texture when storing.
- Taste and adjust seasoning at the end with soy sauce or chili-garlic sauce.
- Use low-sodium broth to control final saltiness.


