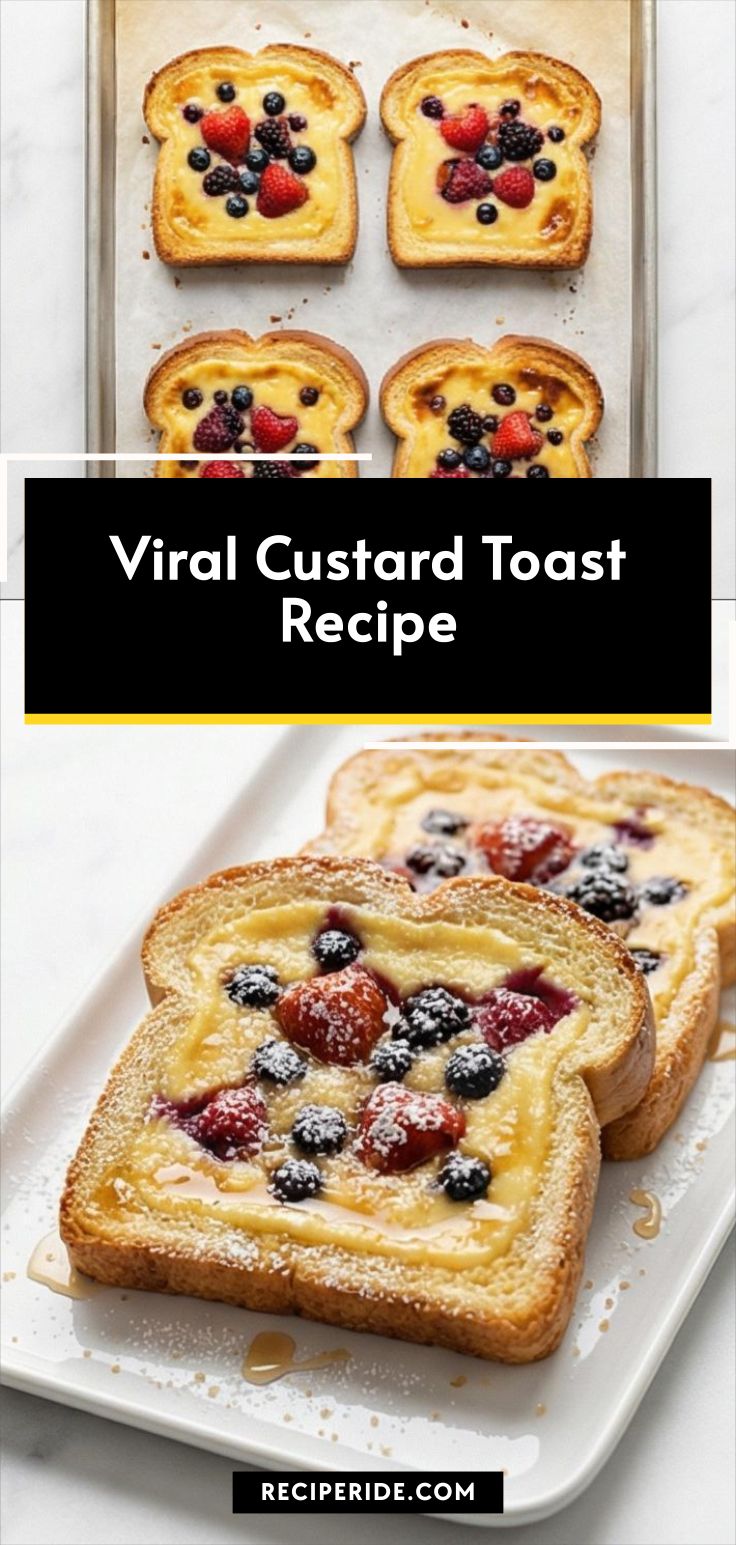
I still remember the first time I made the Viral Custard Toast Recipe: the kitchen smelled like vanilla and warm brioche, and the berries looked like they belonged in a magazine. I love how this recipe feels fancy yet is unexpectedly simple, and it became my go-to for lazy weekend breakfasts and midweek treats. I tweak it depending on what fruit I have, but the core – crisp bread and creamy custard – never fails. If you want a recipe that looks impressive with minimal fuss, this Viral Custard Toast Recipe is a tiny showstopper that rewards very little effort.
How This Recipe Became My Rainy-Day Favorite
The afternoon it rained and I needed comfort, I found myself tearing into day-old brioche and whisking together a quick custard that smelled like warm pie filling. The first bite was creamy and bright – berry juices warming against crisp, golden edges. I felt proud because it took almost no time and the result felt celebratory, like a warm hug in pastry form. Making the Viral Custard Toast Recipe that day was therapeutic; the little ritual of pressing wells into the bread and arranging berries calmed me. It became a weatherproof pick-me-up I turn to whenever I need something cheerful and reliably delicious.
Primary Ingredients and Why They Matter
- Brioche or soft white bread: The base provides a rich, buttery scaffold that crisps while the center stays tender; substitute challah or thick-cut sandwich bread if needed. Choose slightly stale slices for better structure.
- Egg and Greek yogurt: Together they make the custard silky and set gently; for a dairy-free option use a plant-based yogurt and an extra egg replacer for body.
- Granulated sugar and vanilla: Sugar sweetens and helps caramelize edges; vanilla lifts the flavor. Use pure vanilla extract for depth.
- Fresh mixed berries: They add acidity, color, and texture; swap in poached stone fruit for a seasonal twist.
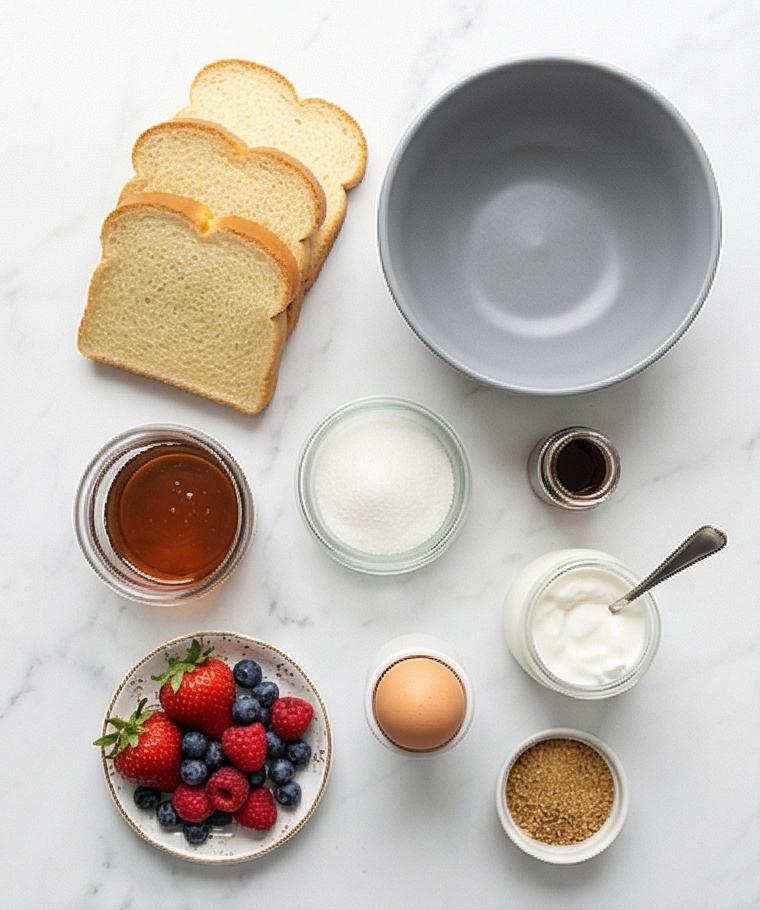
Essential Kitchen Tools and Alternatives
Start with a quick note: you do not need fancy gear to make this shine. A few reliable tools make the cooking flow easier and the results more consistent.
- Baking sheet and parchment: They ensure even baking and easy cleanup; if you do not have parchment, use a silicone baking mat or lightly grease the tray.
- Mixing bowl and whisk: A medium bowl and a sturdy whisk help you reach a silky custard fast; a fork works in a pinch but whisking will take longer.
- Measuring spoons and scale: Accurate sugar and yogurt amounts keep the texture right; eyeballing works for casual cooks but a scale is helpful.
- Air fryer (optional): Great for small batches or when you want faster results; follow the air-fryer timing in the steps.
Step-by-Step Preparation Guide
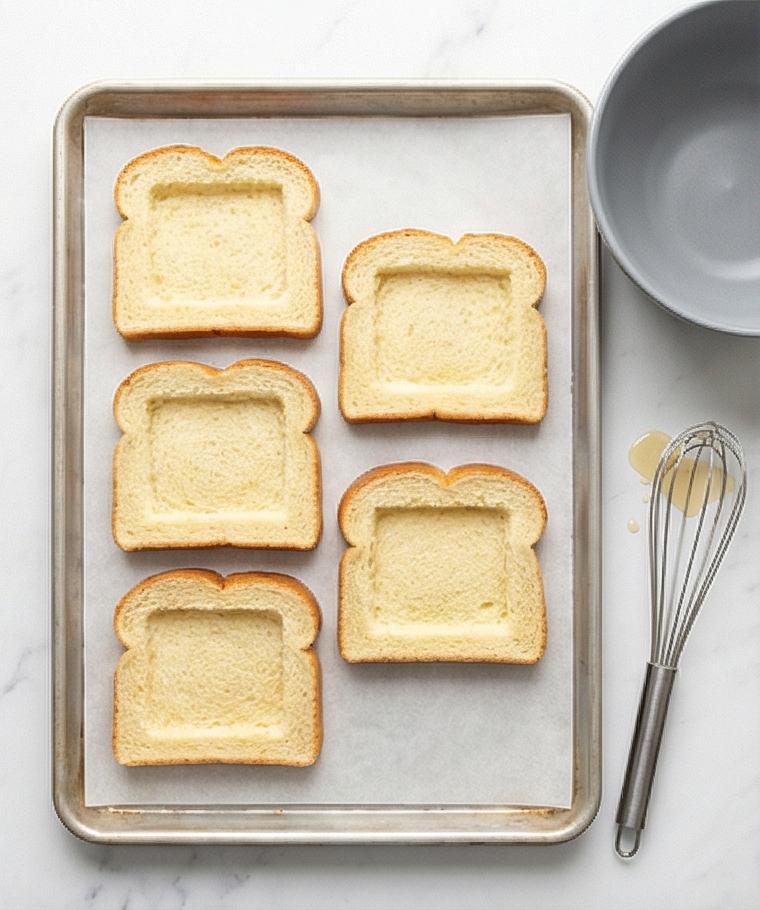
Step 1: Preheat the oven and line the tray
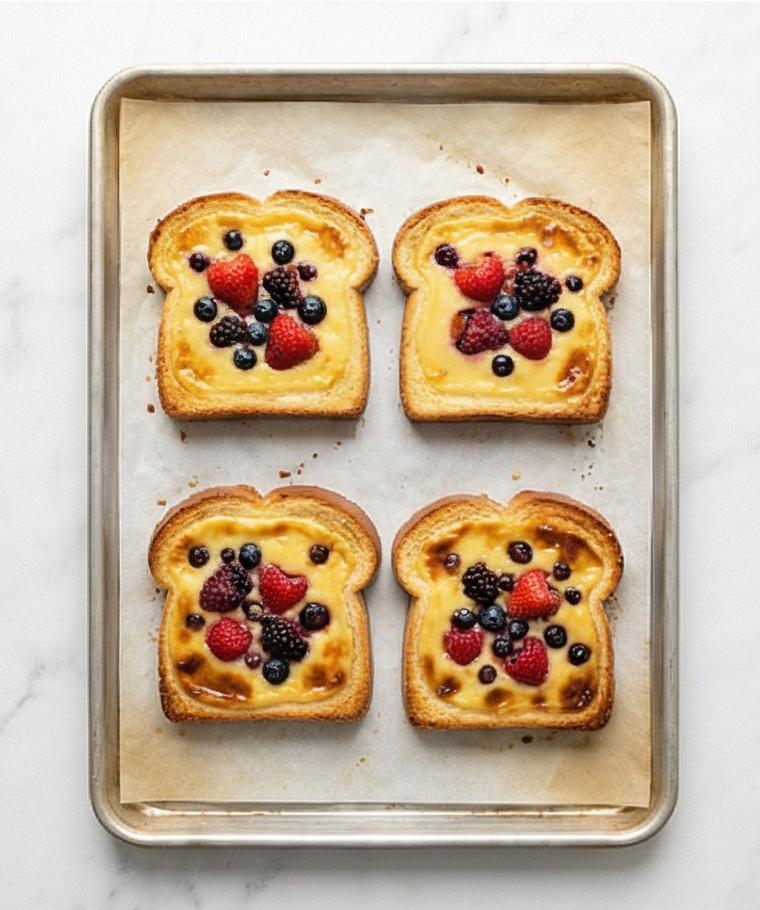
Preheat your oven to 375°F (190°C) and position a rack in the middle. Line a rectangular baking sheet with a piece of parchment paper or a silicone baking mat so nothing sticks; this is the only heat-transfer object that will appear later on the marble surface. Keep the tray and parchment visible on the marble—clean, simple, ready.
Step 2: Shape the brioche wells on the tray
Lay the four slices of slightly stale brioche flat on the lined baking sheet with a little space between each. Using the back of a spoon or your fingers, gently press the center of each slice to form a shallow well, leaving a neat 1/2-inch border to hold the custard. The slices should read as soft, pillowy squares with a clearly depressed center and intact golden rims on the uncooked dough.
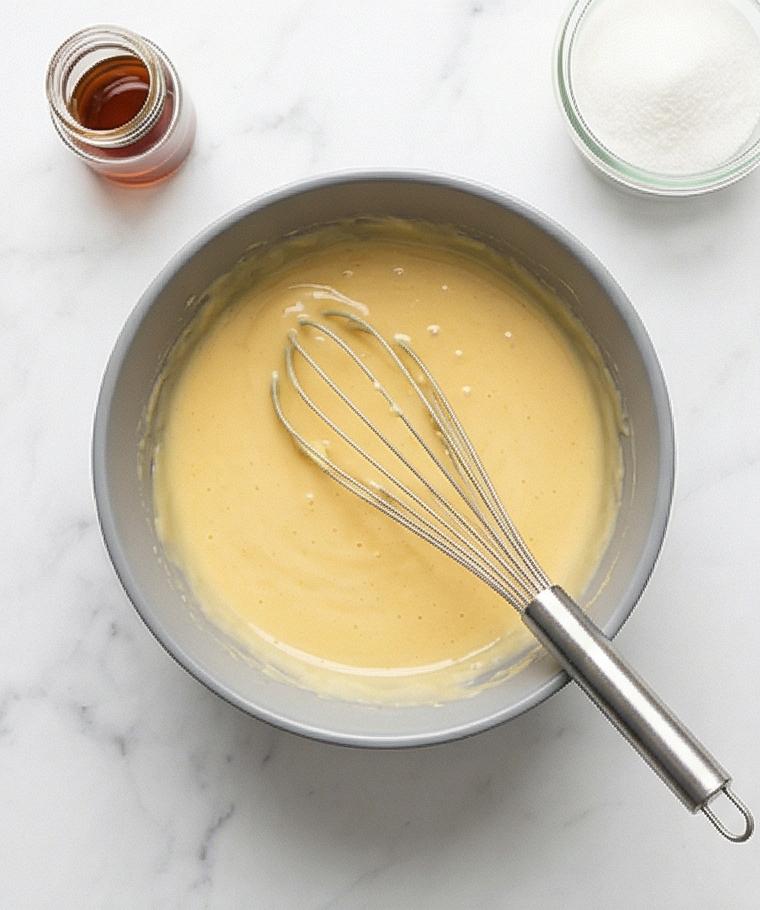
Step 3: Combine the custard ingredients in one bowl
In a single medium matte grey ceramic bowl at room temperature add the egg, full-fat Greek yogurt, granulated sugar, vanilla extract, and a small pinch of fine sea salt. Keep all wet ingredients contained in clear glass or ceramic vessels until added—no liquids ever on the marble itself. This step is about organized, calm assembly of components.
Step 4: Whisk to a smooth, thick custard
Whisk vigorously by hand for 30–45 seconds until the mixture is completely smooth, glossy and thick—no streaks of white egg or lumps of yogurt. The texture should be close to a thick pancake batter: viscous, shiny, and able to hold soft peaks for a second before settling back. Rest the whisk inside the bowl or across the rim so it reads as the active tool.
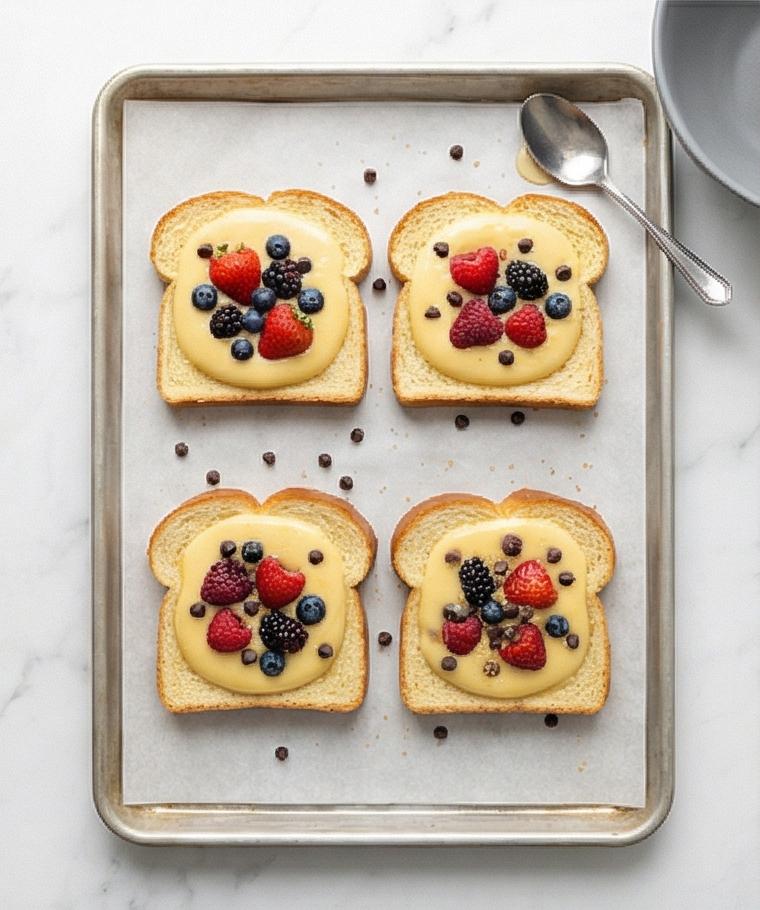
Step 5: Spoon custard into each brioche well
Divide the custard evenly, roughly 2 heaping tablespoons per slice, and spoon it into the pre-formed wells, spreading gently toward the edges while keeping the raised border intact. Each slice should show a neat, glossy, pale custard dome sitting within the bread collar—no spillover, clear borders.
Step 6: Arrange berries and optional add-ins
Top each custard-filled well with the fresh mixed berries, pressing them lightly so they adhere; scatter mini chocolate chips or chopped dark chocolate if desired, and finish with a tiny pinch of coarse turbinado sugar for crunch. The toppings should sit slightly embedded in the custard, color-popping against the pale custard surface.
Step 7: Bake until edges are golden and custard set
Place the assembled baking sheet into the preheated oven and bake 10–13 minutes until the bread edges are golden-brown and crisp and the custard is just set—slightly puffed and glossy with a faint central wobble when the tray is nudged. The visual cue is a gently domed custard with a mirror-like sheen and crisply browned bread rims.
Step 8: (Air-fryer alternative) replicate the baked result
If using an air fryer, arrange 2–4 slices in a single layer in a parchment-lined air-fryer basket and cook at 350°F (180°C) for about 6–8 minutes until you achieve the same golden rims and just-set custard. The resulting texture should match the oven version: glossy custard, puffed centers, and crisp edges.
Step 9: Cool briefly on the tray
Remove the tray from the heat and let the toast cool for 2–3 minutes right on the parchment. This short rest lets the custard finish setting while preserving a soft, creamy center—avoid overbaking so it remains tender, not rubbery.
Step 10: Dust and drizzle just before serving
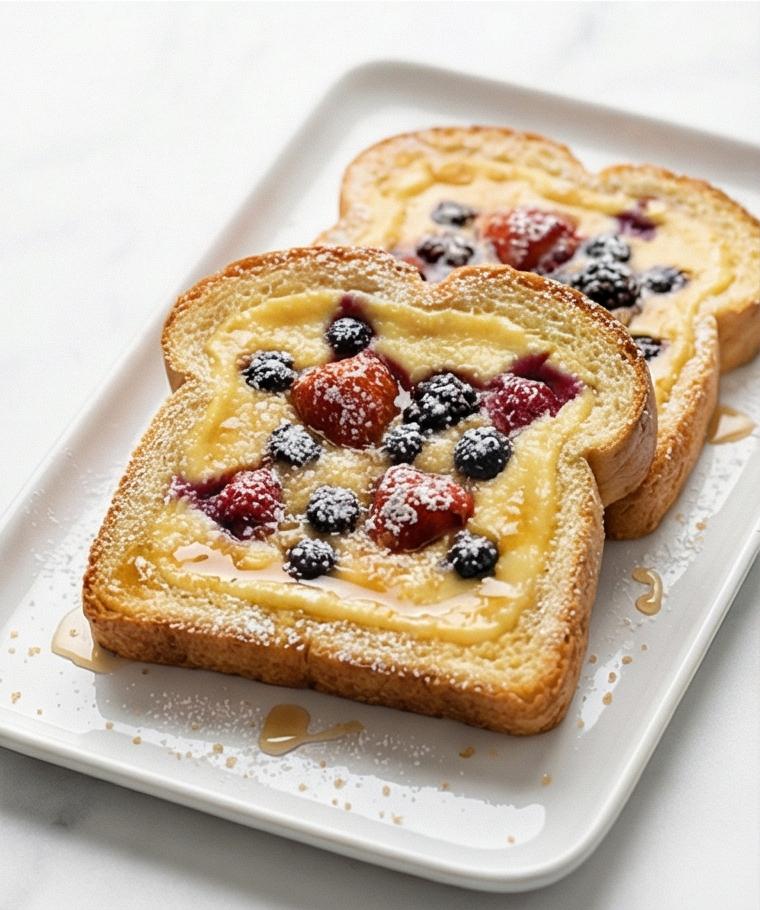
Just before serving, dust the tops lightly with confectioners’ sugar and, if you like, drizzle a little maple syrup or honey from a small glass jar. The sugars should sit delicately on the glossy custard and berries, creating tiny matte contrasts and a hint of sticky sheen.
Step 11: Serve warm and store thoughtfully
Serve the custard toast warm for the best contrast between crisp edges and a creamy center; plate on a rectangular serving platter to echo the baking sheet geometry. Enjoy within 15–20 minutes for crispiest edges; cool completely for storage and refrigerate up to 1 day, reheating in a 350°F (180°C) oven or air fryer until slightly crisp again.
Making It Your Own
I treat the Viral Custard Toast Recipe like a canvas. Try swapping mixed berries for thinly sliced peaches and a sprinkle of cinnamon in late summer; it turns floral and warm. For a chocolate-forward twist, stir a teaspoon of cocoa into the custard and top with dark chocolate shavings. To make it vegan, use a plant-based yogurt and a flax or chia egg substitute, and choose vegan bread. Small experiments like adding lemon zest or a nutty crumble keep the base recipe familiar while letting you play with texture and seasonal produce.
How to Serve
If I am hosting brunch I make two baking sheets so there are plenty and arrange the finished toasts on a long platter with extra berries scattered around for color. Offer small bowls of maple syrup, honey, and extra confectioners’ sugar so guests can customize sweetness. For a dinner-party dessert, plate two toasts per person with a quenelle of mascarpone and a drizzle of warm berry compote.
For larger groups double the recipe and bake in batches, keeping finished toasts warm on a low oven rack. The Viral Custard Toast Recipe holds up well to this approach and looks beautiful when served family-style.
Storage and Reheating Tips
Store any leftovers in an airtight container in the refrigerator for up to 24 hours. Let them cool completely before storing to avoid soggy bread from trapped steam. For best texture, separate layers with parchment paper.
To reheat, preheat the oven to 350°F (180°C) and warm for 6-8 minutes until edges re-crisp and custard is gently warmed. An air fryer on the same temperature for 3-4 minutes works well for single servings. Avoid microwaving if you want to keep the edges crisp.
Common Mistakes and How to Avoid Them
A frequent misstep is overfilling the wells which causes spillover and uneven baking; spoon a modest amount of custard and keep the rim intact. Another trap is overbaking; remove the toasts when the custard still has a faint wobble.
Also, using very fresh, floppy bread can make wells collapse; day-old or slightly stale slices hold shape better and crisp up beautifully.
Ready to Try It?
If you like recipes that look like you spent hours but actually take minutes, give this Viral Custard Toast Recipe a try. It is forgiving, fast, and endlessly adaptable – once you make it a couple of times you will have your favorite tweaks ready.
Frequently Asked Questions.
- Can I use any bread for Viral Custard Toast Recipe? – Yes, but choose thick-sliced brioche or challah for the best texture; slightly stale is ideal.
- How do I know when the custard is done? – Look for a glossy, slightly domed surface with a gentle central wobble when nudged.
- Can I prepare the custard ahead of time? – You can mix the custard up to an hour ahead and keep it covered in the refrigerator; bring it back to room temperature before using.
- Is there a dairy-free option? – Yes, use plant-based yogurt and an egg substitute like a flax egg, though texture will be a bit different.
- Can I freeze the finished toasts? – Freezing is not recommended; the custard and berries lose texture. Best to store in the fridge and reheat as directed.
Viral Custard Toast Recipe
Make the Viral Custard Toast Recipe for a quick, impressive breakfast with crisp brioche, creamy custard, and fresh berries.
Ingredients
Instructions
Step 1: Preheat the oven and line the tray
Preheat your oven to 375°F (190°C) and position a rack in the middle. Line a rectangular baking sheet with a piece of parchment paper or a silicone baking mat so nothing sticks; this is the only heat-transfer object that will appear later on the marble surface. Keep the tray and parchment visible on the marble—clean, simple, ready.
Step 2: Shape the brioche wells on the tray
Lay the four slices of slightly stale brioche flat on the lined baking sheet with a little space between each. Using the back of a spoon or your fingers, gently press the center of each slice to form a shallow well, leaving a neat 1/2-inch border to hold the custard. The slices should read as soft, pillowy squares with a clearly depressed center and intact golden rims on the uncooked dough.
Step 3: Combine the custard ingredients in one bowl
In a single medium matte grey ceramic bowl at room temperature add the egg, full-fat Greek yogurt, granulated sugar, vanilla extract, and a small pinch of fine sea salt. Keep all wet ingredients contained in clear glass or ceramic vessels until added—no liquids ever on the marble itself. This step is about organized, calm assembly of components.
Step 4: Whisk to a smooth, thick custard
Whisk vigorously by hand for 30–45 seconds until the mixture is completely smooth, glossy and thick—no streaks of white egg or lumps of yogurt. The texture should be close to a thick pancake batter: viscous, shiny, and able to hold soft peaks for a second before settling back. Rest the whisk inside the bowl or across the rim so it reads as the active tool.
Step 5: Spoon custard into each brioche well
Divide the custard evenly, roughly 2 heaping tablespoons per slice, and spoon it into the pre-formed wells, spreading gently toward the edges while keeping the raised border intact. Each slice should show a neat, glossy, pale custard dome sitting within the bread collar—no spillover, clear borders.
Step 6: Arrange berries and optional add-ins
Top each custard-filled well with the fresh mixed berries, pressing them lightly so they adhere; scatter mini chocolate chips or chopped dark chocolate if desired, and finish with a tiny pinch of coarse turbinado sugar for crunch. The toppings should sit slightly embedded in the custard, color-popping against the pale custard surface.
Step 7: Bake until edges are golden and custard set
Place the assembled baking sheet into the preheated oven and bake 10–13 minutes until the bread edges are golden-brown and crisp and the custard is just set—slightly puffed and glossy with a faint central wobble when the tray is nudged. The visual cue is a gently domed custard with a mirror-like sheen and crisply browned bread rims.
Step 8: (Air-fryer alternative) replicate the baked result
If using an air fryer, arrange 2–4 slices in a single layer in a parchment-lined air-fryer basket and cook at 350°F (180°C) for about 6–8 minutes until you achieve the same golden rims and just-set custard. The resulting texture should match the oven version: glossy custard, puffed centers, and crisp edges.
Step 9: Cool briefly on the tray
Remove the tray from the heat and let the toast cool for 2–3 minutes right on the parchment. This short rest lets the custard finish setting while preserving a soft, creamy center—avoid overbaking so it remains tender, not rubbery.
Step 10: Dust and drizzle just before serving
Just before serving, dust the tops lightly with confectioners’ sugar and, if you like, drizzle a little maple syrup or honey from a small glass jar. The sugars should sit delicately on the glossy custard and berries, creating tiny matte contrasts and a hint of sticky sheen.
Step 11: Serve warm and store thoughtfully
Serve the custard toast warm for the best contrast between crisp edges and a creamy center; plate on a rectangular serving platter to echo the baking sheet geometry. Enjoy within 15–20 minutes for crispiest edges; cool completely for storage and refrigerate up to 1 day, reheating in a 350°F (180°C) oven or air fryer until slightly crisp again.
Notes
- Use slightly stale brioche for better structure and crisper edges.
- For vegan versions substitute plant-based yogurt and a flax or chia egg replacer.
- Do not overfill wells; roughly 2 heaping tablespoons custard per slice is ideal.
- Reheat in a 350°F (180°C) oven or air fryer to restore crispness.
- Store leftovers in an airtight container in the fridge for up to 24 hours.

