I made this Matcha Chia Pudding Recipe on a sleepy Sunday morning and it immediately became a staple in my rotation. The bright, grassy matcha wakes up the senses while the chia gives the pudding a gentle, tapioca-like bite — it feels indulgent and nourishing at the same time. I love that the Matcha Chia Pudding Recipe is so adaptable; a handful of berries or a sprinkle of toasted coconut changes the whole mood. If you enjoy simple, elegant breakfasts that feel deliberate but take almost no time, this one’s for you.
How This Recipe Became My Rainy-Day Favorite
There’s a small memory lodged in my chest from the first time I made this Matcha Chia Pudding Recipe for a friend who was under the weather. The kitchen smelled faintly of toasted coconut and warm matcha, and the light was low and green through the window. I stirred the mixture slowly, feeling a kind of calm with each whisk stroke as the matcha bloomed into the almond-coconut base. When we ate it, the texture was soothing and the flavor brightened the whole afternoon; it felt like a little ritual. I remember the quiet gratitude on my friend’s face and how the tiny seeds gave a surprising, comforting chew. Since then I reach for this recipe when I want something that feels like care in a jar: simple, tactile, and balanced between creamy and fresh.
Why These Ingredients Matter
- Unsweetened almond milk: The main liquid that keeps the pudding light and dairy-free; use oat milk for creamier body or soy for more protein.
- Full-fat canned coconut milk: Adds richness and mouthfeel; substitute with cashew cream for a nutty silkiness.
- Matcha green tea powder: The flavor star and color driver; choose ceremonial-grade for best aroma and vividness.
- Maple syrup: Natural sweetener that complements matcha’s grassy notes; honey or agave work as alternatives.
- Chia seeds: The gelling agent that creates the pudding texture; if allergic, try ground flax with an extra binder.
- Vanilla and salt: Tiny accents that round flavors and lift the vegetal matcha.
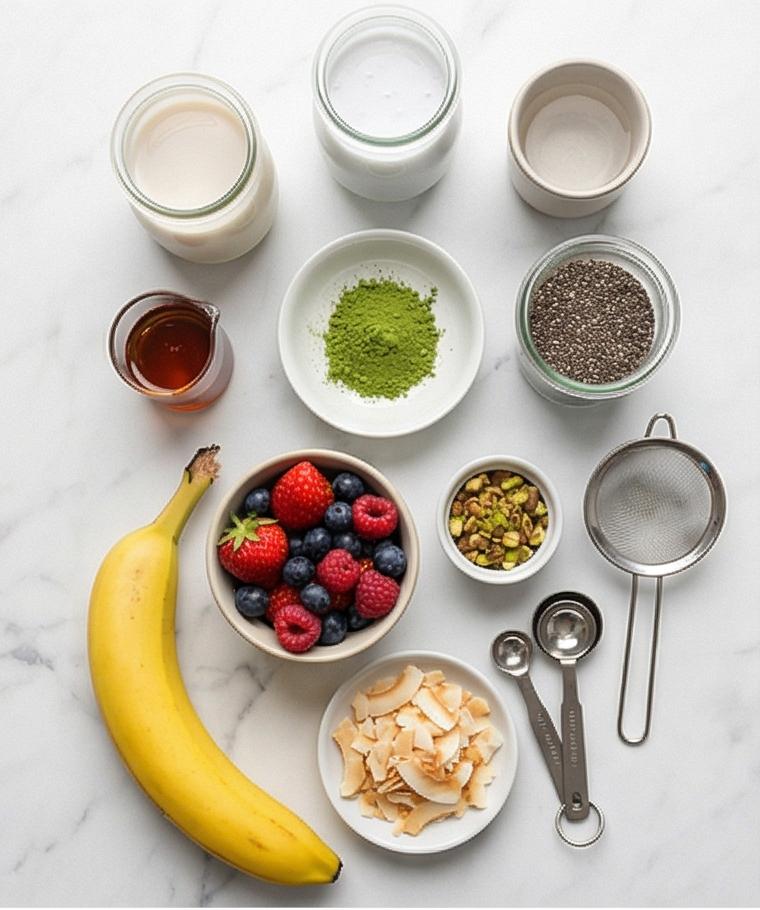
Essential Kitchen Tools
A few simple tools make this Matcha Chia Pudding Recipe effortless and consistent. A small whisk or a bamboo whisk helps dissolve matcha without lumps; if you don’t have one, use a small metal whisk or a fork and whisk vigorously. A medium mixing bowl gives you room to whisk and scrape, though a large mason jar works if you plan to shake the mixture. Glass jars with lids are perfect for chilling portions and presenting the pudding, but any airtight container will do. Finally, a fine mesh sieve is handy for sifting matcha to avoid gritty bits, though you can press powder through a small tea strainer in a pinch.
Step-by-Step Preparation Guide
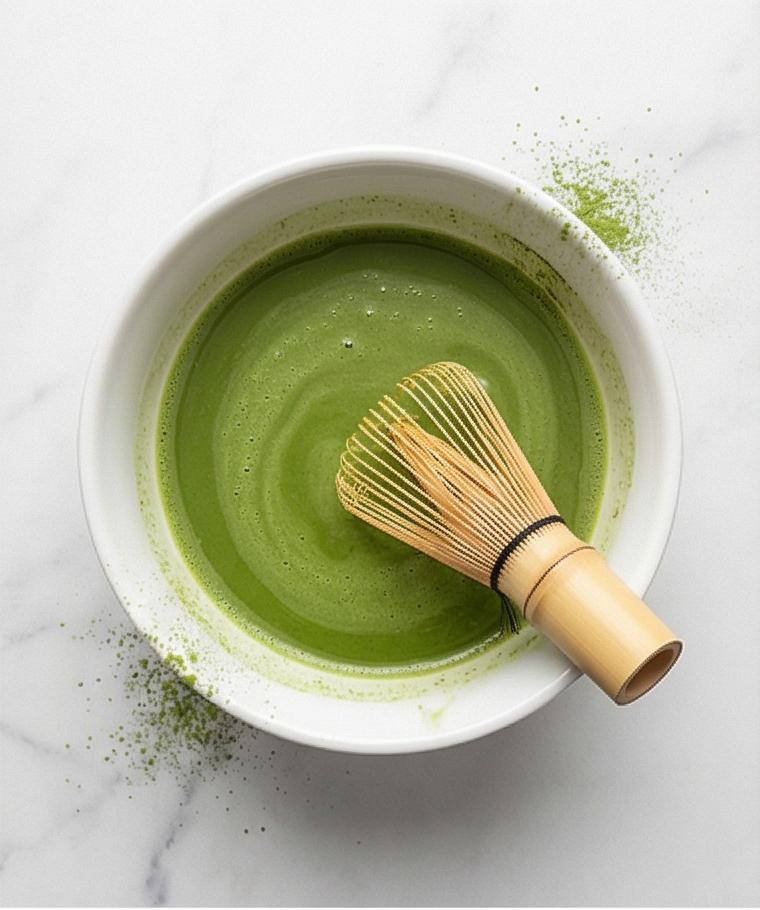
Step 1: Prepare the matcha base
In a small heatproof white porcelain bowl, sift 2 1/2 teaspoons of high-quality matcha green tea powder so there are no clumps. Pour in the measured hot water (about 175°F / 80°C) and whisk vigorously with a small bamboo or metal whisk for 30–60 seconds until the mixture becomes completely smooth and slightly frothy on the surface. The result should be a glossy, bright, even emerald-green liquid with no visible powder granules and a whisper of foam at the top – vibrant, luminous, and homogeneous.
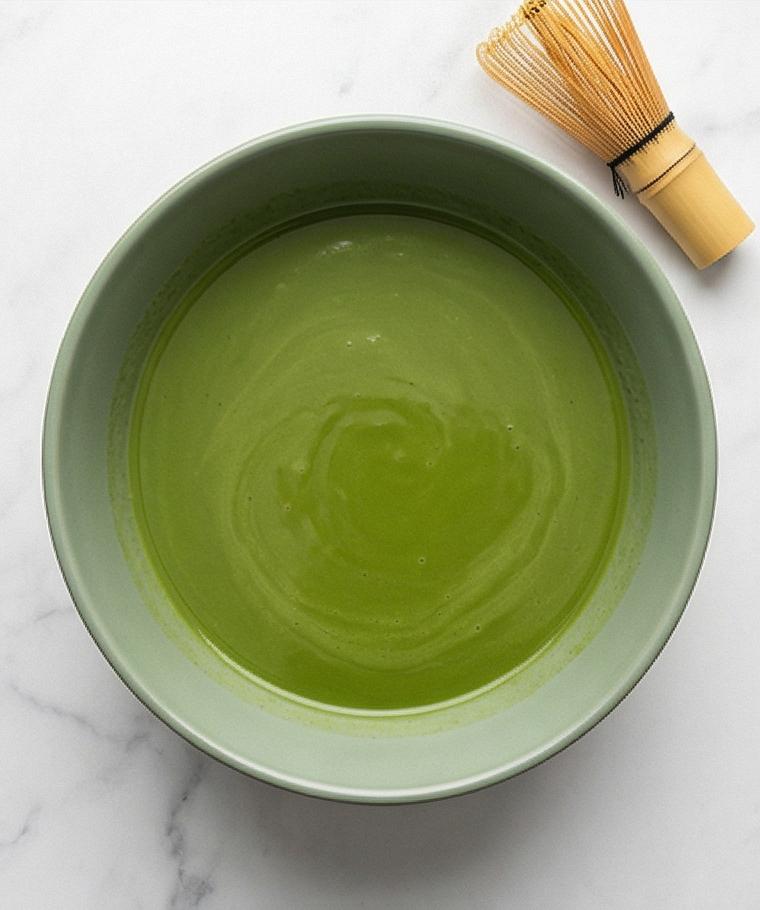
Step 2: Combine the milks and sweetener
In a medium matte sage-green ceramic mixing bowl, pour the chilled almond milk and the well-shaken full-fat canned coconut milk, add the maple syrup, vanilla extract, and a pinch of fine sea salt. Whisk briskly until the mixture is silky and uniform, the coconut fat evenly dispersed into the almond milk, creating a slightly pearlescent pale greenish-cream base. This is the gentle, neutral platform that will carry the matcha’s vibrancy and support the chia’s gel. Keep the same whisk handy and resting on the rim of the bowl.
Step 3: Incorporate the matcha into the milk
Pour the prepared matcha into the sage-green mixing bowl and whisk for 30–60 seconds until the color is an even, vivid green with no darker streaks. Taste and, if needed, add a touch more maple syrup to balance the vegetal brightness – remembering the flavor will soften as it chills. The finished liquid should appear smooth and slightly glossy, an even verdant hue that clings slightly to the whisk tines.
Step 4: Add the chia seeds and disperse evenly
Sprinkle the chia seeds in a slow, steady stream over the surface of the matcha-milk while whisking constantly. Continue whisking for 1–2 minutes, scraping the bowl’s sides and bottom so every seed is suspended and no clumps form. The texture at this stage is a thin, seed-speckled emerald liquid: visible black-and-white chia specks suspended in a fluid matrix, still pourable but showing the first signs of body. Keep the whisk or a silicone spatula resting across the bowl to show active tooling.
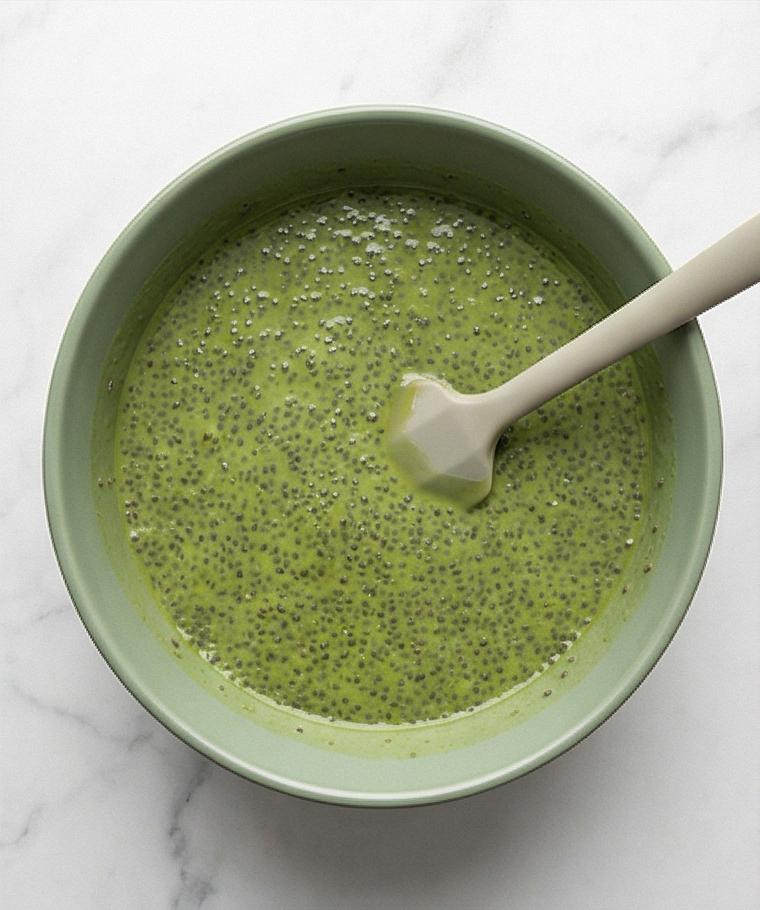
Step 5: Rest briefly and re-whisk for a smooth finish
Let the bowl sit at room temperature for 5–10 minutes so the seeds absorb liquid and the mixture begins to thicken. Return to the bowl and whisk thoroughly for 30–60 seconds to break any settled clumps; the surface should become subtly thicker, glossy, and cohesive, with chia seeds evenly distributed like tiny pearls. This gentle, tactile intervention ensures a creamy, tapioca-like final texture rather than a grainy, clumped one.
Step 6: Transfer into jars and chill
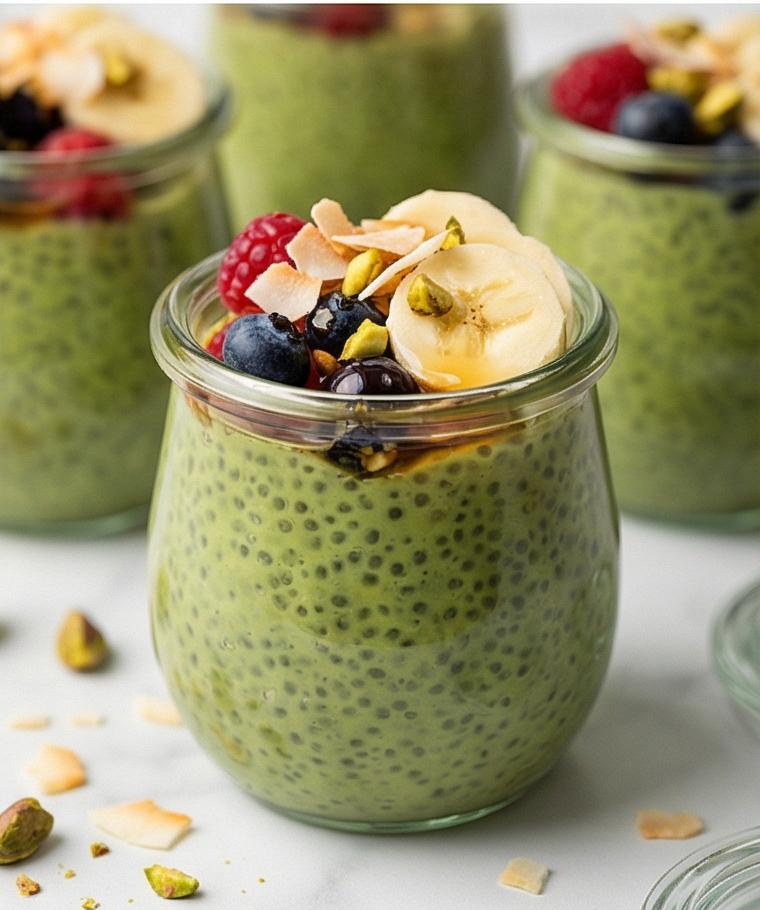
Spoon or pour the matcha chia mixture into four identical short clear glass jars, leaving a little headspace. Cover each jar tightly with lids and refrigerate at 35–40°F (2–4°C) for at least 2 hours, preferably 4 or overnight, until the pudding is thick and spoonable. The chilled pudding will have a creamy, slightly gelatinous consistency that holds soft peaks and shows suspended chia pearls throughout.
Step 7: Check consistency and adjust if needed
After chilling, remove the jars and stir each pudding to assess body. If a jar is too thick, loosen with 1–2 tablespoons of almond milk at a time until smooth and silky; if too loose, stir in 1–2 teaspoons of chia and rest another 15–20 minutes. The final ideal texture is spoonable and cohesive – not runny, not rigid – with the chia pearls giving a delicate, tapioca-like bite.
Step 8: Prepare the optional toppings
While the pudding chills or just before serving, rinse and thoroughly pat dry the mixed berries; slice the ripe banana into neat rounds immediately before use to prevent browning. Toast coconut flakes and roughly chop roasted pistachios or almonds in a dry skillet until fragrant and just golden, then cool them on a plate to retain crispness. Arrange the berries, banana slices, toasted coconut, chopped nuts, and a small pourer of maple syrup in small glass and ceramic bowls so they’re ready for assembly.
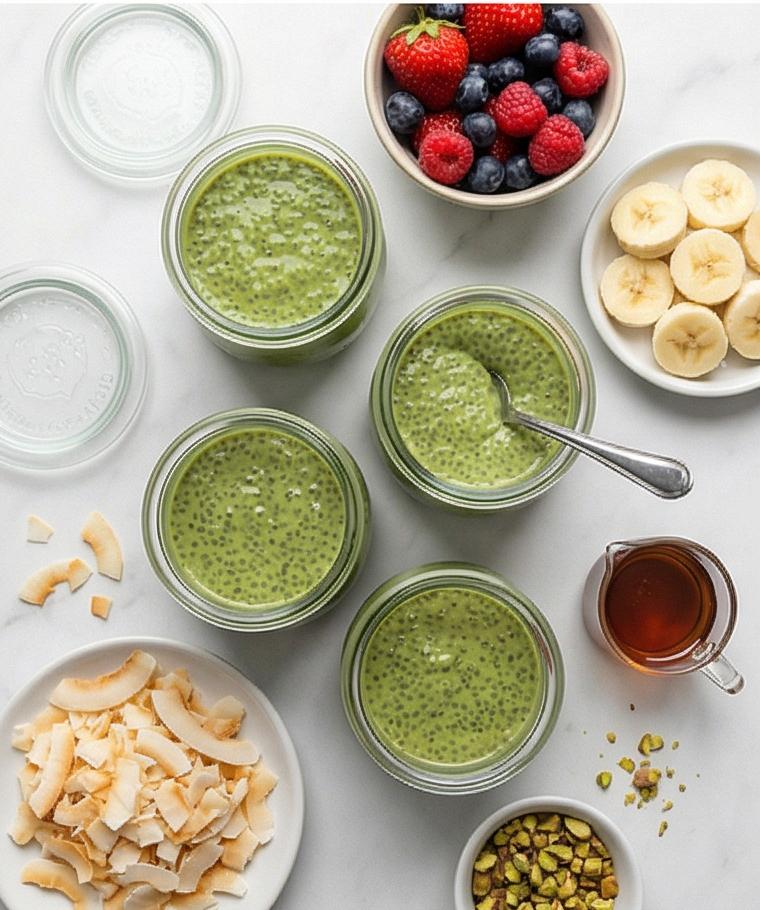
Step 9: Assemble the servings
Divide the chilled pudding evenly into the four short clear glass jars if not already portioned. Top each jar with a careful composition of mixed berries, a few banana rounds, a sprinkle of toasted coconut flakes and chopped pistachios, then finish with a delicate 2-teaspoon-wide ribbon of pure maple syrup. The assembled jars should present a layered sensory contrast: glossy, creamy green pudding beneath jewel-like berries, matte banana, and crunchy, golden nut and coconut fragments.
Step 10: Serve chilled and store properly
Serve the matcha chia puddings well-chilled for the best texture and flavor. Cover any leftovers and refrigerate at 35–40°F (2–4°C) for up to 4 days, stirring before serving; add fresh fruit toppings only at the moment of service to preserve texture.
Making It Your Own
I treat the Matcha Chia Pudding Recipe like a canvas. In cooler months I stir in a spoonful of tahini or a pinch of cinnamon for depth. For a spring twist I fold in diced kiwi and lime zest for a tangy lift.
If you want more protein, blend in a scoop of vanilla plant-based protein or swap almond milk for soy milk. For a tropical twist, use coconut milk as the dominant liquid and add diced mango and toasted coconut on top.
Regional experiments? Try hojicha powder for a roasted Japanese note or replace matcha with spirulina for a superfood green, adjusting sweetener to taste.
How to Serve
When I host, I serve these in identical short glass jars for a neat, elegant look. For brunch with eight guests, double the recipe and use larger jars or a shallow trifle dish so everyone can customize toppings.
Arrange bowls of berries, sliced banana, toasted coconut, chopped nuts, and extra maple syrup on the table. Let guests pick combinations; it feels interactive and pretty.
For a formal dessert course, spoon into chilled porcelain cups, add a small quenelle of coconut cream, and finish with micro herbs or finely grated lemon zest for contrast.
Storage and Reheating Tips
Store sealed jars in the refrigerator for up to 4 days. I always add fresh fruit only when serving to keep textures bright and prevent sogginess. If the pudding firms too much, stir in a splash of almond milk to loosen.
Reheating isn’t necessary since this is a chilled pudding, but if you prefer it slightly warmer, let jars sit at room temperature for 10-15 minutes before serving. A gentle stir restores creaminess.
Common Pitfalls and Fixes
Clumping is the most common issue. If chia seeds clump, whisk vigorously after the initial rest and scrape the sides well. Sifting matcha before mixing also helps avoid gritty bits.
Wrong texture? If too thick, add almond milk 1 tablespoon at a time. If too thin, stir in a teaspoon of chia and let it sit 15-20 minutes. Taste and adjust maple syrup after chilling.
Final Thoughts
This Matcha Chia Pudding Recipe is an easy ritual that rewards small attention. It’s bright, adaptable, and perfect for busy mornings or laid-back hosting. Try it once and you’ll find your favorite topping combo in no time.
Frequently Asked Questions.
- What type of matcha is best for this pudding?
- Use a high-quality ceremonial or culinary matcha; ceremonial gives a brighter flavor and aroma.
- Can I make the Matcha Chia Pudding Recipe nut-free?
- Yes. Substitute almond milk with oat or soy milk and use sunflower-seed butter instead of coconut if avoiding all nuts.
- How long does the pudding keep in the fridge?
- Properly sealed, it will keep up to 4 days; add fresh fruit only when serving.
- Can I use a different sweetener?
- Absolutely. Honey, agave, or a simple syrup work; adjust to taste.
- Will using low-fat milk affect the texture?
- Lower fat liquids yield a thinner mouthfeel; increase chia a bit or add a dollop of coconut cream to improve richness.
Matcha Chia Pudding Recipe
Whip up Matcha Chia Pudding Recipe—mix, chill, and top for a bright, healthy breakfast or dessert.
Ingredients
Instructions
Step 1: Prepare the matcha base
In a small heatproof white porcelain bowl, sift 2 1/2 teaspoons of high-quality matcha green tea powder so there are no clumps. Pour in the measured hot water (about 175°F / 80°C) and whisk vigorously with a small bamboo or metal whisk for 30–60 seconds until the mixture becomes completely smooth and slightly frothy on the surface. The result should be a glossy, bright, even emerald-green liquid with no visible powder granules and a whisper of foam at the top — vibrant, luminous, and homogeneous.
Step 2: Combine the milks and sweetener
In a medium matte sage-green ceramic mixing bowl, pour the chilled almond milk and the well-shaken full-fat canned coconut milk, add the maple syrup, vanilla extract, and a pinch of fine sea salt. Whisk briskly until the mixture is silky and uniform, the coconut fat evenly dispersed into the almond milk, creating a slightly pearlescent pale greenish-cream base. This is the gentle, neutral platform that will carry the matcha’s vibrancy and support the chia’s gel. Keep the same whisk handy and resting on the rim of the bowl.
Step 3: Incorporate the matcha into the milk
Pour the prepared matcha into the sage-green mixing bowl and whisk for 30–60 seconds until the color is an even, vivid green with no darker streaks. Taste and, if needed, add a touch more maple syrup to balance the vegetal brightness — remembering the flavor will soften as it chills. The finished liquid should appear smooth and slightly glossy, an even verdant hue that clings slightly to the whisk tines.
Step 4: Add the chia seeds and disperse evenly
Sprinkle the chia seeds in a slow, steady stream over the surface of the matcha-milk while whisking constantly. Continue whisking for 1–2 minutes, scraping the bowl’s sides and bottom so every seed is suspended and no clumps form. The texture at this stage is a thin, seed-speckled emerald liquid: visible black-and-white chia specks suspended in a fluid matrix, still pourable but showing the first signs of body. Keep the whisk or a silicone spatula resting across the bowl to show active tooling.
Step 5: Rest briefly and re-whisk for a smooth finish
Let the bowl sit at room temperature for 5–10 minutes so the seeds absorb liquid and the mixture begins to thicken. Return to the bowl and whisk thoroughly for 30–60 seconds to break any settled clumps; the surface should become subtly thicker, glossy, and cohesive, with chia seeds evenly distributed like tiny pearls. This gentle, tactile intervention ensures a creamy, tapioca-like final texture rather than a grainy, clumped one.
Step 6: Transfer into jars and chill
Spoon or pour the matcha chia mixture into four identical short clear glass jars, leaving a little headspace. Cover each jar tightly with lids and refrigerate at 35–40°F (2–4°C) for at least 2 hours, preferably 4 or overnight, until the pudding is thick and spoonable. The chilled pudding will have a creamy, slightly gelatinous consistency that holds soft peaks and shows suspended chia pearls throughout.
Step 7: Check consistency and adjust if needed
After chilling, remove the jars and stir each pudding to assess body. If a jar is too thick, loosen with 1–2 tablespoons of almond milk at a time until smooth and silky; if too loose, stir in 1–2 teaspoons of chia and rest another 15–20 minutes. The final ideal texture is spoonable and cohesive — not runny, not rigid — with the chia pearls giving a delicate, tapioca-like bite.
Step 8: Prepare the optional toppings
While the pudding chills or just before serving, rinse and thoroughly pat dry the mixed berries; slice the ripe banana into neat rounds immediately before use to prevent browning. Toast coconut flakes and roughly chop roasted pistachios or almonds in a dry skillet until fragrant and just golden, then cool them on a plate to retain crispness. Arrange the berries, banana slices, toasted coconut, chopped nuts, and a small pourer of maple syrup in small glass and ceramic bowls so they’re ready for assembly.
Step 9: Assemble the servings
Divide the chilled pudding evenly into the four short clear glass jars if not already portioned. Top each jar with a careful composition of mixed berries, a few banana rounds, a sprinkle of toasted coconut flakes and chopped pistachios, then finish with a delicate 2-teaspoon-wide ribbon of pure maple syrup. The assembled jars should present a layered sensory contrast: glossy, creamy green pudding beneath jewel-like berries, matte banana, and crunchy, golden nut and coconut fragments.
Step 10: Serve chilled and store properly
Serve the matcha chia puddings well-chilled for the best texture and flavor. Cover any leftovers and refrigerate at 35–40°F (2–4°C) for up to 4 days, stirring before serving; add fresh fruit toppings only at the moment of service to preserve texture.
Notes
- Sift matcha before mixing to avoid lumps.
- Add fresh fruit only at serving to prevent sogginess.
- If pudding is too thick, loosen with almond milk 1 tablespoon at a time.
- For extra richness, stir in a tablespoon of coconut cream before chilling.
- Store sealed in refrigerator for up to 4 days.
