Chocolate Covered Strawberries Recipe has been one of those simple pleasures I come back to again and again. I learned to make this Chocolate Covered Strawberries Recipe the first summer I wanted to impress a date with something homemade, and it stuck around because it is both quick and gloriously rewarding. The shine of the chocolate against the bright red berries is oddly satisfying, and the technique is forgiving enough for beginners. If you love a no-fuss dessert that feels special, this Chocolate Covered Strawberries Recipe is your ticket.
How These Became My Celebration Staple
I remember the first time I made these for a small rooftop birthday party. The kitchen smelled faintly of toasted chocolate while the city hummed below, and I felt a little proud, juggling two bowls of melted chocolate. Placing each berry on the parchment was like arranging tiny jewels; the green tops, wet with a little condensation, contrasted with the glossy dark coating. Guests hovered near the counter as if watching a small magic trick, and that warm, slightly embarrassed glow when someone complimented them is why I keep making them. The mix of textures, the faint pop when you bite through the chocolate to the juicy strawberry, and the ease of adapting toppings make these strawberries a go-to for celebrations and quiet weeknights alike.
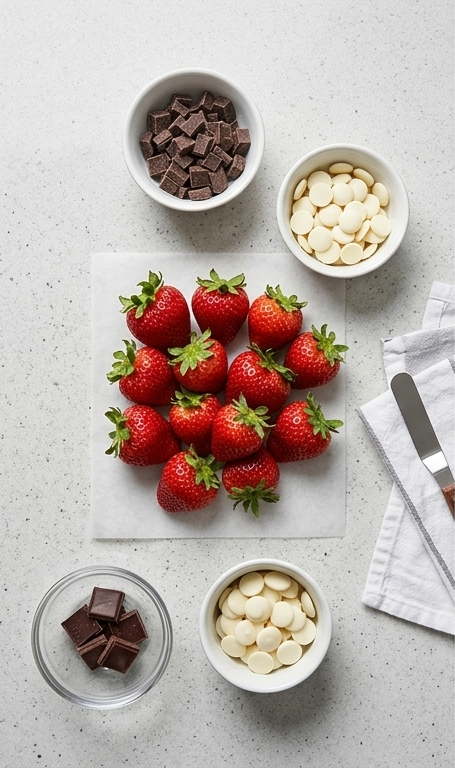
Meet the Stars of the Dish
- Strawberries: Fresh, firm berries are the base. Choose berries that are ripe but not mushy; firm berries hold shape and provide the best contrast with chocolate. Substitute with raspberries or whole cherries for variation.
- Dark Chocolate: This is the coating that provides depth and shine. Use good-quality chocolate for flavor and better melting behavior; if you prefer sweeter, swap for milk chocolate.
- White Chocolate or Candy Melts: Mostly for decoration and contrast. If real white chocolate isn’t available, candy melts are easier to temper and pipe.
Essential Kitchen Tools and Why They Matter
A few simple tools make this Chocolate Covered Strawberries Recipe much easier and more consistent. The right tools help you melt chocolate smoothly, keep berries dry, and present the final dish with charm.
- Heatproof bowls: Use two so you can keep dark chocolate and white chocolate separate. Glass or metal works well.
- Double boiler or microwave-safe bowl: A gentle heat source prevents burning; a double boiler is gentler, the microwave is faster.
- Parchment paper and a baking sheet: Keeps dipped strawberries from sticking and makes transfer easy.
- Spatula and spoons: For stirring and scraping every glossy bit of chocolate out of the bowl.
- Piping bag or zip-top bag: Creates the delicate white chocolate drizzle; scissors can trim the tip to your desired width.
Step-by-Step Preparation Guide
Step 1: Rinse and Dry the Strawberries
Gently rinse the strawberries under cool water, keeping the green stems intact — they’re important for handling and the final look. Pat each berry carefully and thoroughly with paper towels or a clean kitchen towel until completely dry; any residual water will cause the chocolate to seize or not adhere smoothly. Lay the dried berries in a single layer on a small square of parchment on the Luna Pearl granite while you prepare the chocolate, keeping them stem-up and spaced so they don’t touch.
Step 2: Melt the Chocolates Separately
Divide chocolates into two heatproof bowls: one for the dark/bittersweet chocolate and one for the white chocolate or candy melts. Melt each bowl gently — either set over a simmering water bath or in the microwave at medium power in 30-second bursts, stirring between intervals — until completely smooth, viscous and glossy. Keep the dark chocolate warm and fluid for dipping, and temper the white just enough to pipe thin drizzles; stir until silky with no graininess.
Step 3: Dip and Transfer to Parchment
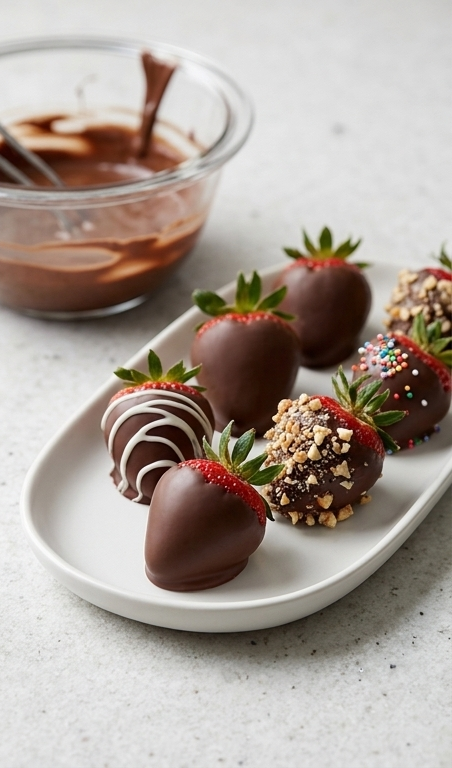
Holding each strawberry by the stem, dip the lower two-thirds into the warm dark chocolate so it forms a glossy, even coat. Allow excess chocolate to drip back into the bowl, then place the dipped strawberry on parchment to set. Repeat until a neat, staggered bed of chocolate-coated berries covers the sheet; this is the primary visual milestone where fresh red fruit meets shiny set chocolate.
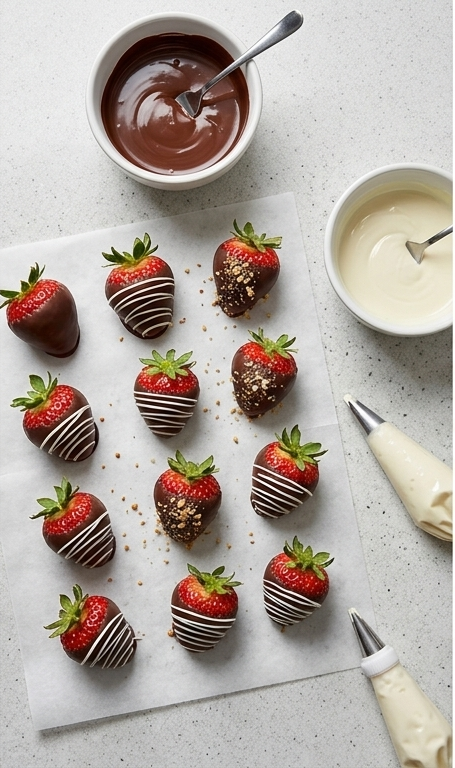
Step 4: Add Toppings and Decorative Drizzle
While the coating is still wet, scatter any toppings—crushed nuts, finely chopped freeze-dried berries, or toasted coconut—on a selection of strawberries so they stick to the chocolate. Transfer a small amount of warmed white chocolate to a piping bag (or a small zip bag with the tip snipped) and swiftly pipe thin, contrasting stripes across other dipped berries for a refined, graphic look. Keep some berries plain to showcase the deep shiny chocolate and bright green tops.
Step 5: Set and Serve
Let the strawberries rest at room temperature until the surface has a firm satin sheen, or refrigerate them for 10–15 minutes to speed firming. Arrange the finished berries on a shallow matte white ceramic platter for serving, with any remaining melted chocolate contained in the same small matte bowl used earlier — this keeps utensils and vessels consistent between stages. Chill briefly if your kitchen is warm, then bring to the table and enjoy.

Making It Your Own
Try swapping the dark chocolate for a 70 percent bar and sprinkling flaky sea salt for a grown-up contrast. For a nut-free picnic, skip nuts and use crushed freeze-dried raspberries or toasted coconut for crunch.
If you want a vegan option, choose dairy-free dark chocolate and vegan candy melts; the strawberries and technique stay the same. I once added a teaspoon of espresso to the dark chocolate for a subtle mocha note that friends actually fought over.
For a festive twist, use colored candy melts and dip only the tips for an ombre effect. Small changes like texture and color turn this Chocolate Covered Strawberries Recipe into a personalized treat.
How to Serve
When I host, I arrange these Chocolate Covered Strawberries Recipe on a shallow platter, leaving space between berries so each piece is visible. For a small dinner party, plan on 3 to 4 berries per person as a light finish. For dessert tables or larger gatherings, lay them in tiers on a cake stand and mix plain, nut-covered, and drizzled versions for variety.
Label choices for guests who may have allergies, and place napkins and small forks nearby if your berries are large. If you need to scale up, prepare multiple baking sheets and work in batches so each berry gets a glossy finish.
Storage and Reheating
Store leftovers in a single layer in an airtight container in the refrigerator. Keep parchment between layers to prevent sticking. They taste best within 48 hours, after which the fruit may release juices and soften the chocolate.
Avoid reheating; instead let refrigerated berries sit at room temperature for 5 to 10 minutes before serving so the chocolate regains a pleasant texture. If you see condensation after chilling, let them dry briefly on fresh paper towels.
Common Pitfalls and How to Avoid Them
One common issue is chocolate seizing from water; always dry strawberries thoroughly and avoid steam near the melting bowls. If chocolate thickens, a teaspoon of neutral oil or a small knob of butter can help restore shine.
Another mistake is rushing the set time. Give the chocolate at least 10 minutes to firm, or briefly chill the tray. Take your time arranging each berry for the best presentation.
Final Thoughts
If you try this Chocolate Covered Strawberries Recipe, I think you will love how simple technique and a few good ingredients create a dessert that looks and tastes special. It is an easy recipe to adapt, and it rewards small touches like a precise drizzle or a sprinkle of flaky salt. Have fun with the process and share the results.
Frequently Asked Questions
- Q: How do I stop the chocolate from seizing? A: Make sure berries are completely dry, avoid steam, and stir chocolate gently; add a teaspoon of neutral oil if it gets grainy.
- Q: Can I prepare these a day ahead? A: Yes, store them in a single layer in an airtight container in the fridge and bring them to room temperature before serving.
- Q: Can I use frozen strawberries? A: Avoid frozen fruit; they release too much water when thawed and will make the chocolate fail to set properly.
- Q: What is the best chocolate to use? A: Use a good-quality bar for flavor and melting behavior; couverture or high-cocoa dark chocolate works well.
- Q: How do I make the drizzle look professional? A: Thin the white chocolate slightly if needed and use a small piping bag or a snipped zip bag for steady lines.

Chocolate Covered Strawberries Recipe
Make Chocolate Covered Strawberries Recipe for glossy, elegant treats in 30 minutes. Dip, decorate, and serve.
Ingredients
Instructions
Step 1: Rinse and Dry the Strawberries
Gently rinse the strawberries under cool water, keeping the green stems intact — they’re important for handling and the final look. Pat each berry carefully and thoroughly with paper towels or a clean kitchen towel until completely dry; any residual water will cause the chocolate to seize or not adhere smoothly. Lay the dried berries in a single layer on a small square of parchment on the Luna Pearl granite while you prepare the chocolate, keeping them stem-up and spaced so they don’t touch.
Step 2: Melt the Chocolates Separately
Divide chocolates into two heatproof bowls: one for the dark/bittersweet chocolate and one for the white chocolate or candy melts. Melt each bowl gently — either set over a simmering water bath or in the microwave at medium power in 30-second bursts, stirring between intervals — until completely smooth, viscous and glossy. Keep the dark chocolate warm and fluid for dipping, and temper the white just enough to pipe thin drizzles; stir until silky with no graininess.
Step 3: Dip and Transfer to Parchment
Holding each strawberry by the stem, dip the lower two-thirds into the warm dark chocolate so it forms a glossy, even coat. Allow excess chocolate to drip back into the bowl, then place the dipped strawberry on parchment to set. Repeat until a neat, staggered bed of chocolate-coated berries covers the sheet; this is the primary visual milestone where fresh red fruit meets shiny set chocolate.
Step 4: Add Toppings and Decorative Drizzle
While the coating is still wet, scatter any toppings—crushed nuts, finely chopped freeze-dried berries, or toasted coconut—on a selection of strawberries so they stick to the chocolate. Transfer a small amount of warmed white chocolate to a piping bag (or a small zip bag with the tip snipped) and swiftly pipe thin, contrasting stripes across other dipped berries for a refined, graphic look. Keep some berries plain to showcase the deep shiny chocolate and bright green tops.
Step 5: Set and Serve
Let the strawberries rest at room temperature until the surface has a firm satin sheen, or refrigerate them for 10–15 minutes to speed firming. Arrange the finished berries on a shallow matte white ceramic platter for serving, with any remaining melted chocolate contained in the same small matte bowl used earlier — this keeps utensils and vessels consistent between stages. Chill briefly if your kitchen is warm, then bring to the table and enjoy.
Notes
- Dry strawberries thoroughly to prevent chocolate from seizing.
- Work in small batches to keep chocolate warm and glossy.
- Use parchment paper to prevent sticking and for easy transfer.
- Chill for 10-15 minutes if your kitchen is warm to speed setting.

