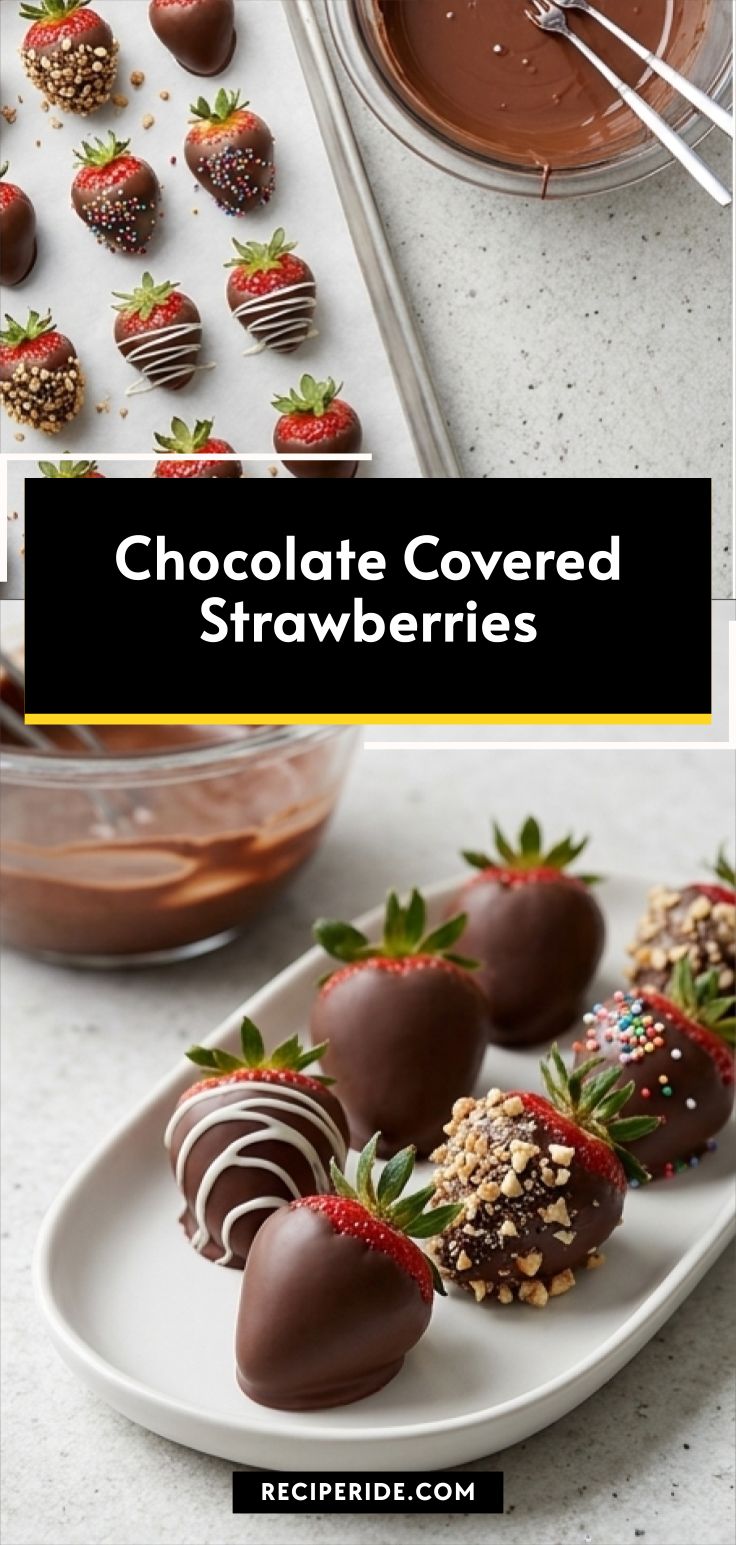
Chocolate Covered Strawberries have been my go-to for last-minute gifts and easy party desserts. I still remember the first time I made these: the smell of warm chocolate, the bright red of the berries, and the tiny thrill when a glossy shell snapped. This recipe is simple, forgiving, and feels special without a fuss. If you want an elegant dessert that looks like you spent hours, Chocolate Covered Strawberries are that little hero you can rely on.
I love how quick they come together and how flexible they are, so they often make my list for impromptu gatherings and holiday plates. Chocolate Covered Strawberries are perfect for weekend baking with kids or for a quiet treat after dinner.
How This Recipe Became My Rainy-Day Favorite
The memory that sticks with me is a rainy afternoon when I had a pint of strawberries on the counter and nothing planned. I melted chocolate on a low setting and dipped one berry out of curiosity. The first bite was a tiny celebration: the warm chocolate cooling into a glossy shell and the burst of juicy strawberry beneath it. I remember thinking how small rituals like this can lift a gloomy day. Since then, I make Chocolate Covered Strawberries whenever I want a mood boost or a quick, pretty gift. The ritual of dipping, the little clinks on the parchment, and the careful sprinkle of toppings all slow the world down for a few minutes.
Sweet Essentials: The Primary Ingredients
- Semi-sweet or white chocolate (8 ounces): The star of the coating. Choose high-quality chocolate for a smooth, glossy finish. Substitute with couverture or chocolate chips designed for melting. Avoid candy melts if you want true chocolate flavor.
- Shortening (1 Tablespoon): Helps thin the chocolate and adds sheen. You can use a neutral oil or cocoa butter if preferred, but shortening is forgiving for beginners.
- Strawberries (1 pint): Fresh, ripe, and dry strawberries give the best results. Look for bright, firm berries with green caps still attached; avoid overly soft or watery fruit.
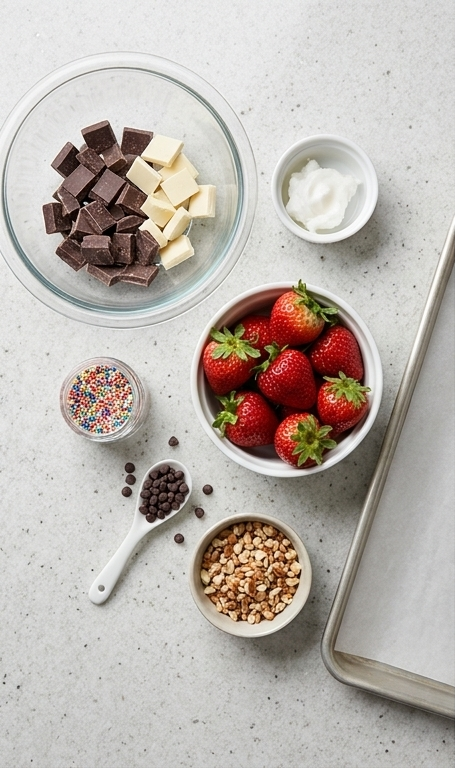
Essential Kitchen Tools and Why They Matter
A few simple tools make Chocolate Covered Strawberries easy and pretty. The right items help with smooth melting, neat dipping, and tidy presentation.
- Microwave-safe glass bowl: Heats evenly for chocolate melting and lets you see when the chocolate is smooth.
- Parchment-lined baking sheet: Keeps dipped berries from sticking and makes cleanup easy. Use wax paper if you must, but parchment is best.
- Small ramekin or spoon: For the shortening or to help drizzle chocolate. A spoon works in a pinch.
- Shallow bowl for berries: Keeps the fruit close at hand while you work. A shallow bowl prevents squishing the strawberries.
If you don’t have a microwave, melt chocolate in a heatproof bowl set over simmering water. Tongs or a fork can substitute for holding berries if you prefer.
Step-by-Step Preparation Guide
Step 1: Line the sheet and set a staging area
Line a baking sheet with a single sheet of parchment paper and smooth it so the edges sit flat; set the sheet aside as the dedicated staging area for the dipped berries. Place a clear microwave-safe glass bowl, a small white ceramic ramekin for the shortening, and a shallow ceramic pint-style bowl for the strawberries nearby on the same Luna Pearl surface so everything stays within easy reach while you melt the chocolate.
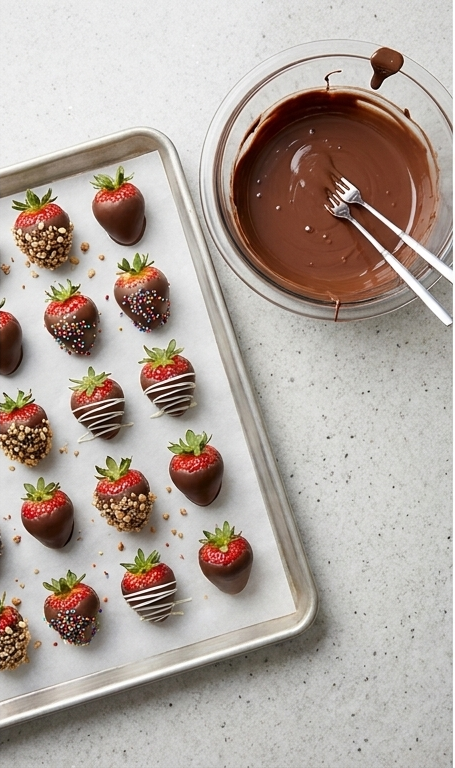
Step 2: Melt the chocolate until glossy and smooth
Place the 8 ounces of semi-sweet (or white) chocolate and the tablespoon of shortening into the glass microwave-safe bowl. Microwave in short bursts, stirring thoroughly every 30 seconds, until the mixture becomes completely melted, warm, and glossy, thick but fluid, with a satiny sheen and no graininess. Stir until the chocolate flows in a smooth ribbon and there are no visible lumps.
Step 3: Dip each strawberry and apply toppings
Working one berry at a time, hold the strawberry by its green cap and fully dip it into the warm, liquid chocolate so the fruit is completely coated; allow excess to drip back into the bowl, then place the coated strawberry on the parchment-lined sheet. If using toppings, sprinkle or roll the chocolate while it’s still wet so sprinkles, mini chips, chopped nuts, crushed candy bar or crushed peppermint adhere to the glossy shell. Repeat until all strawberries are dipped and decorated, leaving them to begin setting on the parchment.
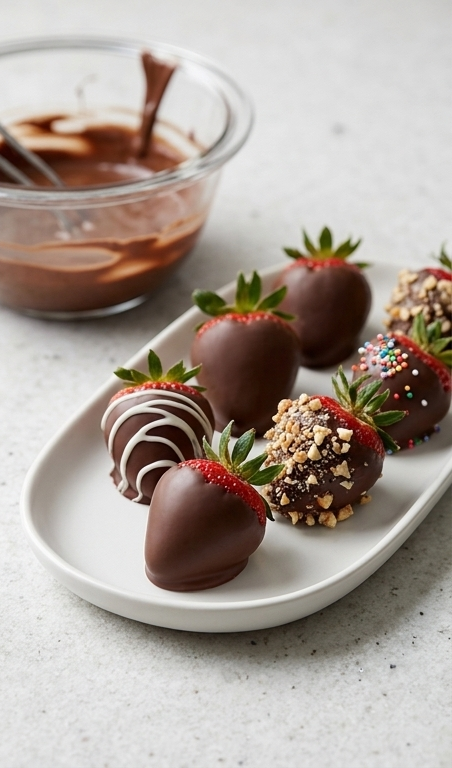
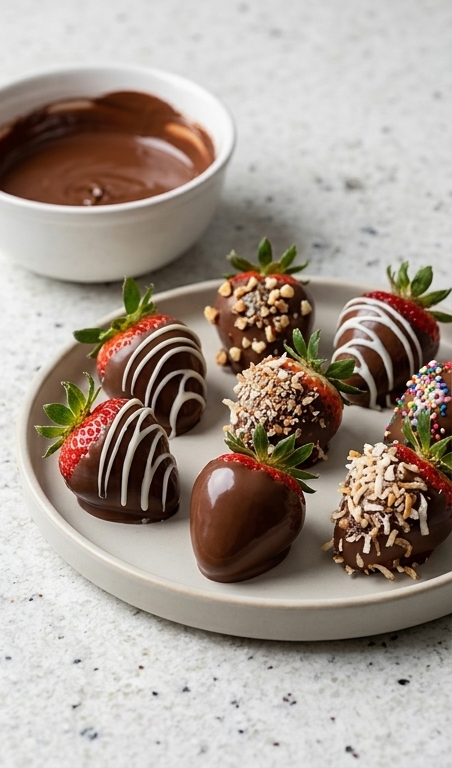
Step 4: Let the shells set and transfer to a serving platter
Allow the chocolate shells to cool and firm up at room temperature until they hold a delicate, glossy snap to the touch. Once set, gently transfer the berries to a shallow matte white serving platter or keep a few on the parchment for a rustic look; the final image captures a close-up eye-level view of the arranged berries, the residual glass bowl with a few streaks of chocolate nearby, and the elegant contrast of dark chocolate, creamy white drizzle, and textured toppings against the pale Luna Pearl surface.
Making It Your Own
I like to experiment with flavors and textures, and Chocolate Covered Strawberries are a playground for small changes. Try dipping half of the berries in dark chocolate and finish others with a white chocolate drizzle for contrast. For a nutty twist, roll the edges in finely chopped pistachios or toasted almonds.
If you need a dairy-free version, choose vegan chocolate and a plant-based shortening or neutral oil. For a seasonal version, add a pinch of cinnamon in winter or a little lemon zest in summer for a bright lift. You can also swap crushed peppermint for crushed freeze-dried raspberries for a tart, colorful crunch.
How to Serve
Think like a host: arrange Chocolate Covered Strawberries on a shallow platter with space between each berry to show off their glossy shells. For a small gathering, place a dozen berries on a single plate with a few edible flowers or mint sprigs as garnish. For larger parties, set out multiple platters with different topping themes so guests can choose.
If serving as part of a dessert board, pair the berries with cheeses, nuts, and crackers; they play beautifully with a milder cheese like Brie. To scale up, double the chocolate and work in batches so the melted chocolate stays warm and smooth while you dip.
Storage and Reheating Tips
Store leftover Chocolate Covered Strawberries in a single layer in the refrigerator, separated by parchment to prevent sticking. They keep best for 24 to 48 hours; after that the berries can release moisture and soften the shells.
Avoid freezing dipped strawberries, as thawing makes the fruit watery and affects texture. If your chocolate blooms a little in the fridge, the flavor is still fine even if the sheen dulls.
Common Mistakes and How to Avoid Them
Don’t try to dip wet strawberries; moisture causes the chocolate to seize and prevents a smooth shell. Pat berries completely dry before dipping and let them come to room temperature.
Avoid overheating the chocolate. Heat gently and stir frequently. If it thickens, add a tiny bit of shortening or neutral oil to loosen it up instead of raising the heat.
Final Thoughts
Give this simple treat a try and enjoy the small ceremony of making Chocolate Covered Strawberries. They are quick, forgiving, and always feel a little celebratory, whether you’re sharing them or keeping them all to yourself.
Frequently Asked Questions.
- What is the best chocolate to use for Chocolate Covered Strawberries? Use a good-quality semi-sweet or white chocolate; couverture gives the best sheen but quality chips work too.
- How do I prevent the chocolate from seizing? Make sure the strawberries are dry and heat the chocolate gently, stirring every 30 seconds. A little shortening can help smooth the texture.
- Can I prepare Chocolate Covered Strawberries ahead of time? You can dip them a few hours before serving and refrigerate, but they are best within 24 hours for texture and flavor.
- Are there good alternatives for shortening? Yes, use a neutral oil or cocoa butter if you prefer, though shortening is very forgiving for beginners.
- How should I store leftover Chocolate Covered Strawberries? Place berries in a single layer in the refrigerator separated with parchment; they keep best for 24 to 48 hours.
Chocolate Covered Strawberries
Make Chocolate Covered Strawberries quickly: melt, dip, chill, and serve an elegant treat with minimal fuss.
Ingredients
Instructions
Step 1: Line the sheet and set a staging area
Line a baking sheet with a single sheet of parchment paper and smooth it so the edges sit flat; set the sheet aside as the dedicated staging area for the dipped berries. Place a clear microwave-safe glass bowl, a small white ceramic ramekin for the shortening, and a shallow ceramic pint-style bowl for the strawberries nearby on the same Luna Pearl surface so everything stays within easy reach while you melt the chocolate.
Step 2: Melt the chocolate until glossy and smooth
Place the 8 ounces of semi-sweet (or white) chocolate and the tablespoon of shortening into the glass microwave-safe bowl. Microwave in short bursts, stirring thoroughly every 30 seconds, until the mixture becomes completely melted, warm, and glossy — thick but fluid, with a satiny sheen and no graininess. Stir until the chocolate flows in a smooth ribbon and there are no visible lumps.
Step 3: Dip each strawberry and apply toppings
Working one berry at a time, hold the strawberry by its green cap and fully dip it into the warm, liquid chocolate so the fruit is completely coated; allow excess to drip back into the bowl, then place the coated strawberry on the parchment-lined sheet. If using toppings, sprinkle or roll the chocolate while it's still wet so sprinkles, mini chips, chopped nuts, crushed candy bar or crushed peppermint adhere to the glossy shell. Repeat until all strawberries are dipped and decorated, leaving them to begin setting on the parchment.
Step 4: Let the shells set and transfer to a serving platter
Allow the chocolate shells to cool and firm up at room temperature until they hold a delicate, glossy snap to the touch. Once set, gently transfer the berries to a shallow matte white serving platter or keep a few on the parchment for a rustic look; the final image captures a close-up eye-level view of the arranged berries, the residual glass bowl with a few streaks of chocolate nearby, and the elegant contrast of dark chocolate, creamy white drizzle, and textured toppings against the pale Luna Pearl surface.
Notes
- Pat strawberries completely dry before dipping to prevent seizing.
- Work in small batches so the chocolate stays warm and smooth.
- Use high-quality chocolate for better flavor and shine.
- Store in a single layer in the fridge separated by parchment.
- Avoid freezing dipped strawberries; it affects texture.


