Chocolate Dipped Strawberries are one of those simple, dazzling treats that make every gathering feel a little more special. I fell for this recipe years ago when I needed a quick, elegant dessert for an impromptu dinner and discovered how few ingredients it takes to look like a showstopper. The mix of glossy chocolate and bright red berries is a texture and flavor win every time. If you love make-ahead party bites or a timeless Valentine favorite, these Chocolate Dipped Strawberries will be in heavy rotation in your kitchen.
I still remember the first time I brought a platter of Chocolate Dipped Strawberries to a friend’s small get-together. The kitchen smelled faintly of toasted coconut, and there was laughter echoing through the living room as I laid the last berry on the parchment. I had nervously tested the chocolate twice to get that perfect shine, and when someone reached for a strawberry and closed their eyes with that little ‘oh wow’ face, I felt like I had unlocked a tiny culinary superpower. The strawberries were cool and slightly firm, the chocolate crisped just enough, and the toasted nuts added a warm crunch. That evening made me realize how a small, homemade touch can lift a low-key night into something memorable, and since then I always keep 16 oz of berries on hand for last-minute celebrations.
How the Main Ingredients Work for You
- Strawberries: Fresh berries are the canvas for the recipe. Choose ripe but firm strawberries so they hold their shape and provide contrast against the chocolate. Substitute with raspberries or banana slices for variety, though texture will change.
- Baking chocolate: This is the coating and the visual star. Semi-sweet or bittersweet offers great balance; milk or white chocolate gives a sweeter, softer flavor. If you need dairy-free, choose a vegan baking chocolate.
- Vegetable oil: A tiny amount thins the melted chocolate and adds a subtle shine. You can swap light olive oil or coconut oil for different flavor notes, but use sparingly to keep crispness.

Essential Kitchen Tools and Why They Matter
A few modest tools make this process fast and tidy. The right gear keeps your chocolate glossy and your toppings from becoming a mess.
- Shallow matte bowl: For melting chocolate and whisking in oil; its wide surface helps you stir and judge consistency.
- Baking tray with parchment: Keeps dipped berries from sticking and makes cleanup instant.
- Small ramekins or bowls: Keeps toppings organized so you can finish berries quickly while the chocolate is still tacky.
- Microwave-safe jug or double boiler: Melt chocolate gently to avoid scorching; a double boiler is ideal but a microwave works fine on low power.
- Dipping fork or spoon: Helps you lift and drain each berry evenly; a fork gives better airflow and fewer drips.
Step-by-Step Preparation Guide
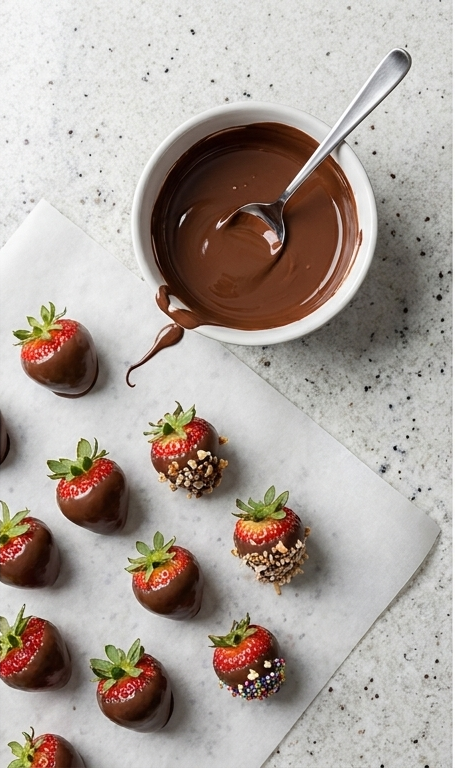
Step 1: Prepare the tray and toppings
Line a baking tray with a single sheet of parchment paper and set it on the Luna Pearl granite surface. Arrange small, simple vessels for toppings: a shallow matte white ceramic bowl of chopped semi‑sweet baking chocolate, a tiny clear glass jar with 2 teaspoons vegetable oil, and three small ramekins or ceramic bowls holding toasted coconut, chopped nuts, and sprinkles. Keep an extra clean towel or paper towels nearby to dry berries. Everything is organized but minimal — each topping in its own vessel so you can dip and finish immediately without searching for tools.
Step 2: Rinse and dry the strawberries
Rinse the strawberries under cool water, gently shake off excess and spread them on a clean towel. Pat each berry dry very thoroughly — moisture is the enemy of glossy melted chocolate; any dampness will cause the chocolate to seize or slide. Leave the green crowns intact; stems provide a natural handle for dipping and offer a fresh color contrast against the chocolate. Keep the berries at room temperature while you melt the chocolate so the coating adheres smoothly.
Step 3: Melt the chocolate and prepare coating bowls
Place the chopped baking chocolate in the same shallow matte white ceramic bowl used earlier; add the measured vegetable oil and melt gently: microwave at 50% power for 60 seconds, stir, then continue at 50% power in 30‑second bursts, stirring until fully melted and glossy. Alternatively, melt over a double boiler and transfer back to the matte bowl. Stir until velvety and smooth — the oil adds sheen and a slightly thinner coating. Arrange the topping bowls within arm’s reach and set a small stainless spoon or dipping fork on the bowl rim to rest; this utensil will persist into the final frame.
Step 4: Dip, finish, and set the strawberries
Working one berry at a time, hold each by its stem and dip into the glossy chocolate, let excess chocolate drip back into the bowl, then gently scrape the bottom against the bowl rim to remove drips. Place each dipped berry onto the parchment-lined tray; if adding a coating, immediately roll or sprinkle the berry so the topping adheres. Let chocolates set at room temperature until firm (or chill 20–30 minutes if serving right away), then transfer to a single-layer storage container lined with paper towels if needed. Serve fresh the same day for best texture and flavor.
Making It Your Own
I like to treat the base recipe as a starting point for small experiments. Try swapping semi-sweet baking chocolate for milk chocolate and finishing half the berries with crushed pistachios for a nutty, salty contrast. For a winter twist, mix a teaspoon of crushed candy cane into the white chocolate coating and top with cookie crumbs for crunch.
For dietary twists, use dairy-free chocolate and coconut oil to make vegan Chocolate Dipped Strawberries that still have shine and snap. If you want a boozy edge, stir a teaspoon of orange liqueur into the melted dark chocolate, but use sparingly so the chocolate sets properly.
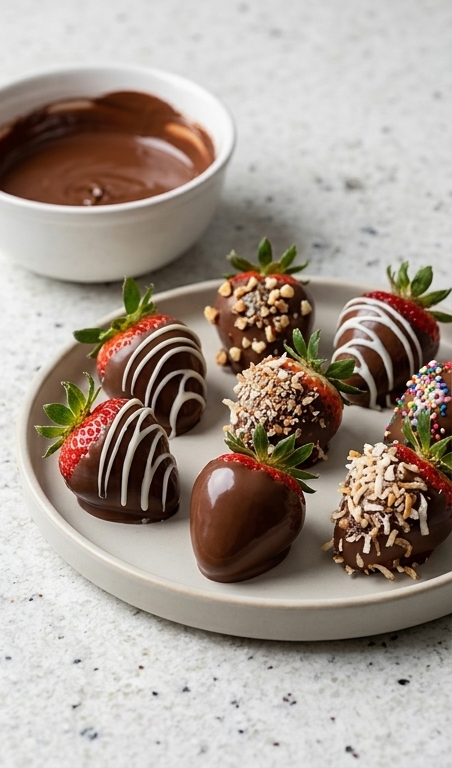
How to Serve
If I am hosting, I lay the Chocolate Dipped Strawberries on a large white platter in a single layer with small gaps so each berry looks intentional. For a dinner party of 12, plan on 2 to 3 berries per guest as a light finish, or bump that to 4 to 6 for a dessert course. Add a few mint leaves and edible flowers for color and place a bowl of extra toppings nearby so guests can customize.
For a casual gathering, arrange them in clusters on parchment-lined boards and pair with a small cheese selection and bubbly. Keep chilled until 10 minutes before serving so the chocolate regains a delicate snap.
Storage and Reheating Tips
Store dipped berries in a single layer in a shallow container lined with paper towels to absorb any moisture. If you need to stack, place parchment between layers to avoid sticking.
Do not warm these to reheat; instead let chilled berries come to cool room temperature for 10 to 15 minutes before serving. If the chocolate blooms slightly from chilling, the flavor is not affected, but the shine may soften; a light flash with a warm hands will bring back some gloss.
Oops Moments and How to Fix Them
If the chocolate seizes or becomes grainy, stop and add a teaspoon of warm oil or a tiny bit of warm cream and stir until smooth. Avoid adding water, which makes things worse.
If berries weep or make the chocolate slip, make sure they are thoroughly dry and at room temperature. Work quickly and keep toppings close so coatings adhere while the chocolate is tacky.
Final Thoughts
Give Chocolate Dipped Strawberries a try the next time you want an easy, beautiful dessert. The recipe rewards a little patience and organization, and once you nail the routine you will reach for these for everything from quiet nights in to festive gatherings. They are forgiving, quick, and always well received.
Frequently Asked Questions.
- What kind of chocolate is best for Chocolate Dipped Strawberries? Semi-sweet or bittersweet baking chocolate gives balance and good snap; milk and white chocolate are sweeter options.
- Can I make Chocolate Dipped Strawberries ahead of time? Yes, make them earlier in the day and store in a single layer in a lined container in the fridge, then bring to room temperature before serving.
- How do I keep the chocolate glossy? Add a teaspoon of vegetable or coconut oil when melting and avoid overheating the chocolate.
- Can I use frozen strawberries? Frozen berries release moisture when thawed and are not recommended for dipping because the chocolate may not adhere well.
- How long will they stay fresh? Best eaten the same day, but stored properly they keep 1 to 2 days in the fridge with minimal quality loss.

Chocolate Dipped Strawberries
Make Chocolate Dipped Strawberries quickly for glossy, party-ready treats with simple ingredients and easy steps.
Ingredients
Instructions
Step 1: Prepare the tray and toppings
Line a baking tray with a single sheet of parchment paper and set it on the Luna Pearl granite surface. Arrange small, simple vessels for toppings: a shallow matte white ceramic bowl of chopped semi‑sweet baking chocolate, a tiny clear glass jar with 2 teaspoons vegetable oil, and three small ramekins or ceramic bowls holding toasted coconut, chopped nuts, and sprinkles. Keep an extra clean towel or paper towels nearby to dry berries. Everything is organized but minimal — each topping in its own vessel so you can dip and finish immediately without searching for tools.
Step 2: Rinse and dry the strawberries
Rinse the strawberries under cool water, gently shake off excess and spread them on a clean towel. Pat each berry dry very thoroughly — moisture is the enemy of glossy melted chocolate; any dampness will cause the chocolate to seize or slide. Leave the green crowns intact; stems provide a natural handle for dipping and offer a fresh color contrast against the chocolate. Keep the berries at room temperature while you melt the chocolate so the coating adheres smoothly.
Step 3: Melt the chocolate and prepare coating bowls
Place the chopped baking chocolate in the same shallow matte white ceramic bowl used earlier; add the measured vegetable oil and melt gently: microwave at 50% power for 60 seconds, stir, then continue at 50% power in 30‑second bursts, stirring until fully melted and glossy. Alternatively, melt over a double boiler and transfer back to the matte bowl. Stir until velvety and smooth — the oil adds sheen and a slightly thinner coating. Arrange the topping bowls within arm's reach and set a small stainless spoon or dipping fork on the bowl rim to rest; this utensil will persist into the final frame.
Step 4: Dip, finish, and set the strawberries
Working one berry at a time, hold each by its stem and dip into the glossy chocolate, let excess chocolate drip back into the bowl, then gently scrape the bottom against the bowl rim to remove drips. Place each dipped berry onto the parchment-lined tray; if adding a coating, immediately roll or sprinkle the berry so the topping adheres. Let chocolates set at room temperature until firm (or chill 20–30 minutes if serving right away), then transfer to a single-layer storage container lined with paper towels if needed. Serve fresh the same day for best texture and flavor.
Notes
- Pat strawberries completely dry before dipping to prevent seizing.
- Use a small amount of oil to add shine, but not so much that the chocolate stays soft.
- Line containers with paper towels and store in a single layer to avoid sticking.
- If chocolate seizes, add a teaspoon of warm oil and stir until smooth.
- Chill briefly if you need them set quickly, then return to room temperature before serving.

