Grilled BBQ Chicken has been my go-to for backyard get-togethers and lazy Sunday dinners for years. I still remember the first time I learned to coax a perfect char and sticky glaze out of a whole bird; the smell alone made neighbors curious. This Grilled BBQ Chicken recipe is forgiving, bold, and a little smoky, so it’s ideal whether you’re a weekend griller or hosting a big family meal. I love how the sauce caramelizes into a glossy lacquer that tastes like summer in every bite.
How This Recipe Became My Rainy-Day Favorite
The first time I made this Grilled BBQ Chicken it was pouring outside, and I kept checking the window as if the weather could change my mood. I brought the grill under a covered porch and let the steady heat do its work while the house filled with the scent of caramelizing sauce and warm spices. I remember the sound of fat popping on the grate and how the skin tightened up into crackly, golden patches. When I served it, the room went quiet for a beat, then the compliments started. That quiet approval is the reason I keep this recipe in rotation: it turns an ordinary night into something celebratory without a lot of fuss. The memory of that first perfect bite still feels like a small, comforting victory.
The Ingredients That Make It Sing
- Whole Chicken: The canvas for everything else. Choose a 3-4 pound bird for balanced cooking; spatchcocking is an easy alternate for faster, even results.
- Olive Oil: Helps the skin crisp and gives the seasoning something to cling to; avocado oil works well if you prefer a neutral taste.
- Salt and Pepper: Small but essential; kosher salt and freshly cracked black pepper give the best texture and flavor control.
- Barbecue Sauce: The flavor driver and glaze. Use your favorite bottled sauce or blend ketchup, vinegar, and molasses for a homemade swap.

Essential Kitchen Tools and Why They Matter
A few simple tools will make this Grilled BBQ Chicken feel effortless. A reliable instant-read thermometer keeps you from guessing doneness so your chicken stays juicy and safe. Use long-handled tongs and a sturdy spatula to move pieces without tearing the skin. A silicone brush helps build up the barbecue sauce in thin, even layers so it caramelizes without burning. If you don’t have a grill, a heavy skillet or a broiler can emulate similar results.
- Instant-read thermometer: Ensures safe, juicy meat; aim for 165°F in the breast.
- Long-handled tongs: For safe flipping and turning.
- Silicone basting brush: For even sauce application.
- Charcoal or gas grill: For authentic char; a hot skillet or broiler are fine alternatives.
Step-by-Step Preparation Guide
Step 1: Preheat the grill
Preheat your grill to a steady medium heat, aiming for an even, steady sear — this is the moment where the cooking environment is set and patience pays off. Treat the grill like a partner: give it time to come to temperature so the skin crisps evenly when it hits the grate. Keep your tools and sauce nearby so once the chicken meets the heat you can move confidently.
Step 2: Oil and Season the Chicken
Pat the cut chicken pieces dry, then rub them all over with the olive oil so the skin will develop a crisp, golden crust. Season generously with salt and freshly cracked black pepper, making sure each piece has an even coating; this simple layer of fat and seasoning will help the barbecue sauce adhere later and build deep flavor.
Step 3: Sear Skin Side Down
Place the pieces skin side down on the hot, oiled grate and let them sear undisturbed for about 15 minutes so caramelized, robust grill marks form and fat begins to render. This is the structural moment for texture — the skin tightens, fat renders beneath it, and the surface becomes a dry, blistered canvas ready to accept sauce.
Step 4: Turn, Baste, and Finish Cooking
Flip each piece, then begin brushing on the barbecue sauce, working in layers: baste, let the sauce set and caramelize, and repeat while cooking for another 20–30 minutes until the breast reaches 165°F and thighs 175°F. Keep the brush close and use even, glossy strokes so the sauce builds a sticky, lacquered surface with concentrated, smoky-sweet depth; the chicken should be deeply caramelized with visible char and a glossy glaze when done.

Step 5: Rest and Serve
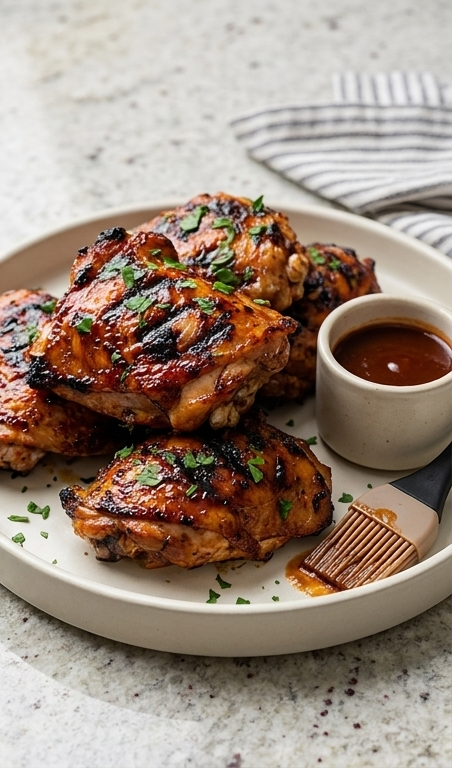
Transfer the cooked pieces to a platter and let them rest for about five minutes so juices redistribute and the glaze sets into a slightly tacky, slice-ready finish. Arrange the pieces stacked high for serving, sprinkle with chopped parsley for a bright contrast, and offer a small pot of extra barbecue sauce on the side for dipping.
Making It Your Own
I like to experiment by swapping sauces and smoke sources. Try a mustard-based sauce if you want a tangy Southern twist; it sings with grilled corn and pickled slaw. For a low-sugar option, use a tomato-vinegar glaze and finish with a touch of honey just before serving so the glaze still caramelizes.
For a regional spin, add chipotle in adobo for a Southwestern kick or brush on a Korean-style gochujang glaze for savory-sweet heat. If you need a gluten-free version, check the barbecue sauce label or make a simple blend of tomato paste, apple cider vinegar, and smoked paprika.
If you’re feeding a crowd, double the sauce and rotate batches on the grill so each piece gets that lacquered finish.
How to Serve
Think of this Grilled BBQ Chicken as the centerpiece for a relaxed, colorful spread. For a family dinner, serve quarters stacked on a large platter with bowls of coleslaw, grilled vegetables, and buttery corn bread so guests can build plates. If hosting a casual party, carve the breasts and thighs into slices and arrange them on a wooden board with lemon wedges and fresh herbs for easy snacking.
To scale up, cook multiple chickens in staggered batches and keep finished pieces in a warm oven at about 200°F on a rack so the skin stays crisp. Offer small ramekins of extra barbecue sauce and pickles for contrast.
Storage and Reheating Tips
Store leftover Grilled BBQ Chicken in an airtight container in the fridge for up to 3 days. Keep sauce separate if you want to preserve the texture of the skin, otherwise the glaze will meld into the meat.
To reheat, warm gently in a 300°F oven on a wire rack so air circulates and the skin regains some crispness. For faster reheating, slice and sear in a hot skillet for a minute per side, then finish in the oven until warmed through.
Oops-Proofing: Common Mistakes and Fixes
A major slip is rushing the initial sear; give the chicken time to color so fat renders and skin crisps. If you skip this, the skin can stay soggy and the final texture suffers.
Another frequent error is basting too early or too often with thick sauce; brush in thin layers and let each set briefly so sugars caramelize without burning. Use indirect heat if your glaze chars too fast.
Final Thoughts and Encouragement
If you’ve been on the fence, give this Grilled BBQ Chicken a try this weekend. It’s approachable, rewarding, and scales nicely whether you’re feeding two or a dozen. Once you taste that glossy, smoky crust and juicy interior, you’ll understand why I keep coming back to it.
Frequently Asked Questions.
- Q: How long should I grill a whole chicken cut into pieces?
A: Plan for about 35 to 45 minutes of direct and indirect grilling after the initial sear; target 165°F for breasts and 175°F for thighs. - Q: Can I use this method on a gas grill and a charcoal grill?
A: Yes, both work well. Charcoal gives more smoke flavor, while gas is easier to control for steady heat. - Q: Is it okay to use bottled barbecue sauce?
A: Absolutely. Use your favorite for convenience or tweak it with a splash of vinegar or hot sauce for brightness. - Q: How do I keep the skin from burning while the inside cooks?
A: Sear skin side down first, then use indirect heat and baste in thin layers so the glaze sets without charring. - Q: Can I make this ahead of time?
A: You can grill the chicken ahead and reheat gently; keep extra sauce separate and re-glaze briefly when warming.

Grilled BBQ Chicken
Grilled BBQ Chicken: grill quarters to a glossy, smoky finish and serve with extra sauce for dipping.
Ingredients
Instructions
Step 1: Preheat the grill
Preheat your grill to a steady medium heat, aiming for an even, steady sear — this is the moment where the cooking environment is set and patience pays off. Treat the grill like a partner: give it time to come to temperature so the skin crisps evenly when it hits the grate. Keep your tools and sauce nearby so once the chicken meets the heat you can move confidently.
Step 2: Oil and Season the Chicken
Pat the cut chicken pieces dry, then rub them all over with the olive oil so the skin will develop a crisp, golden crust. Season generously with salt and freshly cracked black pepper, making sure each piece has an even coating; this simple layer of fat and seasoning will help the barbecue sauce adhere later and build deep flavor.
Step 3: Sear Skin Side Down
Place the pieces skin side down on the hot, oiled grate and let them sear undisturbed for about 15 minutes so caramelized, robust grill marks form and fat begins to render. This is the structural moment for texture — the skin tightens, fat renders beneath it, and the surface becomes a dry, blistered canvas ready to accept sauce.
Step 4: Turn, Baste, and Finish Cooking
Flip each piece, then begin brushing on the barbecue sauce, working in layers: baste, let the sauce set and caramelize, and repeat while cooking for another 20–30 minutes until the breast reaches 165°F and thighs 175°F. Keep the brush close and use even, glossy strokes so the sauce builds a sticky, lacquered surface with concentrated, smoky-sweet depth; the chicken should be deeply caramelized with visible char and a glossy glaze when done.
Step 5: Rest and Serve
Transfer the cooked pieces to a platter and let them rest for about five minutes so juices redistribute and the glaze sets into a slightly tacky, slice-ready finish. Arrange the pieces stacked high for serving, sprinkle with chopped parsley for a bright contrast, and offer a small pot of extra barbecue sauce on the side for dipping.
Notes
- Use an instant-read thermometer to avoid overcooking.
- Dry the skin well before oiling for extra crispness.
- Baste in thin layers to build a glossy glaze without burning.
- Keep extra barbecue sauce on the side for dipping.
- Rest the chicken for 5 minutes before serving to redistribute juices.

