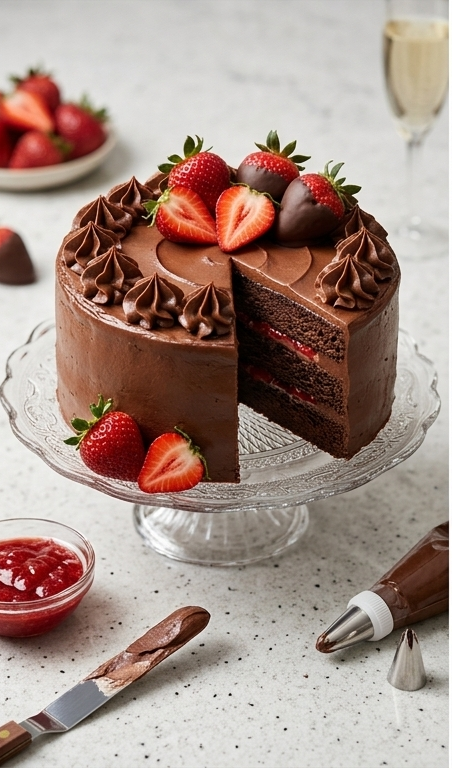
Chocolate Truffles have been my little ritual for as long as I can remember. I love how a few pantry ingredients turn into something indulgent and giftable, and these Chocolate Truffles always feel like a tiny celebration. I first learned this technique when I wanted a simple, no-fuss dessert to bring to a friend’s party, and now I reach for it whenever I want something elegant without a lot of fuss. The balance of silky ganache and varied coatings makes these truffles worth trying again and again.
How These Truffles Became My Cozy Weekend Tradition
I remember a rainy Saturday when I pulled out a bag of chopped chocolate and a jar of vanilla, intending only to make a few test bites. The house smelled warm and faintly of cocoa while the rain tapped the windows, and I found myself stirring the glossy ganache with a ridiculous amount of calm. I rolled the first imperfect ball and pressed it into chopped hazelnuts, and the crunch against the melting center felt like the best discovery. Serving them that evening to a neighbor, I watched a simple dessert create conversation and laughter, and that memory sealed Chocolate Truffles as my cozy weekend tradition.
The Main Players: What Makes These Truffles Sing
- Chocolate: The soul of the recipe; milk chocolate gives sweetness and creaminess, dark chocolate gives depth. Substitute with 70% dark for more intensity, or use a mix for balance. Choose high quality, finely chopped chocolate so it melts evenly.
- Heavy cream: Provides the silky texture of the ganache. You can use a lighter cream for slightly softer centers, but avoid milk alone.
- Instant espresso or coffee: Optional lift for flavor complexity; omit if you prefer straightforward chocolate notes.
- Sea salt and vanilla: Small amounts brighten and round the flavors; use pure vanilla extract and flaky sea salt if possible.
Essential Tools That Make This Easy and Fun
A few simple tools let you focus on texture and presentation. A heatproof bowl is essential for combining hot cream and chocolate safely, and a sturdy spatula helps you coax a glossy ganache without overworking it. A small cookie scoop gives uniform truffles, but if you do not have one, use two spoons to portion evenly. Parchment or a silicone mat keeps the truffles from sticking, and a small dipping fork or fork alternative makes chocolate coating smooth. If you plan to gift, a box with parchment dividers keeps each truffle pristine.
Step-by-Step Preparation Guide
Step 1: Assemble the chocolate and seasonings in a heatproof bowl
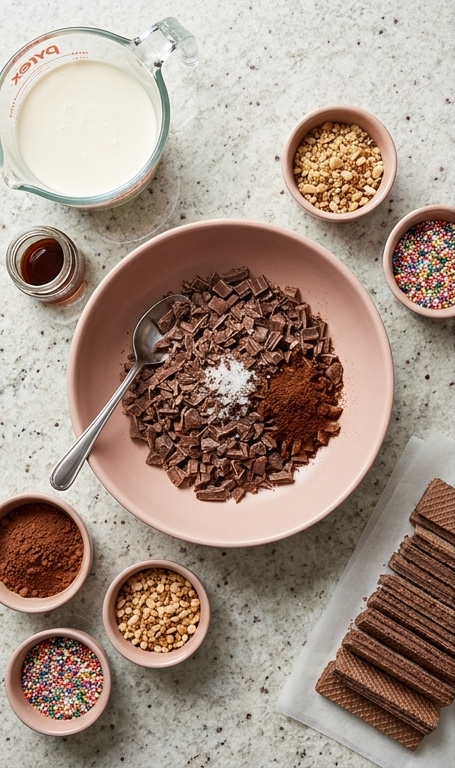
Place the finely chopped milk or dark chocolate into a heatproof, shallow matte blush-pink ceramic bowl along with the pinch of sea salt and the optional instant espresso powder scattered on top. Set a small clear glass measuring cup of cold heavy cream, a tiny glass jar of vanilla extract, and trio of tiny ceramic ramekins holding cocoa powder, chopped nuts and colorful sprinkles nearby on the Luna Pearl granite surface. A small stainless spoon rests on the rim of the bowl , ready for the next move.
Step 2: Heat the cream and steep it over the chocolate
Warm the cream gently (microwave at moderate power until very hot but not boiling) then pour it directly into the bowl over the chopped chocolate; leave the mixture completely undisturbed for several minutes so the hot cream softens and begins to melt the chocolate into the bowl, creating a soft, slumped mass with shiny softened fragments at the edges.
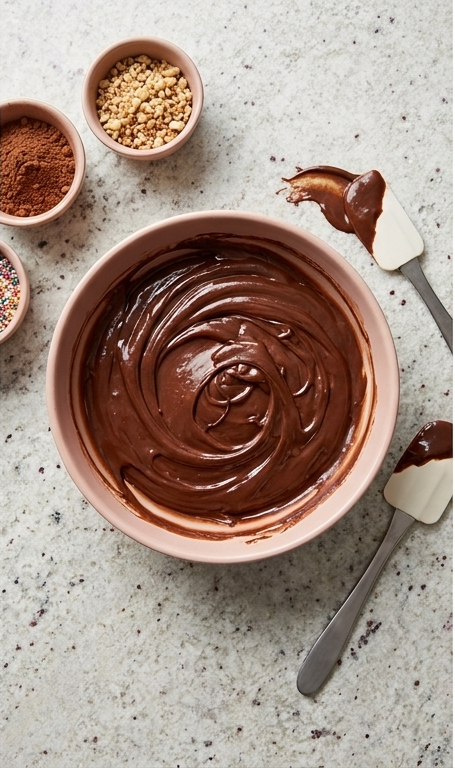
Step 3: Stir to form a glossy ganache and flavor it
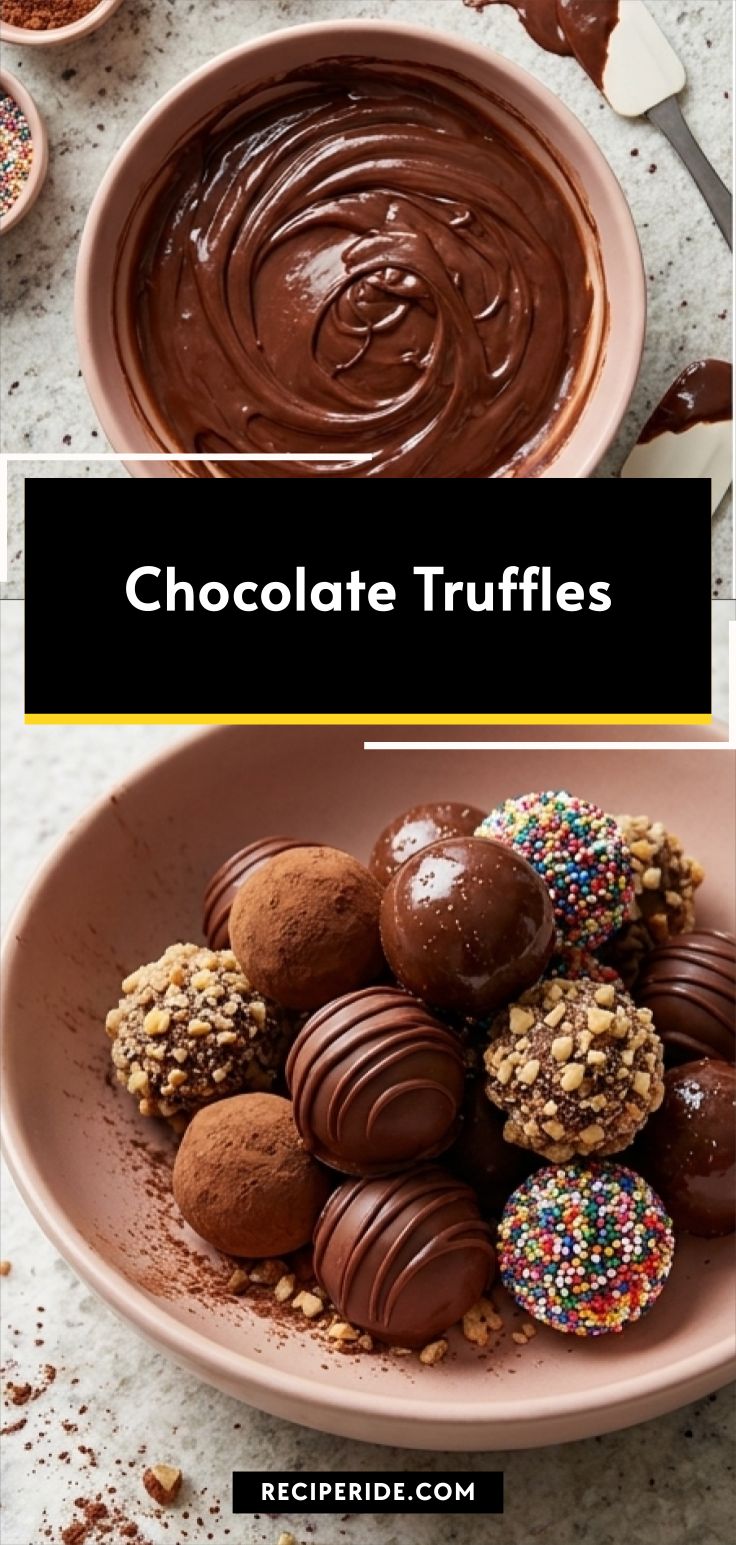
Use a gentle, steady stirring motion with a small spatula or spoon, coaxing the softened chocolate and cream into a smooth, glossy ganache; stir in the vanilla extract until fully incorporated. Scrape the sides and smooth the surface so the ganache sits as a single, thick, glossy mass in the same blush-pink bowl , the moment the mixture reads as homogeneous and silky is the key visual milestone.
Step 4: Cool and chill until firm but scoopable
Allow the ganache to cool at room temperature for about 15 minutes, then cover and refrigerate for 1–2 hours (or overnight) until it is firm enough to scoop yet still yielding to a small scoop without cracking. Remove and let the chilled ganache rest for 20–30 minutes at room temperature so it softens slightly and becomes easy to portion.
Step 5: Scoop and shape into smooth truffle centers
Using a small cookie scoop or spoon, portion even balls of ganache onto parchment-lined tray or a silicone mat. Roll each portion briskly between your palms (or on the mat) until round and satin-smooth, then transfer the formed truffles back to the parchment in neat rows, ready for coating or finishing.
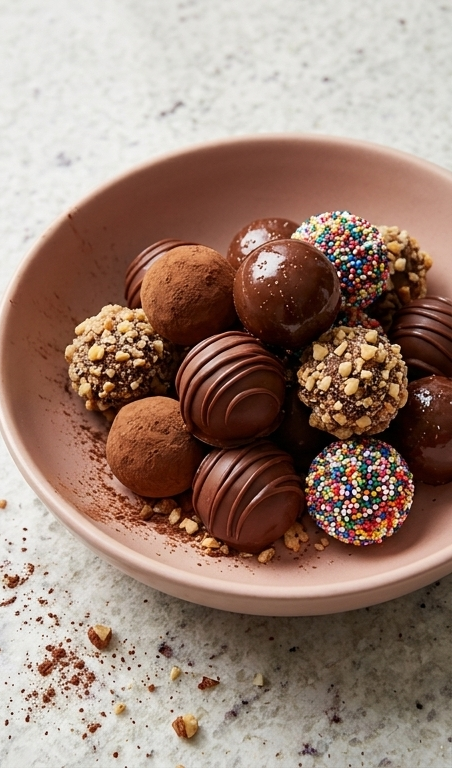
Step 6: Finish with coatings — dusts, nuts, sprinkles
Roll some truffles in cocoa powder for a dry, matte, bittersweet finish; press others into chopped nuts for crunchy texture; and toss a few in colorful sprinkles for contrast and playfulness. Arrange the assortment thoughtfully so each finish reads distinctly: velvety powder, coarse nut fragments, sparkling sugar beads.
Step 7: Optional chocolate coating and drizzle
If coating, gently melt chocolate wafers in short intervals until just smooth and fluid. Using a dipping fork, submerge truffles fully, tap off excess and let them set on parchment. Once set, warm a little more melted chocolate into a piping bag or small corner-cut Ziploc and drizzle thin ribbons over selected truffles, then allow to fully set before serving.
Making It Your Own
I like to think of Chocolate Truffles as a template for flavor play. Try stirring in orange zest and a splash of Grand Marnier for a citrusy twist that brightens the chocolate without overwhelming it. For a nutty regional spin, fold in finely ground pistachios or use chopped almonds for coating. If you want a dairy-free version, use coconut cream and high-quality dark chocolate that is dairy-free; the texture will be slightly different but still luxurious.
For seasonal takes, add a pinch of cinnamon or cardamom for fall, or fold in freeze-dried raspberry powder for a spring-fresh pop. Smaller changes, like swapping toppings, often make the biggest impression when you serve them.
How to Serve
When hosting, present an assortment of Chocolate Truffles on a shallow platter with little labels so guests know their finishes. For a small dinner party, two to three truffles per person is a perfect little finish, while for larger gatherings provide 3 to 5 per guest and arrange them on tiered trays. If you want to create a dessert sampler, pair the truffles with strong coffee or a dessert wine that complements the chocolate.
If gifting, line a small box with parchment and separate layers with tissue so each truffle stays intact. For a plated dessert, serve one truffle alongside a small scoop of vanilla ice cream and a few seasonal berries for contrast.
Storage and Reheating Tips
Store truffles in an airtight container in the refrigerator for up to two weeks; keep layers separated with parchment to prevent sticking. For longer storage, freeze them in a single layer on a tray and then transfer to a sealed container for up to three months.
To thaw, move frozen truffles to the refrigerator overnight, then bring them to room temperature for about 20 to 30 minutes before serving so the centers soften. Avoid reheating in a microwave because that will change the texture; gentle room temperature warming preserves the silky ganache.
Oops Moments and How to Fix Them
If your ganache seizes or looks grainy, warming it gently over a double boiler while stirring often brings it back to smoothness; if that does not work, stir in a little warm cream, one teaspoon at a time. If truffles are too soft to shape, chill them longer until they are firm enough to scoop without flattening.
If coatings look streaky when dipping, ensure your coating chocolate is fully melted and tempered enough for a clean finish, or cool the truffles slightly before dipping. Small experiments will teach you what works best in your kitchen.
Final Thoughts
I hope you give these Chocolate Truffles a try, whether you make a small batch for yourself or a big box to share. They are forgiving, elegant, and endlessly adaptable, and few things feel more rewarding than handing someone a homemade truffle. Enjoy the process, and have fun making them your own.
Frequently Asked Questions.
- Can I use all dark chocolate instead of milk chocolate? Yes, you can use all dark chocolate; using 70% dark will give a more intense, slightly less sweet truffle.
- How long do Chocolate Truffles keep? Stored in the refrigerator in an airtight container, they keep well for up to two weeks, and you can freeze them for up to three months.
- Can I make the ganache ahead of time? Absolutely, you can make ganache a day ahead, chill it until firm, then portion and coat when you are ready.
- What if my ganache is too firm to scoop? Let it sit at room temperature for 20 to 30 minutes to soften, or work in smaller portions so it warms slightly between rolls.
- Do I have to coat the truffles in chocolate? No, coating is optional; rolling in cocoa powder, nuts, or sprinkles is classic and delicious.
Chocolate Truffles
Make Chocolate Truffles now: silky ganache rolled into bite-size delights, simple and elegant.
Ingredients
Instructions
Step 1: Assemble the chocolate and seasonings in a heatproof bowl
Place the finely chopped milk or dark chocolate into a heatproof, shallow matte blush-pink ceramic bowl along with the pinch of sea salt and the optional instant espresso powder scattered on top. Set a small clear glass measuring cup of cold heavy cream, a tiny glass jar of vanilla extract, and trio of tiny ceramic ramekins holding cocoa powder, chopped nuts and colorful sprinkles nearby on the Luna Pearl granite surface. A small stainless spoon rests on the rim of the bowl — ready for the next move.
Step 2: Heat the cream and steep it over the chocolate
Warm the cream gently (microwave at moderate power until very hot but not boiling) then pour it directly into the bowl over the chopped chocolate; leave the mixture completely undisturbed for several minutes so the hot cream softens and begins to melt the chocolate into the bowl, creating a soft, slumped mass with shiny softened fragments at the edges.
Step 3: Stir to form a glossy ganache and flavor it
Use a gentle, steady stirring motion with a small spatula or spoon, coaxing the softened chocolate and cream into a smooth, glossy ganache; stir in the vanilla extract until fully incorporated. Scrape the sides and smooth the surface so the ganache sits as a single, thick, glossy mass in the same blush-pink bowl — the moment the mixture reads as homogeneous and silky is the key visual milestone.
Step 4: Cool and chill until firm but scoopable
Allow the ganache to cool at room temperature for about 15 minutes, then cover and refrigerate for 1–2 hours (or overnight) until it is firm enough to scoop yet still yielding to a small scoop without cracking. Remove and let the chilled ganache rest for 20–30 minutes at room temperature so it softens slightly and becomes easy to portion.
Step 5: Scoop and shape into smooth truffle centers
Using a small cookie scoop or spoon, portion even balls of ganache onto parchment-lined tray or a silicone mat. Roll each portion briskly between your palms (or on the mat) until round and satin-smooth, then transfer the formed truffles back to the parchment in neat rows, ready for coating or finishing.
Step 6: Finish with coatings — dusts, nuts, sprinkles
Roll some truffles in cocoa powder for a dry, matte, bittersweet finish; press others into chopped nuts for crunchy texture; and toss a few in colorful sprinkles for contrast and playfulness. Arrange the assortment thoughtfully so each finish reads distinctly: velvety powder, coarse nut fragments, sparkling sugar beads.
Step 7: Optional chocolate coating and drizzle
If coating, gently melt chocolate wafers in short intervals until just smooth and fluid. Using a dipping fork, submerge truffles fully, tap off excess and let them set on parchment. Once set, warm a little more melted chocolate into a piping bag or small corner-cut Ziploc and drizzle thin ribbons over selected truffles, then allow to fully set before serving.
Notes
- Use high quality chocolate for the best texture and flavor.
- Chill ganache until firm but still scoopable to make shaping easier.
- Separate layers with parchment when storing to prevent sticking.
- If ganache is grainy, stir in a teaspoon of warm cream to smooth it.
- Let truffles come to room temperature for optimal texture before serving.
