Energy Balls are my go-to snack for busy afternoons and early-morning hikes. I started making Energy Balls years ago when I wanted something that travelled well, tasted like a treat, and still kept me fueled; they quickly became a constant in my fridge. The mix of peanut butter, oats, and honey creates a comforting, chewy bite that somehow feels both indulgent and wholesome. If you want a no-bake, grab-and-go snack that holds up under real life, these Energy Balls are exactly that.
How This Recipe Became My Rainy-Day Favorite
There was one rainy Saturday when I first mixed these Energy Balls that I still remember. The house smelled warm and nutty, the rain pattering against the windows, and I pressed the sticky mixture into neat little spheres while a playlist of old favorites hummed in the background. Rolling each ball felt oddly meditative, and when I tasted the first one it was like a small celebration: crunchy rice bits, pops of coconut, gooey chocolate chips, and the familiar comfort of peanut butter and honey. I packed a few into a tin for later and discovered they were the perfect companion for brisk walks and late-afternoon work sessions. That rainy-day ritual turned into a habit, and now Energy Balls are the thing I make when I want simple comfort and reliable energy in one bite.
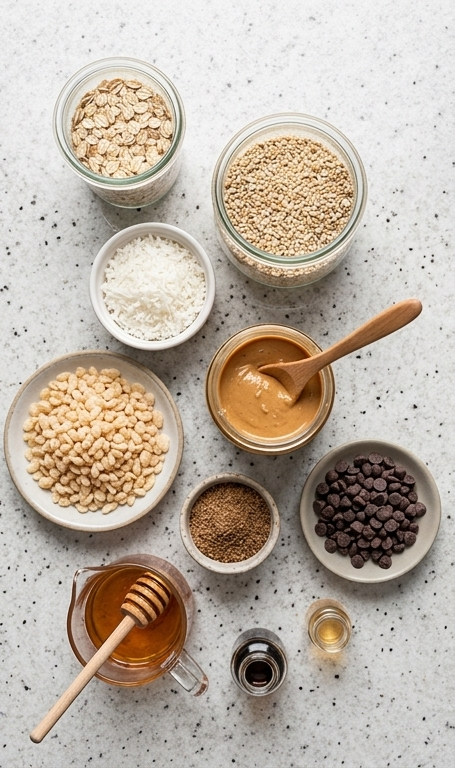
The Ingredients That Make These Energy Balls Sing
- Old-Fashioned Rolled Oats: Provide chew and body; substitute with quick oats for a softer texture. Choose whole, unflavored oats for the best mouthfeel.
- Steel Cut Oats: Add extra chew and a nutty note; if unavailable, use more rolled oats or quick oats and expect a slightly different texture.
- Shredded Sweetened Coconut: Brings buttery sweetness and a tropical lift; unsweetened coconut will reduce sugar.
- Crispy Rice Cereal: Gives crunch and lightness; swap for crushed rice chex or puffed quinoa for a gluten-free option.
- Peanut Butter: The binding superstar and flavor anchor; almond or cashew butter works for a different nutty profile.
- Ground Flaxseed: Adds fiber and helps bind; chia seed meal is a fine substitute.
- Chocolate Chips: Pockets of sweetness and texture; use chopped dark chocolate or cacao nibs for less sugar.
- Honey: Natural sweetener and binder; maple syrup works for a vegan swap, but expect a looser mix.
- Vanilla Extract: Brightens flavors; omit or replace with a pinch of cinnamon for a twist.
Essential Kitchen Tools
Start with a couple of basics and you are set. You do not need a fancy setup to make these Energy Balls, but the right tools make the job faster and cleaner.
- Large mixing bowl: Essential for tossing everything together without making a mess; a wide bowl gives you more surface area to work.
- Sturdy wooden spoon or flexible spatula: For folding the mixture; a silicone spatula helps scrape the bowl clean.
- Measuring cups and spoons: Accurate dry and wet measures keep the texture consistent from batch to batch.
- Small scoop or tablespoon: Makes uniform balls and speeds up the rolling process.
- Plastic wrap and refrigerator: Chilling firms the mixture so it rolls cleanly; a flat tray helps with chilling.
- Airtight container: For storage; glass or BPA-free plastic both work fine.
Step-by-Step Preparation Guide
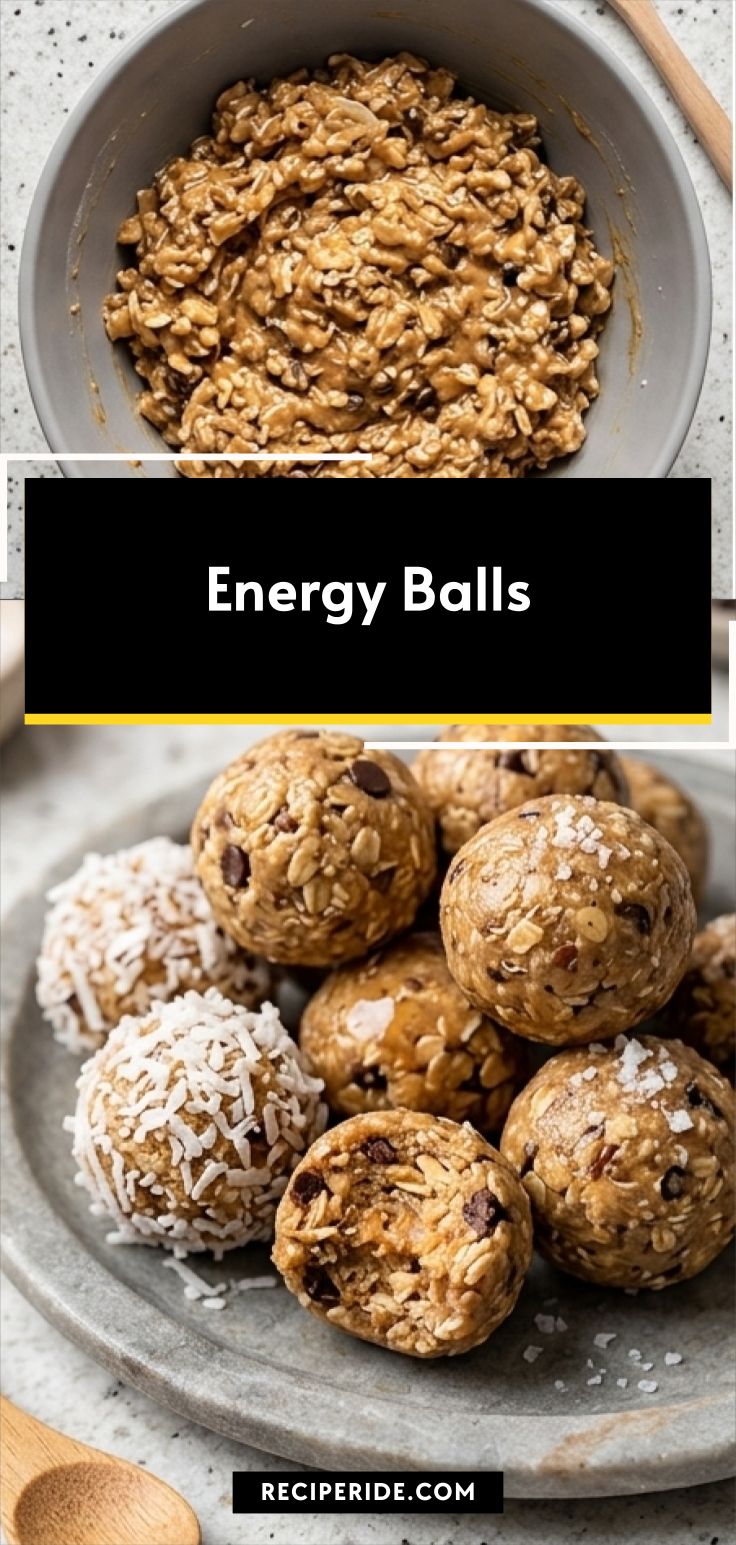
Step 1: Combine everything in a large bowl
In a large mixing bowl, add the rolled oats, steel-cut oats, shredded sweetened coconut, crispy rice cereal, ground flaxseed, chocolate chips, peanut butter, honey and vanilla. Use a sturdy wooden spoon or flexible spatula to fold the ingredients together until everything is evenly distributed and the mixture becomes uniformly sticky — you should see a glossy peanut-butter-and-honey sheen coating the oats and chocolate chips, with distinct flakes of coconut and crunchy rice pieces suspended throughout.
Step 2: Check texture and adjust the bind
If the mixture feels too dry or crumbly, fold in an extra tablespoon or two of nut butter or a drizzle more honey until the mass clumps when pressed; if it becomes too wet, add a handful of oats or ground flax to firm it up. The goal is a cohesive, tuckable texture — chunky and dense, with visible pockets of crispy rice and scattered chocolate chips, and a slightly tacky surface that holds shape.

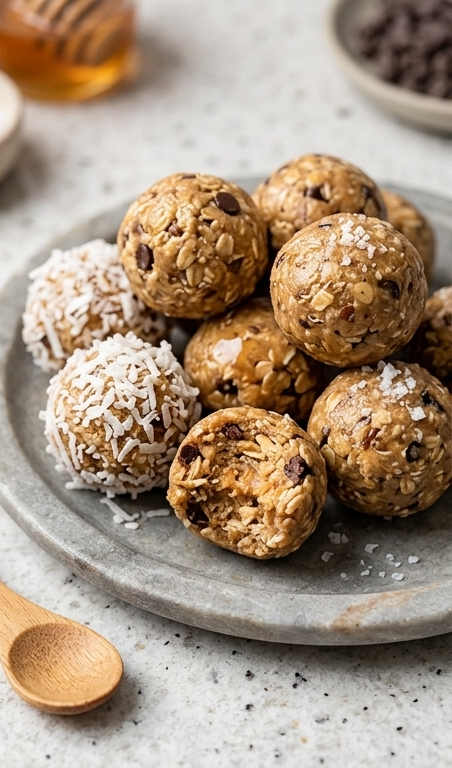
Step 3: Chill and form into balls
Press plastic wrap onto the surface, refrigerate the bowl for at least 1 hour to fully firm the mixture, then scoop generous tablespoons and roll into tight 1–2 inch balls using slightly damp hands (or a small scoop). Arrange the finished spheres on a platter or tray, optionally finishing a few with a light sprinkle of coarse sea salt or by rolling others in extra shredded coconut to create textural variety.
Step 4: Store and customize
Transfer the energy balls into an airtight container and keep refrigerated for up to two weeks depending on ingredient freshness. Feel free to fold in add-ins during mixing — chopped almonds, raisins, or chopped dried fruit are all welcomed variations that change texture and flavor while preserving the same binding method.
Making It Your Own
I treat each batch of Energy Balls like a small experiment. One week I swap peanut butter for almond butter and toss in dried cherries for a tart contrast. Another time I stir in a spoonful of cocoa powder and swap milk chocolate chips for dark to make a more grown-up version.
For a seasonal twist, add pumpkin spice and chopped toasted pepitas in autumn, or fold in lemon zest with white chocolate chips for a springy lift. If you need a vegan or allergy-friendly option, use sunflower seed butter, maple syrup, and ensure the cereal is gluten-free.
Small changes change the experience: a few chopped nuts make them more substantial, while extra coconut gives a chewier, tropical vibe.
How to Serve
Think of Energy Balls as party-friendly nibbles that are easy to scale. For a casual coffee brunch, arrange them on a wooden board with fresh fruit, yogurt cups, and a pot of strong coffee so guests can help themselves.
For a dinner-party dessert tray, place 3-4 Energy Balls per person beside small ramekins of whipped coconut cream and a scattering of chopped toasted nuts. If you are serving a larger crowd, double or triple the batch and present them in nested bowls or compostable cupcake liners for easy grabbing.
To adjust serving sizes, offer 1 ball for a light snack or 2 to 3 balls as a more filling treat depending on your guests’ appetite.
Storage and Reheating Tips
Keep Energy Balls refrigerated in an airtight container and they will stay fresh for up to two weeks. If you want to freeze them, layer parchment between rows and store in a freezer-safe container for up to three months.
To refresh chilled or frozen Energy Balls, let them sit at room temperature for 10 to 15 minutes so they soften slightly. I do not recommend microwaving, since that can make the chocolate too melty and change the texture.
Common Mistakes to Avoid
The most common slip is adding too much liquid. If you overdo the honey or nut butter, the mixture gets sticky and hard to handle. Counter this with extra oats or flax.
Another misstep is skipping the chill. Trying to roll warm mixture results in misshapen balls and a sticky mess. Give the bowl its hour in the fridge and rolling becomes quick and tidy.
Ready to Roll?
If you are looking for a reliable, no-bake snack that travels and tastes like a treat, give these Energy Balls a try. They are forgiving, quick to make, and endlessly adaptable, so start with the base recipe and make it yours. I promise you will reach for these Energy Balls time and again.
Frequently Asked Questions.
- Can I make Energy Balls without peanut butter? Yes. Swap peanut butter for almond, cashew, or sunflower seed butter and the binding works the same way.
- How long do Energy Balls keep? Stored in an airtight container in the fridge they keep up to two weeks; freeze for longer storage up to three months.
- Can I make them nut-free? Absolutely. Use sunflower seed butter and check that your cereal and mix-ins are nut-free.
- Are Energy Balls suitable for meal prep? Yes. They are excellent for meal prep and make a great pre- or post-workout snack.
- Can I change the sweetness level? Yes. Reduce the chocolate chips or use unsweetened coconut and swap honey for a milder sweetener like agave or maple syrup.
Energy Balls
Make Energy Balls fast: whip up no-bake, protein-packed Energy Balls for snacks or lunchbox treats.
Ingredients
Instructions
Step 1: Combine everything in a large bowl
In a large mixing bowl, add the rolled oats, steel-cut oats, shredded sweetened coconut, crispy rice cereal, ground flaxseed, chocolate chips, peanut butter, honey and vanilla. Use a sturdy wooden spoon or flexible spatula to fold the ingredients together until everything is evenly distributed and the mixture becomes uniformly sticky — you should see a glossy peanut-butter-and-honey sheen coating the oats and chocolate chips, with distinct flakes of coconut and crunchy rice pieces suspended throughout.
Step 2: Check texture and adjust the bind
If the mixture feels too dry or crumbly, fold in an extra tablespoon or two of nut butter or a drizzle more honey until the mass clumps when pressed; if it becomes too wet, add a handful of oats or ground flax to firm it up. The goal is a cohesive, tuckable texture — chunky and dense, with visible pockets of crispy rice and scattered chocolate chips, and a slightly tacky surface that holds shape.
Step 3: Chill and form into balls
Press plastic wrap onto the surface, refrigerate the bowl for at least 1 hour to fully firm the mixture, then scoop generous tablespoons and roll into tight 1–2 inch balls using slightly damp hands (or a small scoop). Arrange the finished spheres on a platter or tray, optionally finishing a few with a light sprinkle of coarse sea salt or by rolling others in extra shredded coconut to create textural variety.
Step 4: Store and customize
Transfer the energy balls into an airtight container and keep refrigerated for up to two weeks depending on ingredient freshness. Feel free to fold in add-ins during mixing — chopped almonds, raisins, or chopped dried fruit are all welcomed variations that change texture and flavor while preserving the same binding method.
Notes
- Chill the mixture for at least 1 hour to make rolling easier.
- Adjust texture with extra oats or nut butter to get the perfect bind.
- Freeze in single layers with parchment for up to 3 months.
- Use a small scoop for uniform sized balls and quicker assembly.
- For nut-free versions, substitute sunflower seed butter and check all labels.
