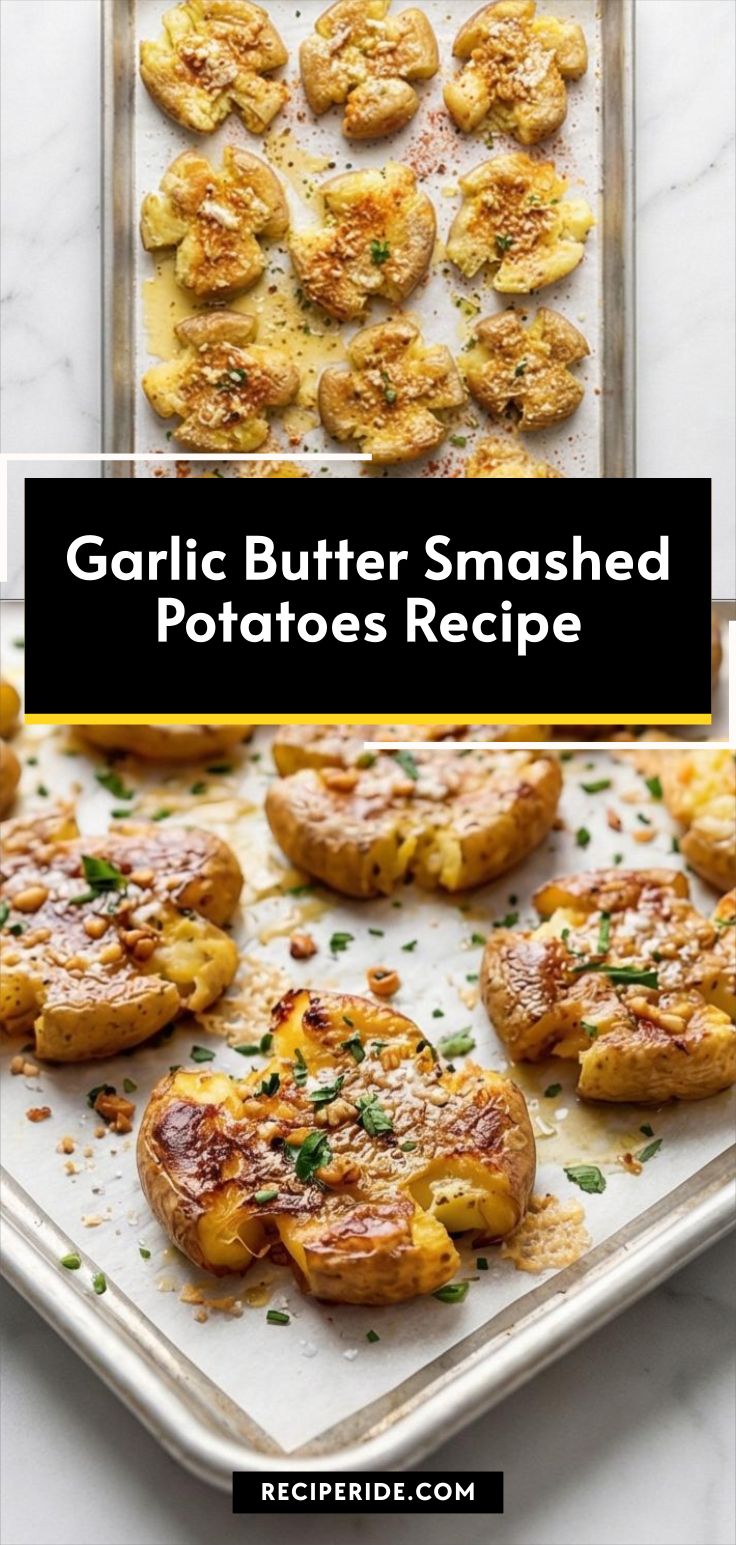
Garlic Butter Smashed Potatoes Recipe is the kind of thing I make when I want something comforting, crunchy, and impossibly simple. I first learned this riff years ago and it quickly became a weekend staple in my kitchen; the smell of garlic and butter roasting in the oven feels like an instant hug. I love how the potatoes get perfectly crisp edges while staying pillowy inside, and the recipe is forgiving enough to jazz up on a whim. If you like bold but homey flavors, this Garlic Butter Smashed Potatoes Recipe will become a go-to for weeknights and dinner parties alike.
I still remember the first time I brought the Garlic Butter Smashed Potatoes Recipe to a potluck; the sheet pan arrived empty and the compliments never stopped. The recipe is deeply tied to an evening when rain tapped the windows and friends gathered around a low table. The potatoes roasted long enough to give the kitchen that golden, nutty aroma; I kept brushing them with garlicky butter and watching edges blister into small, crisp islands. The texture was the star that night, the way a fork met crunchy flakes and fluffy centers in one bite. Each small potato felt like an invitation to slow down: hot steam, flecks of parsley, a light sprinkle of flaky salt, and that communal pleasure of passing the baking sheet between hands. It still makes me nostalgic and glad to share.
The Ingredients That Make the Magic
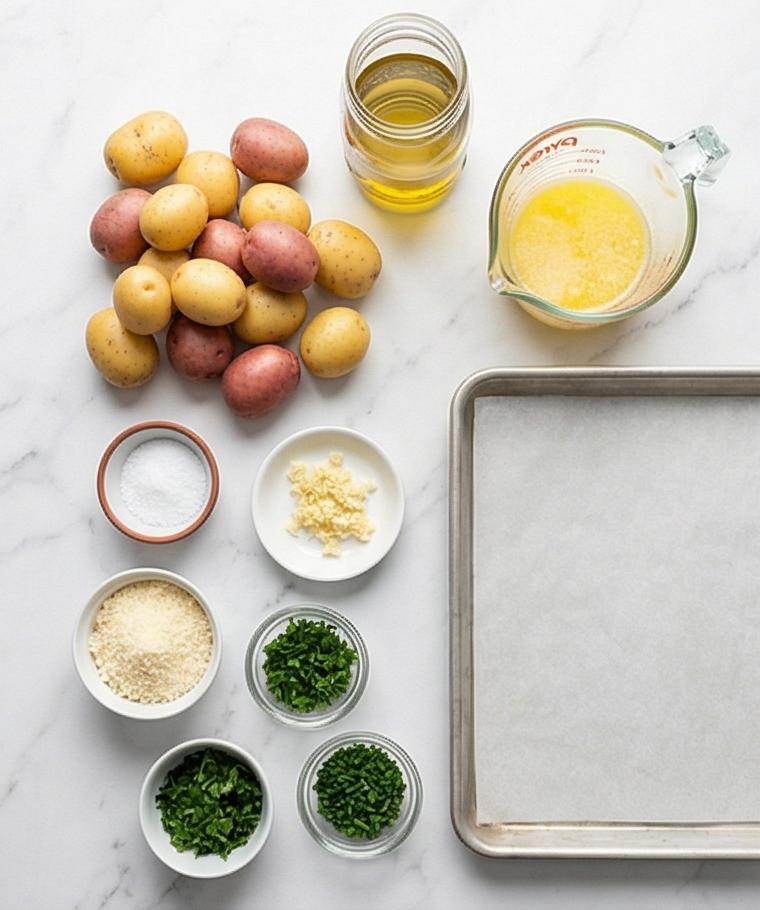
- 2 pounds small yellow or red baby potatoes: The heart of the dish; choose firm, evenly sized babies so they cook at the same rate. Yukon Gold or small red potatoes work well. If you need a substitute, try fingerlings parted into similar sizes.
- Unsalted butter and extra-virgin olive oil: Butter brings richness and oil helps with browning; ghee or a neutral oil can work in place of butter for a dairy-free option.
- Garlic: Fresh cloves give the brightest, most aromatic flavor; garlic powder is a last-resort swap.
- Kosher salt, black pepper, smoked paprika and dried herbs: Salt and pepper are essential; smoked paprika adds color and subtle smoke. Use thyme if you don’t have an Italian blend.
- Fresh parsley, optional Parmesan and chives: Herbs finish the dish with brightness; grated Parmesan adds crisp, toasty pockets on top.
Essential Kitchen Tools
Start with a short list of reliable tools and you’ll be amazed how smooth the process feels. Each tool helps get the potatoes evenly cooked and perfectly smashed.
- Large rimmed baking sheet: Wide surface area means space between potatoes and better crisping; use two sheets if you want to roast more.
- Parchment paper: Keeps cleanup easy and preserves the crispy bottoms; a silicone mat is an alternative.
- Large pot and colander: For boiling; make sure the pot is big enough so the potatoes can move freely.
- Flat-bottomed glass or measuring cup: For smashing; a sturdy metal spoon works, but the glass gives an even press.
- Basting brush or spoon and metal spatula: To coat and flip the potatoes; tongs can substitute for flipping. A small whisk helps emulsify the butter and oil mix.
Step-by-Step Preparation Guide
Step 1: Preheat and ready the baking sheet
Preheat the oven to 425°F (220°C) and line a large rectangular rimmed baking sheet with a single sheet of parchment paper; this is your primary roasting vessel and will carry through to the final presentation. Make sure the parchment lies flat with a small neat fold at the edges so the potatoes can sit in a single layer. The sheet should be clean and empty on the Carrara marble surface while you finish the other tasks; think of it as a neutral stage awaiting the smashed potatoes.
Step 2: Boil the potatoes until fork-tender
Place the scrubbed small baby potatoes into a pot, cover with cold water and a tablespoon of kosher salt, and bring to a gentle boil until each potato is easily pierced from stem to skin with a fork (about 15–20 minutes). Once very tender, drain the potatoes thoroughly in a colander and let them rest for a few minutes so surface steam dissipates, this brief drying makes the skins ready to crisp when roasted. The potatoes should look plump, intact, and just-yielding, with smooth skins and tiny droplets of steam lifting off.
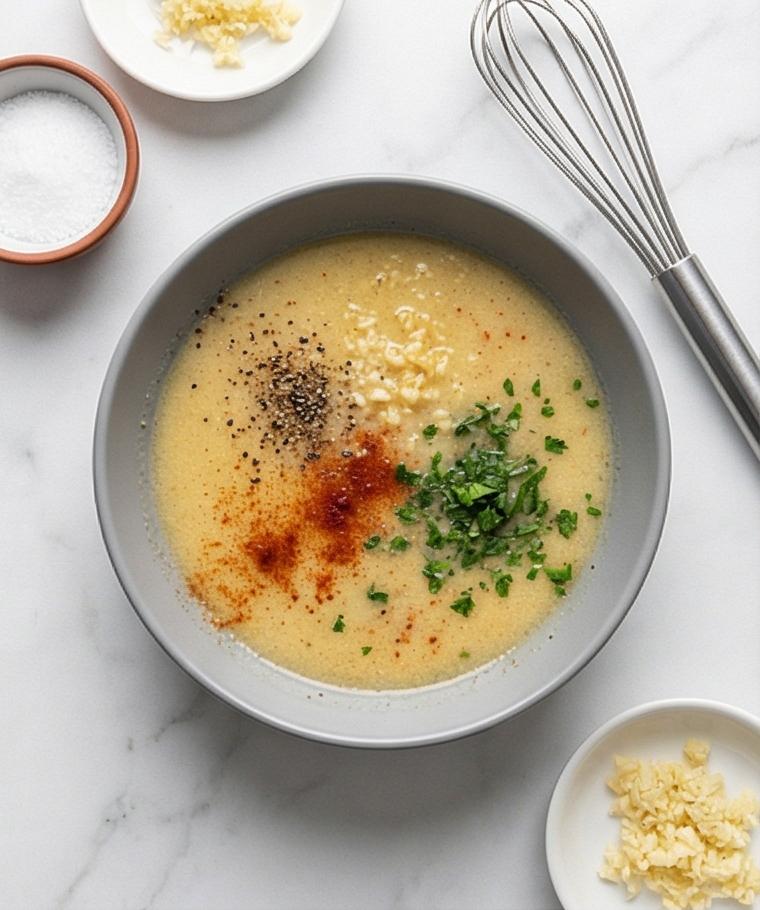
Step 3: Whisk the garlic butter mixture and herbs
In a medium matte grey ceramic bowl whisk together the slightly cooled melted butter and extra-virgin olive oil until they glide together into a silky, glossy emulsion. Stir in the finely minced garlic, the remaining 1/2 tablespoon kosher salt, black pepper, smoked paprika if using, dried Italian herbs, and the finely chopped fresh parsley; the mixture should be pale gold with tiny suspended flecks of green and darker garlic specks. Set the whisk resting on the bowl rim so it reads as an active tool but remains cleanly placed on the marble.
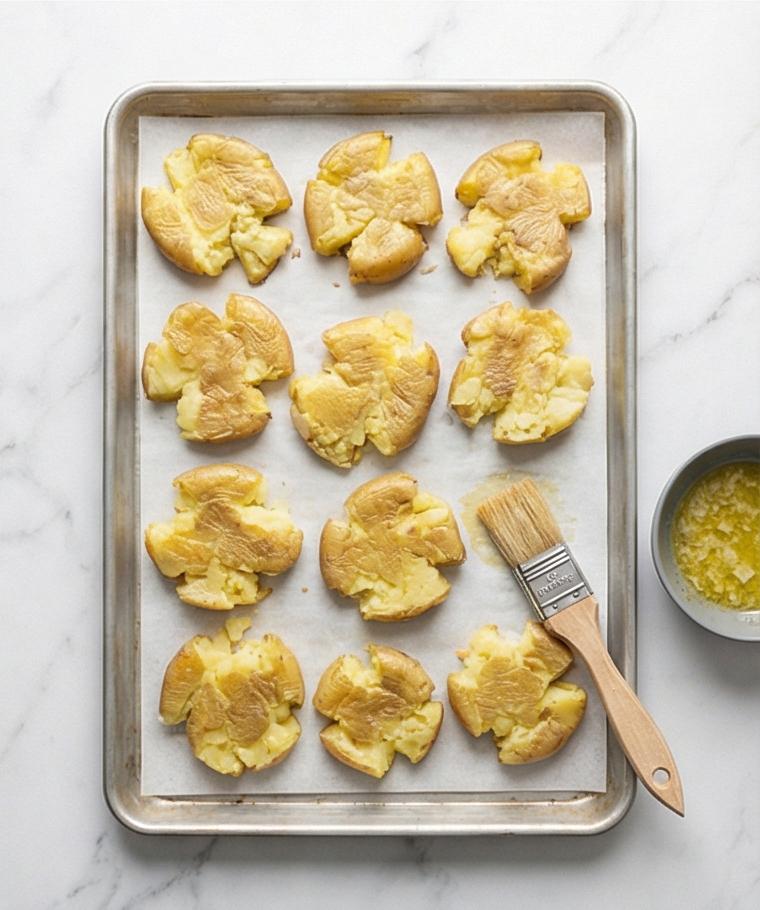
Step 4: Drain, space out, and smash the potatoes on the sheet
Transfer the drained, slightly drier potatoes onto the prepared rectangular baking sheet, spaced so each potato has room to spread when smashed. Use the flat bottom of a sturdy drinking glass or a flat measuring cup to press down each potato until it flattens to roughly 1/2 inch (about 1.25 cm), keeping the interior intact while producing many broken, craggy edges. The smashed tops should show exposed fluffy interiors contrasted against wrinkled, torn skins and fissured edges that will crisp beautifully. A clean flat glass sits nearby as the smashing instrument.

Step 5: Coat both sides with garlic butter, tuck herbs into crevices
Spoon and brush about half of the garlic butter over the smashed potatoes so the pale-gold liquid pools into the crevices and settles on the exposed flesh; flip the potatoes carefully with a metal spatula so the undersides catch the remaining buttery-herb mixture, ensuring every surface is evenly glossed. The garlic bits and parsley should be visible in the nooks, clinging to torn edges and pooling slightly on the parchment. Keep a small bowl with the remaining sauce and a natural-bristled basting brush resting on the sheet — utensils remain present but tidy.
Step 6: Roast to deep golden crispness, add Parmesan and finish
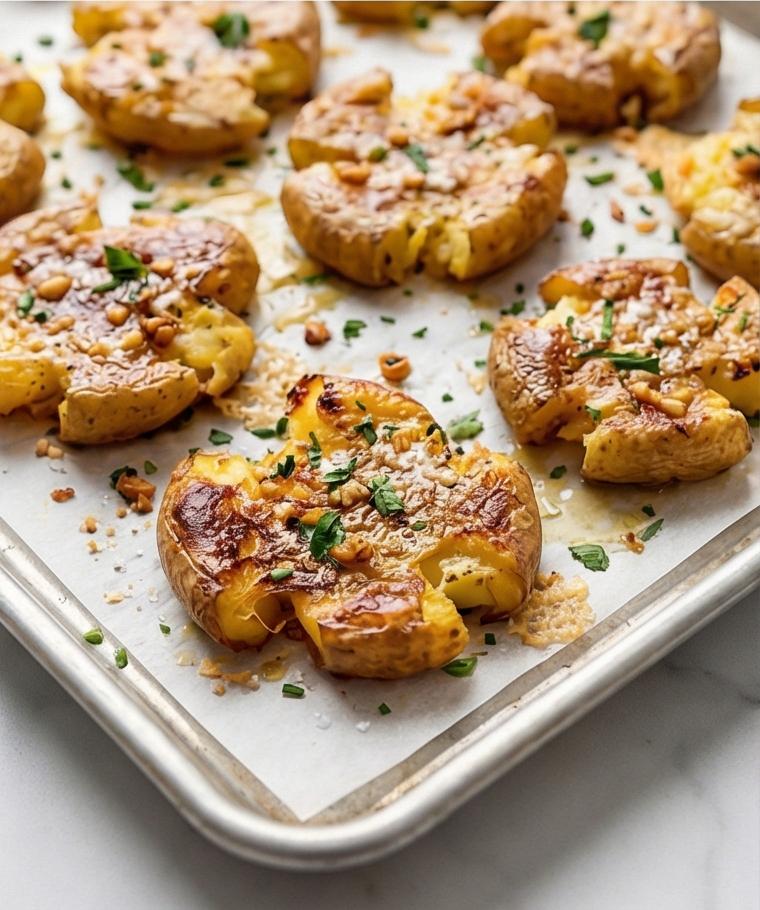
Place the coated sheet aside to be moved to the preheated oven (we only document the result). The finished roasted result on the same rectangular baking sheet should present potatoes deeply golden on the exposed ridges, edges blistered and caramelized to a complex bronze, interior flesh pillowy and tender. If using Parmesan, it will be evenly sprinkled and melted into pale golden lace and tiny toasted pockets. Immediately after roasting, scatter flaky sea salt, extra chopped parsley and optional chives for bright contrast and transfer the sheet to a warm spot on the marble — the potatoes should look ultra-crisp at the edges and buttery within.
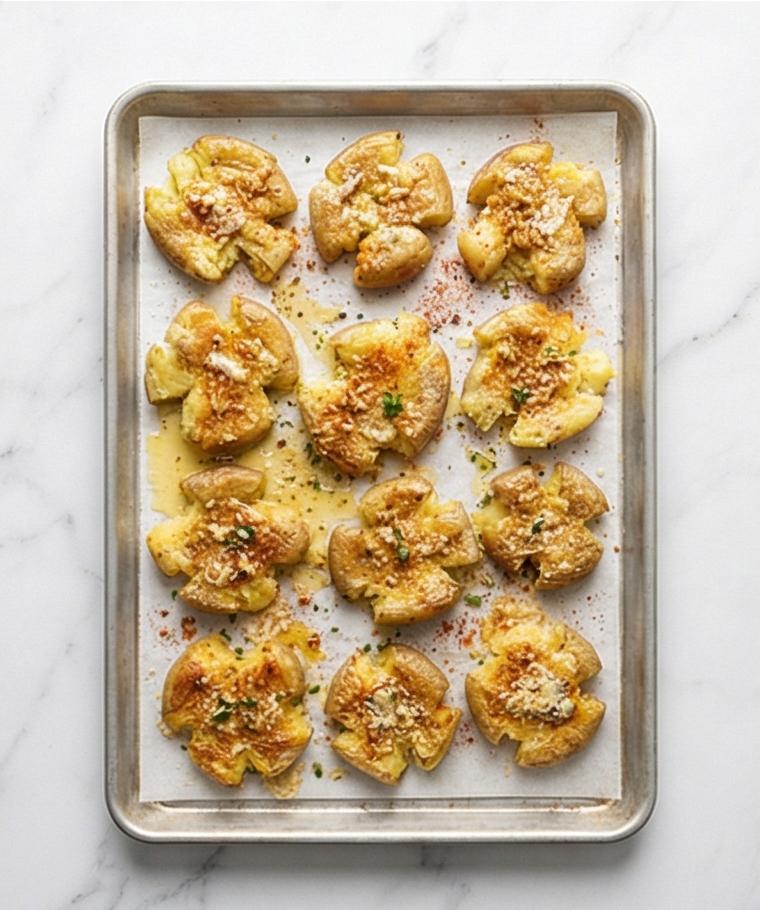
Step 7: Serve straight from the roasting vessel, hot and crisp
Transfer and arrange the final garlic butter smashed potatoes on the same rectangular rimmed baking sheet for serving, keeping the geometry and crisp edges intact. The dish should glisten with melted butter, show visible garlic fragments and herb flecks, have a sprinkling of flaky sea salt and a light dusting of grated Parmesan where used. Present the sheet close to eye-level for an intimate, very-close-up view that celebrates texture: crunchy torn edges, glossy herb-speckled surfaces, and soft, steaming interiors.
Making It Your Own
I like to experiment with flavors depending on the season. In early fall I add a pinch more smoked paprika and a dusting of chili flakes for warmth; in spring I swap out parsley for tarragon or dill for a fresher finish. For a vegetarian boost try adding a scattering of toasted pine nuts and a drizzle of lemony yogurt when serving.
For a dairy-free version, replace butter with melted coconut oil or a high-heat neutral oil and leave off the Parmesan. If you want a heartier, more savory version, toss in halved baby onions with the potatoes during boiling, or after roasting add roasted garlic cloves mashed into the flesh for a mellow sweetness.
How to Serve
Think about plates, timing, and complementary dishes when serving guests. For a casual dinner, present the Garlic Butter Smashed Potatoes Recipe straight on a warm rimmed baking sheet, letting people help themselves; keep lemon wedges and extra flaky sea salt nearby so everyone can finish to taste. For a composed dinner, place a few potatoes alongside grilled protein and a bright salad, scattering chives and a final shower of Parmesan.
To scale up, roast on two sheets rather than crowding one; if you need to keep the potatoes warm while finishing mains, slide the sheet into a low oven set to 200°F (95°C) for short holds. For finger-food service, offer small forks and napkins and arrange the potatoes in staggered rows for a pretty, shareable platter.
Storage and Reheating Tips
Leftovers keep well and reheat beautifully if you want to regain crispness. Store cooled potatoes in an airtight container in the refrigerator for up to 3 days. When you reheat, a hot oven or a skillet will bring back the edges; avoid the microwave if you care about texture.
To re-crisp, heat oven to 400°F (200°C) and spread the potatoes in a single layer on a baking sheet until warmed through and crisped, about 8 to 12 minutes. Alternatively, pan-fry gently in a bit of oil over medium-high heat to refry the edges and refresh the buttery garlic flavor.
Common Mistakes and How to Avoid Them
One easy mistake is overcrowding the baking sheet, which leads to steaming not crisping. Give the potatoes space so air and heat can circulate; use a second sheet if needed. Another misstep is under-drying the boiled potatoes before smashing; let them sit briefly after draining so surface moisture evaporates and the skins will crisp.
Don’t skip the seasoning or skimp on fresh herbs at the end, they add lift and contrast. If your garlic is too coarse, it can burn while roasting, so mince finely and distribute the butter mixture evenly. Taste as you go and adjust seasoning after roasting for the best balance.
Final Thoughts
I hope you give this Garlic Butter Smashed Potatoes Recipe a try soon, whether for a cozy family dinner or a lively gathering. It’s approachable, quick, and endlessly adaptable, and I find it’s one of those recipes that keeps surprising guests with how much flavor a few simple ingredients can produce. Enjoy the crunch and the comfort.
Frequently Asked Questions.
- What type of potatoes are best for this recipe? I prefer small Yukon Gold or red baby potatoes because they have thin skins and creamy centers that crisp beautifully.
- Can I make these ahead of time? Yes, you can boil and refrigerate the potatoes a day ahead; smash and roast when you are ready to serve for best texture.
- How do I keep them crispy after cooking? Serve immediately on a warm sheet and sprinkle with flaky sea salt just before serving; reheat in a hot oven if needed to restore crispness.
- Can I freeze leftover smashed potatoes? Freezing is not ideal because texture changes; refrigeration for up to 3 days is best and then reheat in the oven or skillet.
- What can I serve with Garlic Butter Smashed Potatoes Recipe? They pair wonderfully with roasted chicken, grilled steak, a green salad, or roasted vegetables.
Garlic Butter Smashed Potatoes Recipe
Make Garlic Butter Smashed Potatoes Recipe for ultra-crisp, garlicky potatoes perfect for weeknight dinners.
Ingredients
Instructions
Step 1: Preheat and ready the baking sheet
Preheat the oven to 425°F (220°C) and line a large rectangular rimmed baking sheet with a single sheet of parchment paper; this is your primary roasting vessel and will carry through to the final presentation. Make sure the parchment lies flat with a small neat fold at the edges so the potatoes can sit in a single layer. The sheet should be clean and empty on the Carrara marble surface while you finish the other tasks; think of it as a neutral stage awaiting the smashed potatoes.
Step 2: Boil the potatoes until fork-tender
Place the scrubbed small baby potatoes into a pot, cover with cold water and a tablespoon of kosher salt, and bring to a gentle boil until each potato is easily pierced from stem to skin with a fork (about 15–20 minutes). Once very tender, drain the potatoes thoroughly in a colander and let them rest for a few minutes so surface steam dissipates — this brief drying makes the skins ready to crisp when roasted. The potatoes should look plump, intact, and just-yielding, with smooth skins and tiny droplets of steam lifting off.
Step 3: Whisk the garlic butter mixture and herbs
In a medium matte grey ceramic bowl whisk together the slightly cooled melted butter and extra-virgin olive oil until they glide together into a silky, glossy emulsion. Stir in the finely minced garlic, the remaining 1/2 tablespoon kosher salt, black pepper, smoked paprika if using, dried Italian herbs, and the finely chopped fresh parsley; the mixture should be pale gold with tiny suspended flecks of green and darker garlic specks. Set the whisk resting on the bowl rim so it reads as an active tool but remains cleanly placed on the marble.
Step 4: Drain, space out, and smash the potatoes on the sheet
Transfer the drained, slightly drier potatoes onto the prepared rectangular baking sheet, spaced so each potato has room to spread when smashed. Use the flat bottom of a sturdy drinking glass or a flat measuring cup to press down each potato until it flattens to roughly 1/2 inch (about 1.25 cm), keeping the interior intact while producing many broken, craggy edges. The smashed tops should show exposed fluffy interiors contrasted against wrinkled, torn skins and fissured edges that will crisp beautifully. A clean flat glass sits nearby as the smashing instrument.
Step 5: Coat both sides with garlic butter, tuck herbs into crevices
Spoon and brush about half of the garlic butter over the smashed potatoes so the pale-gold liquid pools into the crevices and settles on the exposed flesh; flip the potatoes carefully with a metal spatula so the undersides catch the remaining buttery-herb mixture, ensuring every surface is evenly glossed. The garlic bits and parsley should be visible in the nooks, clinging to torn edges and pooling slightly on the parchment. Keep a small bowl with the remaining sauce and a natural-bristled basting brush resting on the sheet — utensils remain present but tidy.
Step 6: Roast to deep golden crispness, add Parmesan and finish
Place the coated sheet aside to be moved to the preheated oven (we only document the result). The finished roasted result on the same rectangular baking sheet should present potatoes deeply golden on the exposed ridges, edges blistered and caramelized to a complex bronze, interior flesh pillowy and tender. If using Parmesan, it will be evenly sprinkled and melted into pale golden lace and tiny toasted pockets. Immediately after roasting, scatter flaky sea salt, extra chopped parsley and optional chives for bright contrast and transfer the sheet to a warm spot on the marble — the potatoes should look ultra-crisp at the edges and buttery within.
Step 7: Serve straight from the roasting vessel, hot and crisp
Transfer and arrange the final garlic butter smashed potatoes on the same rectangular rimmed baking sheet for serving, keeping the geometry and crisp edges intact. The dish should glisten with melted butter, show visible garlic fragments and herb flecks, have a sprinkling of flaky sea salt and a light dusting of grated Parmesan where used. Present the sheet close to eye-level for an intimate, very-close-up view that celebrates texture: crunchy torn edges, glossy herb-speckled surfaces, and soft, steaming interiors.
Notes
- Boil potatoes until fork-tender, about 15 to 20 minutes.
- Let drained potatoes dry briefly before smashing to ensure crisp edges.
- Reheat in a hot oven or skillet to restore crunch, avoid microwaving to preserve texture.
