Cold Brew Coffee feels like a slow hug on a hectic morning, and I make a jar every week. I learned to love Cold Brew Coffee because it mellows my favorite beans into something soft and syrupy, perfect for lazy breakfasts or a quick iced afternoon pick-me-up. The simplicity is the charm: good beans, clean water, patience. Over time I’ve tuned the ratios and learned how small tweaks change the personality of the brew, and that’s part of the fun.
How This Recipe Became My Slow-Morning Ritual
I remember the first time I made Cold Brew Coffee at home: it was a rainy Saturday and I wanted something bold but gentle. The air filled with the toasted scent of freshly ground beans, and the kitchen felt like a tiny cafe. Waiting through the quiet steep felt oddly meditative, like giving the day permission to start slowly. The first sip was velvet and surprising, less acidic than I expected and sweeter in the back of my throat. That mellow richness became my new standard for weekend mornings and late-night writing sessions. I still reach for this method when I want a reliable, smooth cup that feels like a small, deliberate treat.
The Main Ingredients and Why They Matter
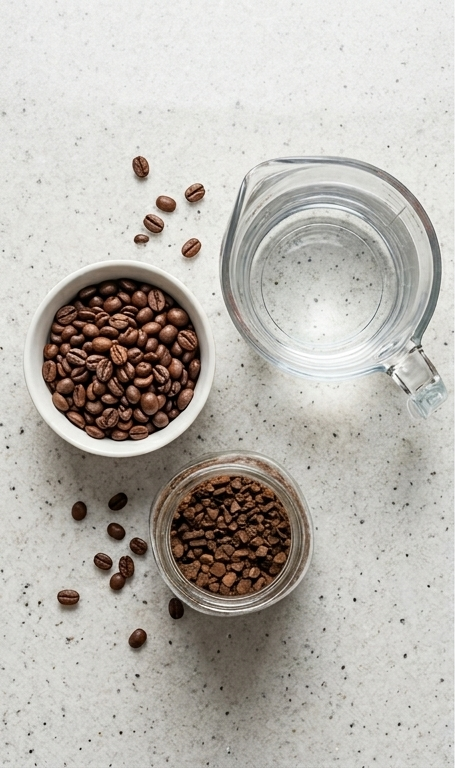
- Whole Coffee Beans: The star ingredient. Fresh whole beans give brightness and aroma that preground coffee loses quickly. Choose a medium to dark roast for deeper chocolate notes or a bright medium roast for more citrus and floral highlights. Substitute with any quality single-origin or blend you like, but avoid oily beans that can gum up filters.
- Cold Water: The carrier for extraction. Use filtered or spring water for clarity and to avoid off flavors; the water’s mineral content affects extraction subtly. Tap works in many places, but if your tap tastes off, switch to bottled or filtered water.
Essential Kitchen Tools You’ll Want
A short list of simple tools makes consistent cold brew easy and enjoyable. Each tool matters because it either protects flavor or makes the process cleaner.
- Coffee Grinder: A burr grinder is ideal for even, coarse grounds. If you don’t have one, pulse whole beans in a food processor but watch the texture.
- Mason Jars or Large Pitcher: Glass is best for neutral flavor and easy storage; jars make shaking and sealing simple.
- Fine Mesh Sieve + Filter or Nut-Milk Bag: These remove sediment for a clear concentrate. Paper filters or a clean cloth are fine substitutes.
- Spoon or Spatula: For gentle folding to hydrate grounds evenly.
Step-by-Step Preparation Guide
Step 1: Grind the coffee
Warm your grinder or food processor and pulse whole beans to a coarse, even grind — think chunky sea-salt sized particles rather than flour. Aim for the texture that still shows fractured bean surfaces and a little irregularity; this coarse texture gives a clean, smooth cold brew with minimal sediment. A quick note while you grind: one cup of whole beans yields roughly a cup-and-a-quarter of coarse grounds, so stop when you see a loose, fluffy pile of uneven, fragrant particles.
Step 2: Combine grounds and water
Spoon the coarse grounds into one or two wide-mouth mason jars so they sit loosely and can be fully saturated. Pour cold water evenly over the grounds — gently fold or stir once with a clean spoon so all the grounds are hydrated and there are no dry pockets. The result should be a matte, saturated mass of coffee grounds suspended in water with small surface ripples and a few floating particles, not a foamy or vigorously mixed mixture.
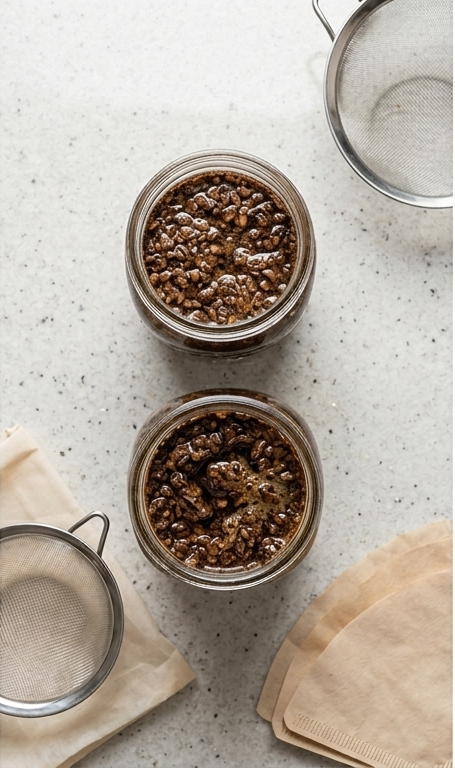
Step 3: Seal, shake, and chill
Seal the jars, give each a firm few shakes to ensure any trapped pockets of dry grounds are incorporated, then set them upright in the refrigerator to steep for about 24 hours. After sealing the surface will show a slightly darker, diffuse bloom where the coffee solubles begin to migrate into the water — a quiet, even extraction rather than an active boil or foam.
Step 4: Strain the steeped concentrate
After refrigeration, strain the dark, viscous concentrate through a fine mesh lined with a coffee filter or through a nut-milk bag until the liquid runs clear; the wet grounds should collapse into a damp, crumbly pile you can compost. The strained concentrate should be glossy, deep mahogany-brown and free of visible grit, with a few tiny suspended bubbles that settle slowly.
Step 5: Transfer and taste-adjust
Pour the filtered concentrate back into one of the clean mason jars you used overnight (rinse it first if you like), sealing it for storage. Taste the concentrate over ice — dilute with cold water or your preferred milk to soften intensity. The texture will be syrupy but pourable; when diluted it becomes velvety and very smooth.
Step 6: Serve cold over ice
Fill tall clear glasses with lots of irregular, jagged ice cubes, then pour the cold brew concentrate so it cascades and clinks around the ice, creating a visible stream, small rising bubbles, and a thin line of condensation on the glass. Serve immediately, optionally with a splash of milk or water to taste for a beautifully dark, cooling beverage.

Making It Your Own
Try small experiments to find your favorite balance. Add cinnamon or a star anise pod to the jar before steeping for a warm, spiced note. For a creamy twist, steep with a few strips of orange peel and finish with oat milk for a citrusy, dairy-free latte.
If you like a brighter cup, reduce steep time by a few hours and use a slightly lighter roast. To make a concentrate with less intensity, increase water by about 25 percent. For a sweetened ready-to-serve option, stir in a tablespoon of simple syrup before refrigerating the jar.
For a diet-friendly version, dilute more with water or use unsweetened almond milk. Regional twists like adding cardamom for a Middle-Eastern flair or a dash of toasted coconut for tropical notes are fun and easy.
How to Serve
When hosting, offer a tiny tasting station with glasses of diluted cold brew at different strengths so guests can choose. Label one jar as “straight concentrate” and another pre-diluted to the house strength. Serve with a small pitcher of milk options and flavored syrups on the side.
For a party of 8, multiply the recipe by three and keep extra concentrate chilled so you can quickly top glasses with ice. Use clear glasses so the rich color and ice clinking add to the experience. Garnish with a long strip of orange peel or a whole cinnamon stick for a pretty, aromatic finish.
Storage and Reheating Tips
Store the sealed concentrate in the refrigerator for up to 2 weeks. Keep it in a clean glass jar to avoid any odd flavors from plastic. If you notice any off smells, discard the batch.
To “reheat” cold brew, dilute to your desired strength and warm gently on the stovetop in a small pot over low heat; avoid boiling to preserve smoothness. You can also add hot water to a measured amount of concentrate for a quick hot cup that keeps the flavor profile intact.
Common Mistakes and How to Avoid Them
Using too-fine a grind will cause over-extraction and a cloudy, bitter result. Stick to a coarse, chunky grind and steep slowly. Also, under-saturating the grounds leaves dry pockets and uneven extraction; give everything a gentle fold when you combine.
Rushing the steep or skipping a fine filtration step can leave sediment and grit. Take the extra minute to filter through a paper filter or nut-milk bag for a clean, silky cup you’ll be proud to serve.
Final Thoughts
Give Cold Brew Coffee a try this weekend and see how a little patience transforms simple ingredients into something comforting and delicious. Make adjustments, take notes, and enjoy the process of dialing in your perfect cup.
Frequently Asked Questions.
- What ratio should I use for Cold Brew Coffee concentrate? The recipe uses 1 cup whole coffee beans to 5 cups water for a balanced, strong concentrate that dilutes well.
- How long should I steep Cold Brew Coffee? Steep about 24 hours in the fridge for optimal extraction, though 18 to 20 hours can work if you prefer a bit less intensity.
- Can I use preground coffee for Cold Brew Coffee? You can, but fresh coarse grounds are best. Preground coffee often results in a flatter, less vibrant cup and can produce more sediment.
- How long does cold brew concentrate keep? When stored in a sealed glass jar it stays good for up to 2 weeks in the refrigerator.
- How do I make a hot drink from Cold Brew Coffee concentrate? Dilute with hot water to taste and warm gently on the stove, avoiding boiling to keep the smooth texture.

Cold Brew Coffee
Make Cold Brew Coffee at home: smooth concentrate from whole beans and water, simple steps and slow steeping for rich flavor.
Ingredients
Instructions
Step 1: Grind the coffee
Warm your grinder or food processor and pulse whole beans to a coarse, even grind — think chunky sea-salt sized particles rather than flour. Aim for the texture that still shows fractured bean surfaces and a little irregularity; this coarse texture gives a clean, smooth cold brew with minimal sediment. A quick note while you grind: one cup of whole beans yields roughly a cup-and-a-quarter of coarse grounds, so stop when you see a loose, fluffy pile of uneven, fragrant particles.
Step 2: Combine grounds and water
Spoon the coarse grounds into one or two wide-mouth mason jars so they sit loosely and can be fully saturated. Pour cold water evenly over the grounds — gently fold or stir once with a clean spoon so all the grounds are hydrated and there are no dry pockets. The result should be a matte, saturated mass of coffee grounds suspended in water with small surface ripples and a few floating particles, not a foamy or vigorously mixed mixture.
Step 3: Seal, shake, and chill
Seal the jars, give each a firm few shakes to ensure any trapped pockets of dry grounds are incorporated, then set them upright in the refrigerator to steep for about 24 hours. After sealing the surface will show a slightly darker, diffuse bloom where the coffee solubles begin to migrate into the water — a quiet, even extraction rather than an active boil or foam.
Step 4: Strain the steeped concentrate
After refrigeration, strain the dark, viscous concentrate through a fine mesh lined with a coffee filter or through a nut-milk bag until the liquid runs clear; the wet grounds should collapse into a damp, crumbly pile you can compost. The strained concentrate should be glossy, deep mahogany-brown and free of visible grit, with a few tiny suspended bubbles that settle slowly.
Step 5: Transfer and taste-adjust
Pour the filtered concentrate back into one of the clean mason jars you used overnight (rinse it first if you like), sealing it for storage. Taste the concentrate over ice — dilute with cold water or your preferred milk to soften intensity. The texture will be syrupy but pourable; when diluted it becomes velvety and very smooth.
Step 6: Serve cold over ice
Fill tall clear glasses with lots of irregular, jagged ice cubes, then pour the cold brew concentrate so it cascades and clinks around the ice, creating a visible stream, small rising bubbles, and a thin line of condensation on the glass. Serve immediately, optionally with a splash of milk or water to taste for a beautifully dark, cooling beverage.
Notes
- Use a burr grinder for consistent coarse grounds.
- Use filtered water to avoid off flavors.
- Steep about 24 hours for balanced extraction.
- Filter through a paper filter or nut-milk bag for clarity.
- Store concentrate in a sealed glass jar for up to 2 weeks.
