I fell for Grilled Garlic Butter Shrimp the first time I tasted it at a backyard cookout, and I still make it whenever friends drop by without warning. There is something deeply comforting about shrimp sizzling over charcoal, glossy in warm garlic butter, lemon in hand and conversation easy. I often find myself sketching variations in the margins of a recipe card while the grill does the work. If you want a quick, impressive dish that feels celebratory and relaxed, Grilled Garlic Butter Shrimp is the one to reach for.
The secret is the balance of bright citrus, mellow butter, and a kiss of heat that makes the shrimp sing. It cooks fast, looks elegant on skewers, and tastes like you spent far more time on it than you did. That same mix of flavors is what keeps me coming back to Grilled Garlic Butter Shrimp whether it’s a weeknight dinner or a weekend gathering.
How This Dish Found Its Place in My Summer Grills
The first time I made Grilled Garlic Butter Shrimp I remember the air smelling like lemon and smoke as the sun went down. I was nervous about timing; shrimp cook in a blink and I did not want rubbery results. When the skewers came off the grill, everyone cheered over the juicy, buttery bites and the charred lemon that cut through the richness. I stood there with the tongs, a bit proud and a lot relieved, and realized that this recipe had become shorthand for relaxed hospitality. Texture mattered as much as flavor: the shrimp were slightly springy, flecked with shallot and parsley, and the little pops of heat from the red pepper flakes kept people reaching for another skewer. Every time I make it now, I am taken back to that evening and the small, satisfied silence that follows the first bite.
The Ingredients That Make It Sing
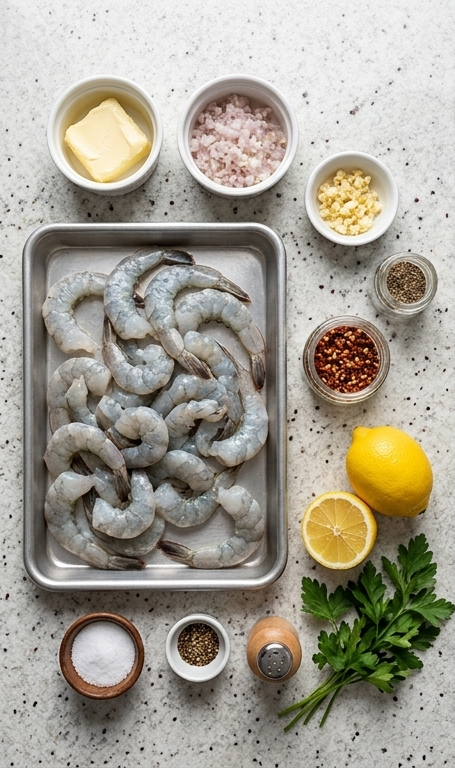
Each ingredient in Grilled Garlic Butter Shrimp plays a clear role, so choose thoughtfully. Butter brings glossy richness and carries the aromatics; swap for olive oil if you need dairy free but add a splash of white wine for depth. Shallot and garlic provide sweetness and savoriness; substitute a small onion plus extra garlic if needed. Fresh shrimp are the star, so pick firm, translucent ones and thaw them gently if frozen. Lemons brighten the dish; don’t skip charred lemon halves. Parsley adds fresh color and lift.
- Unsalted Butter: The flavor base that carries garlic and shallot; use high quality butter for best results.
- Shallot: Adds gentle onion sweetness; replace with a milder white onion if needed.
- Garlic: Provides savory aroma; fresh is best, powdered is a last resort.
- Crushed Red Pepper Flakes: A little heat to balance butter and lemon; adjust to taste.
- Kosher Salt and Black Pepper: Essential for seasoning; taste as you go.
- Medium Shrimp: The main attraction; choose 16-20 count per pound for this recipe.
- Lemons: For charred brightness and acidity; use fresh.
- Fresh Parsley: Finishing herb for color and brightness.
Essential Kitchen Tools and Why They Matter
A few reliable tools make Grilled Garlic Butter Shrimp effortless and help you avoid mishaps. You do not need every gadget, but the right basics keep the process smooth and stress free.
- Grill or Grill Pan: The grill gives that charred flavor; use a hot cast iron grill pan if you don’t have an outdoor grill.
- Small Skillet: For melting butter and softening shallot and garlic; a heavy-bottomed skillet distributes heat evenly.
- Basting Brush: Lets you coat shrimp evenly; a spoon works in a pinch.
- Skewers (bamboo or metal): Keep shrimp from slipping into the fire and make serving easy; soak bamboo skewers first to prevent burning.
- Tongs: For turning skewers safely and finishing with butter.
- Small Ramekin: To reserve butter for finishing — a simple touch that elevates presentation.
Step-by-Step Preparation Guide.
Step 1: Prepare the garlic‑butter
Melt the unsalted butter gently in a small skillet until just liquefied, then stir in the minced shallot, minced garlic, and crushed red pepper flakes. Let the shallot and garlic soften until fragrant and translucent, about two minutes, then season the warm butter mixture with kosher salt and freshly ground black pepper to taste. Spoon a couple of tablespoons of this aromatic butter into a small ramekin to reserve for brushing, and keep the remainder for finishing the dish — the warm butter should be glossy, speckled with tiny softened shallot pieces and flecks of chili.
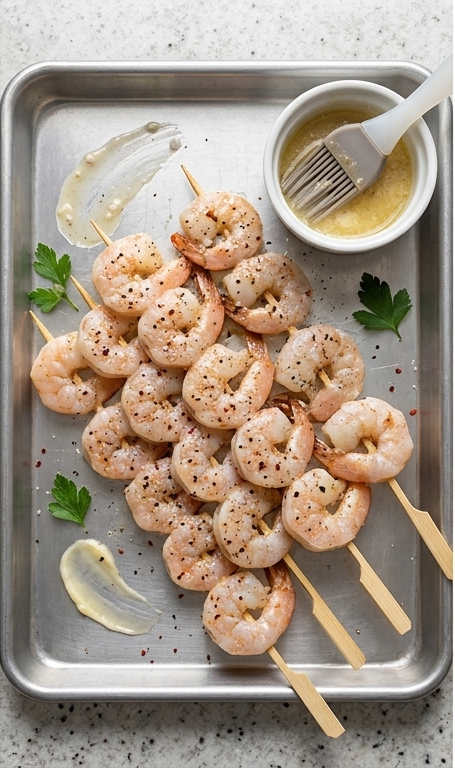
Step 2: Skewer, season and brush the shrimp
Thread the peeled, deveined medium shrimp onto bamboo skewers so they lie in gentle curves, leaving a little space between each shrimp for even cooking. Season the threaded shrimp lightly with salt and pepper, then brush both sides with two tablespoons of the warm garlic‑shallot butter so each shrimp glistens with a thin, even coat. Arrange the skewers on a shallow tray or platter and let the butter cling — you should see the shrimp change from translucent grey to a pale pink sheen as the butter and seasoning sit on the surface. Keep the reserved ramekin of butter and a small basting brush close by for finishing.
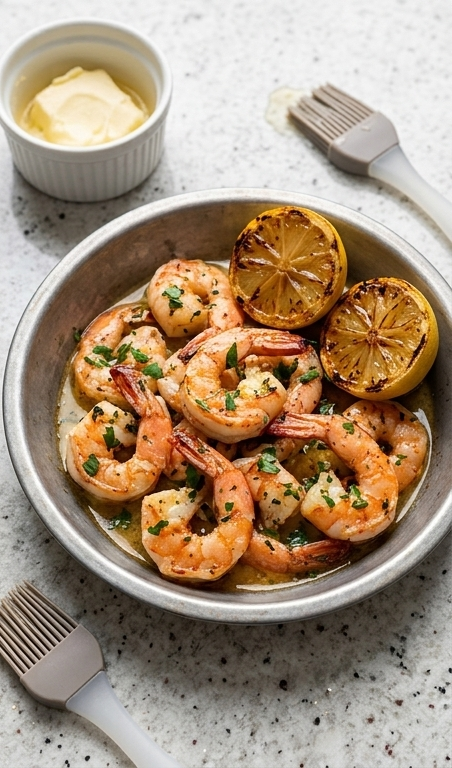
Step 3: Grill, finish and serve
Preheat the grill to medium‑high and cook the skewers until the shrimp are pink and opaque, turning occasionally; during the last two minutes add halved lemons cut‑side down to develop a bit of char. Once off the grill, transfer the skewers back to the surface and immediately drizzle with the remaining warm garlic butter from the ramekin, letting it pool and cling to the shrimp. Garnish with chopped fresh parsley and serve with the charred lemon halves for squeezing. The finished shrimp should be plump, glossy with butter, speckled with tiny shallot and parsley bits, with bright, caramelized lemon flesh for contrast.
Making It Your Own
I like to tinker depending on the season and the crowd. For a spicy twist, I add a pinch more crushed red pepper flakes to the garlic butter and finish with a smear of harissa on the plate to amp up warmth. When friends need gluten free or dairy free options I swap the butter for a good olive oil and add a tablespoon of white wine vinegar for acidity. In cooler months I sometimes finish with a scattering of toasted pine nuts and a handful of chopped basil for a richer, herb-forward profile. Each small change keeps the heart of Grilled Garlic Butter Shrimp intact while letting you tailor it to taste.
How to Serve
If I’m hosting, I thread two skewers per person and set out bowls of charred lemon halves, extra melted butter, and a small jar of hot sauce. For a casual spread, arrange skewers on a large wooden board over a bed of arugula and add grilled bread slices so guests can mop up the buttery juices. To scale up, double the shrimp and cook in batches, keeping finished skewers warm on a foil-lined tray in a low oven. For a lighter meal, pair the shrimp with a citrusy salad and quinoa; for a heartier plate, serve over garlicky linguine.
Storage and Reheating Tips
Shrimp are best eaten fresh, but leftovers can be stored in an airtight container in the fridge for up to 48 hours. Keep the garlic butter separate if you can; it helps preserve texture and flavor. Reheat gently on a skillet over low heat, spooning reserved butter over the shrimp just until warmed through. Avoid the microwave when possible because it can make shrimp rubbery.
If you need to freeze, remove shrimp from skewers, place in a freezer-safe bag with a little butter, and use within one month. Thaw overnight in the refrigerator and finish briefly on a hot pan to revive that grilled flavor.
Common Mistakes and How to Avoid Them
Overcooking is the usual culprit; shrimp go from perfect to tough in a minute or two, so keep a close eye and pull them as soon as they turn opaque and pink. Use a hot grill and quick turns for even cooking. Another mistake is using too much butter or adding it too early on the grill; reserve some to finish so the shrimp stay bright and glossy.
Also, don’t skip the charred lemon. A squeeze of hot, caramelized lemon adds an acid lift that cuts through the butter and balances the dish. Finally, if you skewer shrimp too tightly they won’t cook evenly, so leave a little space between each.
Ready to Grill
Give Grilled Garlic Butter Shrimp a try the next time you want something fast, impressive, and endlessly adaptable. It’s one of those recipes that rewards small, thoughtful touches and makes guests feel looked after. Once you nail the timing, it will become a go-to for both hectic weeknights and relaxed weekend gatherings.
Frequently Asked Questions.
- Can I use frozen shrimp for Grilled Garlic Butter Shrimp? Yes. Thaw shrimp overnight in the fridge or run them under cold water in a colander until pliable, then pat dry thoroughly before skewering.
- How do I prevent shrimp from sticking to the grill? Make sure the grill is clean and preheated to medium-high, brush the grates with oil, and brush the shrimp with garlic butter before grilling.
- Can I make the garlic butter ahead of time? You can, but keep it refrigerated and warm it gently before using; reserve some warm butter to finish the grilled shrimp.
- What side dishes pair best with this shrimp? Think simple and bright: grilled vegetables, a lemony salad, crusty bread, or a light pasta are all great options.
- How long should I grill the shrimp? Grill until the shrimp are pink and opaque, usually just a few minutes per side depending on size; avoid overcooking.

Grilled Garlic Butter Shrimp
Make Grilled Garlic Butter Shrimp for a quick, buttery, lemony grilled shrimp that dazzles guests.
Ingredients
Instructions
Step 1: Prepare the garlic‑butter
Melt the unsalted butter gently in a small skillet until just liquefied, then stir in the minced shallot, minced garlic, and crushed red pepper flakes. Let the shallot and garlic soften until fragrant and translucent, about two minutes, then season the warm butter mixture with kosher salt and freshly ground black pepper to taste. Spoon a couple of tablespoons of this aromatic butter into a small ramekin to reserve for brushing, and keep the remainder for finishing the dish — the warm butter should be glossy, speckled with tiny softened shallot pieces and flecks of chili.
Step 2: Skewer, season and brush the shrimp
Thread the peeled, deveined medium shrimp onto bamboo skewers so they lie in gentle curves, leaving a little space between each shrimp for even cooking. Season the threaded shrimp lightly with salt and pepper, then brush both sides with two tablespoons of the warm garlic‑shallot butter so each shrimp glistens with a thin, even coat. Arrange the skewers on a shallow tray or platter and let the butter cling — you should see the shrimp change from translucent grey to a pale pink sheen as the butter and seasoning sit on the surface. Keep the reserved ramekin of butter and a small basting brush close by for finishing.
Step 3: Grill, finish and serve
Preheat the grill to medium‑high and cook the skewers until the shrimp are pink and opaque, turning occasionally; during the last two minutes add halved lemons cut‑side down to develop a bit of char. Once off the grill, transfer the skewers back to the surface and immediately drizzle with the remaining warm garlic butter from the ramekin, letting it pool and cling to the shrimp. Garnish with chopped fresh parsley and serve with the charred lemon halves for squeezing. The finished shrimp should be plump, glossy with butter, speckled with tiny shallot and parsley bits, with bright, caramelized lemon flesh for contrast.
Notes
- Reserve a couple of tablespoons of the warm garlic butter to brush during and after grilling for glossy finish.
- Soak bamboo skewers for 30 minutes before grilling to prevent burning.
- Pat shrimp dry thoroughly to ensure proper sear and prevent steaming.
- Don’t overcook; remove shrimp as soon as they turn opaque and pink.
- Char the lemon halves on the grill for a brighter finish and easier squeezing.
