Chocolate Covered Strawberries are a small indulgence that feels like a celebration. I reach for this recipe when I want something elegant with minimal fuss, and it never fails to impress. The contrast of glossy dark chocolate and sun-warm strawberries is one of those simple pleasures I keep coming back to. If you love short recipes that deliver a big moment, these Chocolate Covered Strawberries will become your go-to treat.
How This Recipe Became My Rainy-Day Favorite
I remember the first time I made Chocolate Covered Strawberries for a friend who had just moved into a new apartment. The kitchen smelled faintly of chocolate and warm berries as rain tapped the window; I felt oddly ceremonial as I dipped each fruit and watched the glossy coating set. There was a small thrill every time a berry landed perfectly on the parchment and the chocolate caught the light. My friend opened the door with a tired smile and we shared the first one standing in the doorway, crumbs and chocolate on our fingers. That evening taught me that this recipe is more than dessert – it’s a tiny, portable celebration you can bring to someone, and the ritual of making it is almost as rewarding as sharing it.
Main Ingredients and Why They Matter
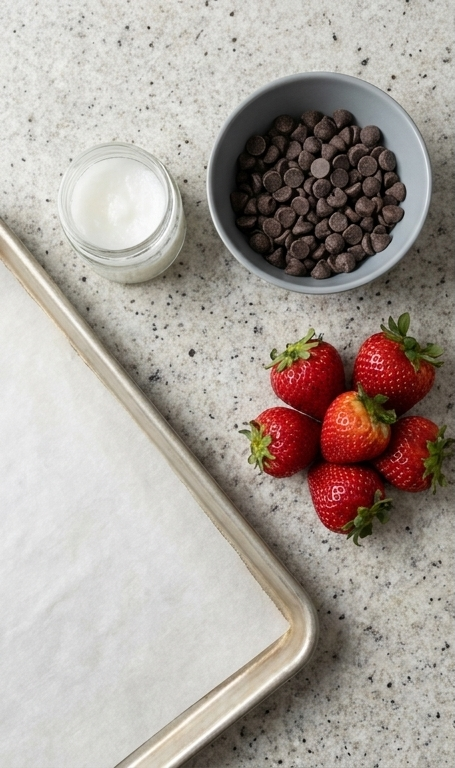
- Strawberries: Fresh, ripe berries are the canvas. Look for firm fruit with bright green caps and no soft spots; smaller berries are easier to eat. Substitute raspberries or cherries if you like a different tartness.
- Dark Chocolate Chips: This is the flavor anchor, giving the rich coating and snap. Use good-quality chips or chopped chocolate for a smoother finish. Swap with milk or white chocolate for a sweeter result.
- Coconut Oil: A tablespoon helps the chocolate melt and smooth out, giving a shiny set. If you prefer, use a neutral vegetable oil or a small pat of butter.
Essential Kitchen Tools Youll Want on Hand
A few well chosen tools make this ridiculously simple dessert feel professional. A heatproof bowl and a double-boiler setup let you melt chocolate gently so it stays glossy. A small silicone spatula helps stir without scratching the bowl and keeps things neat. Parchment paper is nonnegotiable for easy removal and cleanup. If you plan to decorate, a small piping bag or a zip bag with a corner snipped will let you drizzle contrasting chocolate.
- Heatproof bowl: For gentle melting – glass or stainless steel work well.
- Small silicone spatula: For stirring and scraping smoothly.
- Parchment paper-lined baking sheet: Prevents sticking and makes chilling a breeze.
- Double-boiler or small saucepan with a bowl: Keeps the chocolate from scorching.
Step-by-Step Preparation Guide
Step 1: Line the sheet and dry the berries
Line a baking sheet with a single sheet of parchment paper so the liner sits flat and wrinkle-free. Rinse the strawberries under cool water, gently roll them on a clean towel and pat each berry completely dry – the chocolate will only adhere to perfectly dry fruit. Keep the green leafy caps intact; they act as natural handles and add a vibrant color contrast against the chocolate. Arrange the dried strawberries loosely on the prepared parchment so theyre ready to be dipped in the next step.
Step 2: Melt the chocolate until glossy and smooth
Place the dark chocolate chips and the tablespoon of coconut oil together in a medium heatproof glass bowl and warm gently using a double-boiler method until the mixture becomes a single, glossy, pourable dark mass. Stir occasionally with a small silicone spatula so the chocolate becomes satin-smooth and the coconut oil fully integrates, creating a thin, shiny coating that will set firm. Stop heating while the chocolate is warm and fluid but not scorching, and let it settle for a moment so any air bubbles rise out of the surface.
Step 3: Dip and set the strawberries
Working one berry at a time, hold each strawberry by its leafy cap and submerge and rotate it in the warm chocolate to coat the sides, letting the excess drip back into the bowl before placing the berry on the parchment-lined sheet. Space the dipped strawberries evenly so the chocolate can set without touching. Repeat until all berries are coated; small imperfections in the chocolate surface – fine drips, slight ridges where the spatula smoothed the bowl – are natural and attractive.
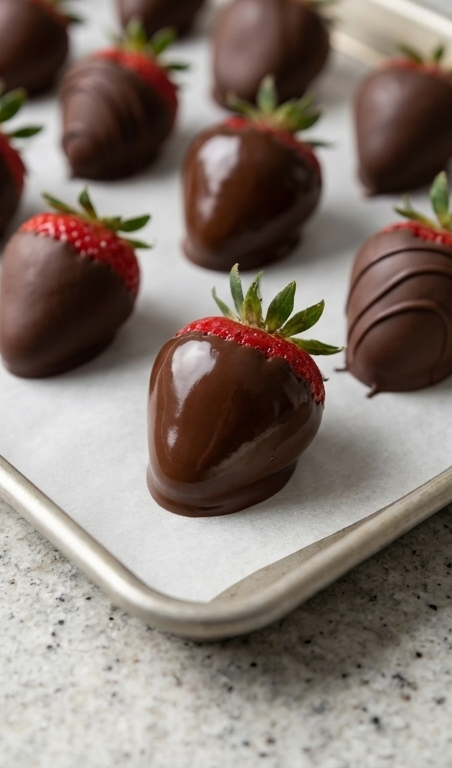
Step 4: Chill, serve, and store
Transfer the baking sheet to the refrigerator and chill the strawberries until the chocolate is fully firm, about 30 minutes. For serving, keep them on the same parchment-lined sheet or transfer carefully to a shallow tray, presenting the glossy dark chocolate against the bright red fruit and green caps. Store any leftovers in an airtight container in the fridge and enjoy within a day for peak texture and flavor.
Making It Your Own
Try a few small experiments to make Chocolate Covered Strawberries feel uniquely yours. For a nutty twist, sprinkle finely chopped toasted hazelnuts or pistachios onto the chocolate while it is still tacky – it adds crunch and a toasted aroma that plays beautifully with dark chocolate.
If you want to lighten the sweetness, use a higher percentage dark chocolate or finish with a tiny pinch of flaky sea salt. Seasonal variations are fun: in summer, use the ripest small berries; in winter, choose firm greenhouse berries and serve quickly after chilling to avoid condensation.
Dietary versions are easy too – use dairy free chocolate and coconut oil to keep this vegan, or swap coconut oil for a mild tasting oil if you prefer less coconut flavor.
How to Serve
If youre hosting, present Chocolate Covered Strawberries on a shallow tray lined with fresh mint leaves for color and aroma. For a romantic dessert plate, serve three berries per person with a dusting of confectioners sugar and a small scoop of vanilla ice cream. For larger gatherings, arrange them on tiered platters so guests can pick and go.
Adjust serving sizes by planning two to three berries per person for a small tasting after a multi-course meal, or four to five per person if the strawberries are the star of a dessert table. Remember that chilled berries should be brought to the table on a cool tray – avoid warm plates that might make the chocolate soften.
Storage and Reheating Tips
Store any leftovers in a single layer in an airtight container in the refrigerator to keep the chocolate set and the fruit fresh. If stacking is unavoidable, separate layers with parchment paper to prevent chocolate sticking.
Avoid reheating – these are best served cold or just slightly below room temperature. If the chocolate dulls from condensation, let the berries sit uncovered in the fridge for a few minutes before serving or gently blot moisture with a paper towel.
Common Mistakes and How to Avoid Them
Not drying the strawberries fully is the most frequent issue – any surface moisture will prevent the chocolate from adhering properly. Pat each berry completely dry and let them air for a minute if your kitchen feels humid.
Overheating the chocolate makes it grainy and dull. Warm gently, stir patiently, and remove from heat while still fluid. Adding the coconut oil helps with shine and a smooth finish.
Why You Should Try This Tonight
These Chocolate Covered Strawberries are quick, impressive, and flexible enough to fit any occasion. Theyre a small luxury you can make any night of the week, and they travel well for picnics or gifts. Give them a try – the simple act of dipping and sharing is a tiny bit of joy.
Frequently Asked Questions.
- Can I use frozen strawberries for Chocolate Covered Strawberries? – It is best to use fresh strawberries because frozen fruit will release water when thawed, making the chocolate not stick well.
- How long do Chocolate Covered Strawberries keep in the fridge? – Store them in an airtight container and enjoy within a day for the best texture and flavor; they may become soggy after that.
- Can I temper the chocolate for a shinier finish? – Yes, tempering gives the shiniest, firmest snap but is optional; adding a tablespoon of coconut oil helps give a nice gloss without full tempering.
- What chocolate is best for Chocolate Covered Strawberries? – Use a good quality dark chocolate or chips for balanced flavor; milk chocolate or white chocolate work if you prefer sweeter coatings.
- How do I prevent chocolate from cracking on the strawberries? – Avoid rapid temperature changes and keep the strawberries cool but not freezing; chilling in the fridge gradually helps the chocolate set without cracking.
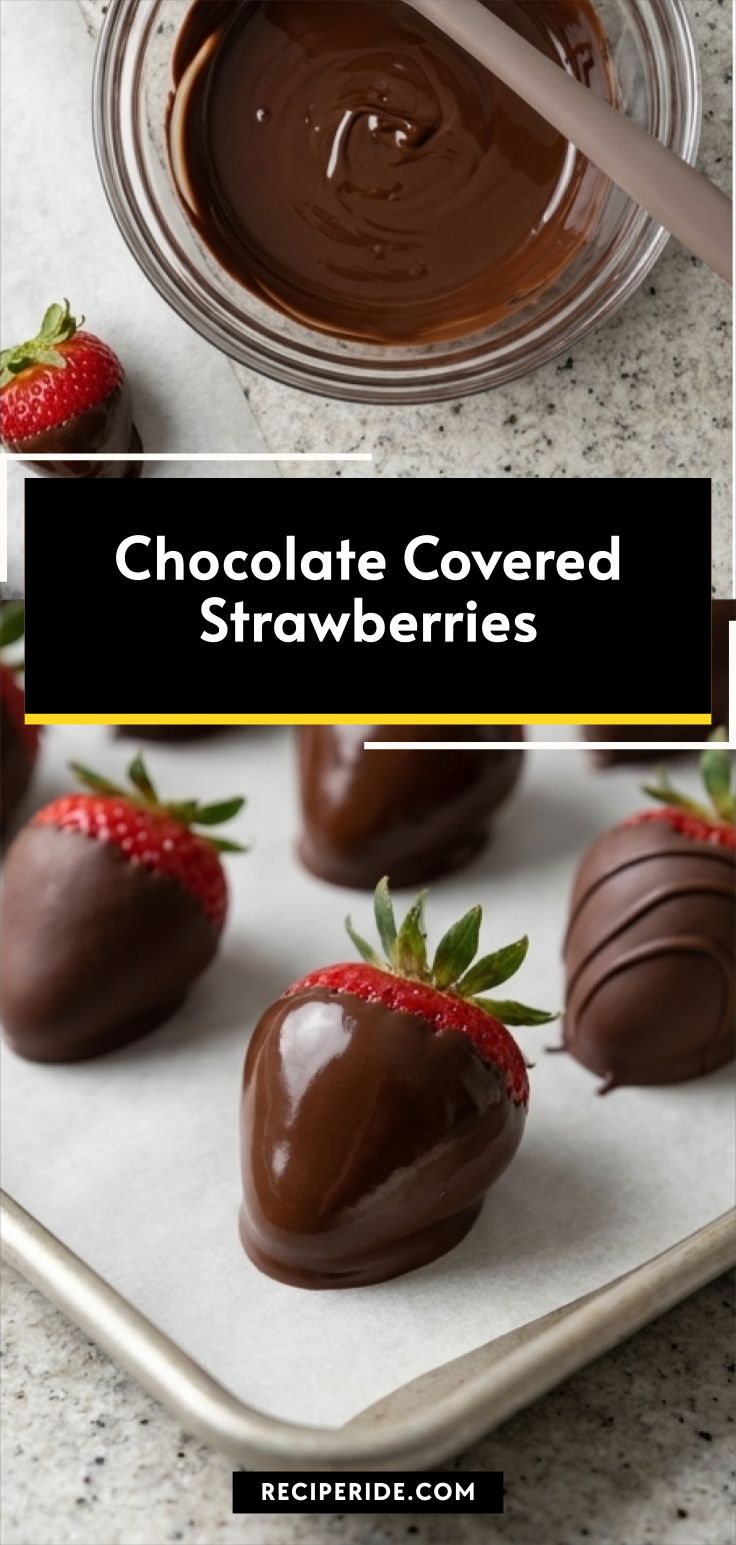
Chocolate Covered Strawberries
Make Chocolate Covered Strawberries tonight: glossy dark chocolate over fresh strawberries for an elegant, no-fuss dessert.
Ingredients
Instructions
Step 1: Line the sheet and dry the berries
Line a baking sheet with a single sheet of parchment paper so the liner sits flat and wrinkle-free. Rinse the strawberries under cool water, gently roll them on a clean towel and pat each berry completely dry — the chocolate will only adhere to perfectly dry fruit. Keep the green leafy caps intact; they act as natural handles and add a vibrant color contrast against the chocolate. Arrange the dried strawberries loosely on the prepared parchment so they’re ready to be dipped in the next step.
Step 2: Melt the chocolate until glossy and smooth
Place the dark chocolate chips and the tablespoon of coconut oil together in a medium heatproof glass bowl and warm gently using a double-boiler method until the mixture becomes a single, glossy, pourable dark mass. Stir occasionally with a small silicone spatula so the chocolate becomes satin-smooth and the coconut oil fully integrates, creating a thin, shiny coating that will set firm. Stop heating while the chocolate is warm and fluid but not scorching, and let it settle for a moment so any air bubbles rise out of the surface.
Step 3: Dip and set the strawberries
Working one berry at a time, hold each strawberry by its leafy cap and submerge and rotate it in the warm chocolate to coat the sides, letting the excess drip back into the bowl before placing the berry on the parchment-lined sheet. Space the dipped strawberries evenly so the chocolate can set without touching. Repeat until all berries are coated; small imperfections in the chocolate surface — fine drips, slight ridges where the spatula smoothed the bowl — are natural and attractive.
Step 4: Chill, serve, and store
Transfer the baking sheet to the refrigerator and chill the strawberries until the chocolate is fully firm, about 30 minutes. For serving, keep them on the same parchment-lined sheet or transfer carefully to a shallow tray, presenting the glossy dark chocolate against the bright red fruit and green caps. Store any leftovers in an airtight container in the fridge and enjoy within a day for peak texture and flavor.
Notes
- Pat strawberries completely dry to ensure chocolate adheres.
- Use good-quality chocolate or chop a chocolate bar for a smoother melt.
- Chill the dipped berries for about 30 minutes before serving to set the coating.