Corn ribs are one of those cheeky, fun dishes that make people smile the moment they see them. I first tried making Corn ribs on a sunny weekend and it felt like summer on a plate: charred kernels, warm garlic butter, and that satisfying curl that turns a cob into a finger-friendly treat. It’s a simple idea with a crowd-pleasing result, and once you get the rhythm of cutting and seasoning, you’ll want to make Corn ribs every time corn is in season. This version keeps things straightforward but bold with smoked paprika and a glossy garlic butter finish—exactly how I like them.
How This Recipe Became My Rainy-Day Favorite
I remember a lazy, rainy afternoon when I had more corn than plans. I quartered the cobs, fired up the oven, and the kitchen filled with the smell of caramelizing kernels and warm garlic. The sound of popping corn kernels and the sight of the ribs curling in the heat felt oddly celebratory. I plated them on a scratched enamel platter, sprinkled bright parsley, and dunked a rib into a tangy dip. My partner, who rarely gets excited about vegetables, reached for seconds before the first rib was finished. That small, messy victory turned Corn ribs into my go-to for casual dinners and impromptu guests. It’s a recipe that feels both nostalgic and adventurous, with each bite delivering sweet, smoky, and buttery notes that make even a grey day feel golden.
The Ingredients That Make These Corn Ribs Sing
- Corn: The showstopper. Use the freshest, sweetest corn you can find; look for bright yellow kernels that feel full and juicy. Substitute with frozen corn on the cob in a pinch, but fresh kernels caramelize best.
- Extra virgin olive oil: Helps the seasoning cling and aids caramelization. Use any neutral oil if you need a higher smoke point.
- Smoked paprika: Gives that warm, smoky color and flavor. Ordinary paprika works if you do not have smoked.
- Garlic butter: Adds gloss and savory depth; unsalted butter lets you control saltiness. Finish with parsley or cilantro for freshness.

Essential Kitchen Tools and Why They Matter
A few key tools make Corn ribs easy and safe to prepare. A very sharp chef’s knife and a sturdy non-slip cutting board are crucial for clean, even ribs; they reduce the chance of slipping and make quartering a cob predictable. A large mixing bowl gives you room to coat the ribs evenly with oil and spices so every kernel gets seasoning. If you’ll grill, a pair of long tongs helps you turn the ribs without touching hot surfaces. For oven-roasting, a rimmed baking sheet lined with foil simplifies cleanup. If you don’t have a grill, a hot cast-iron skillet is a great alternative.
- Chef’s knife: For clean, confident cuts.
- Non-slip cutting board: Safety first; prevents movement.
- Large mixing bowl: Even seasoning distribution.
- Tongs or spatula: Safe turning on grill or pan.
- Rimmed baking sheet or cast iron skillet: For oven or stovetop cooking.
Step-by-Step Preparation Guide
Step 1: Cut the corn into ribs
Start by trimming the base and pointy tip of each cob to create stable ends, then stand a cob upright and quarter it lengthwise to make long corn “ribs.” If you prefer shorter, easier-to-handle pieces, halve each cob lengthwise instead. Use a sharp knife and a non-slip cutting board; imagine gently rocking the blade down the cob or, if you’re comfortable, the quick controlled tapping-technique to drive the knife through. The goal is long, even pieces with intact kernel rows—these proud, raw rib shapes are the building blocks for the next steps.
Step 2: Make the garlic butter
Melt the unsalted butter slowly in a small saucepan until liquid, then stir in the finely minced garlic and remove from heat after a quick 20 seconds so the garlic becomes fragrant without browning. Keep the garlic butter warm and fluid in a small ceramic bowl or jug so it’s ready to brush or pour over the cooked ribs later; you want a glossy, molten patina that will cling to the charred kernels.
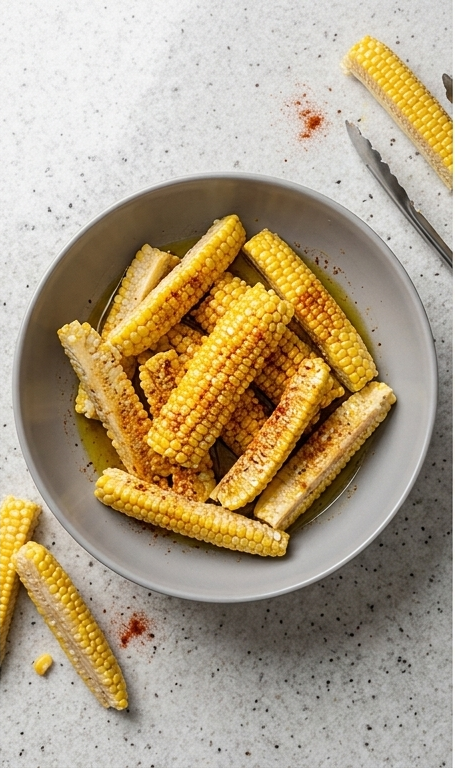
Step 3: Mix the oil and seasoning, then toss the cut corn
Pour olive oil into a large mixing bowl and sprinkle in the garlic powder, smoked paprika, salt and black pepper; toss briefly so the oil carries the spices into a cohesive orange-red coating. Add the cut corn ribs and toss gently but thoroughly so each rib is evenly coated—expect a lot of the seasoning to nestle between kernels, promising those tasty seasoned “bones.” Once the corn looks uniformly glossy, speckled with paprika and pepper, you’re ready for the heat.
Step 4: Cook until charred and curling
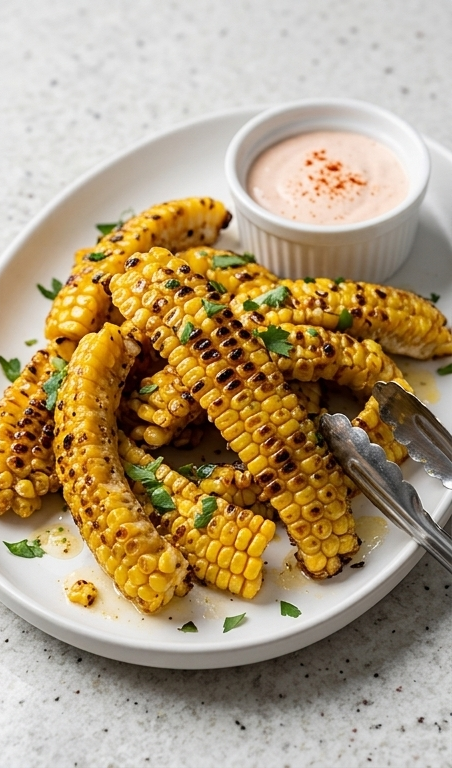
Transfer the seasoned ribs to your hot grill or roast in the oven until the kernels caramelize and dark flecks appear—on the BBQ they will curl dramatically into rib-like shapes and show distinct char marks; in the oven they will brown more evenly without as much curl. Cook each exposed cut side briefly to get caramelized edges. What you want to see is golden-yellow kernels with deep amber caramelization, small blackened char spots, and the individual ribs slightly tightened and curling from the heat.
Step 5: Butter and finish
Return the hot cooked ribs to the mixing bowl and immediately pour over the warm garlic butter, tossing so molten butter soaks into the crevices and sheens the kernels. Taste and add a last light dusting of smoked paprika for color if you like. Scatter the chopped parsley or cilantro over the glossy ribs to introduce a bright green contrast against the warm yellows and charred browns.
Step 6: Plate and serve to eat like ribs
Pile the buttered, charred corn ribs on a shallow oval plate or platter, arrange them so the curled “bones” are visible and easy to grab. Add a small ceramic ramekin of the optional pink dipping sauce alongside and finish with a final pinch of paprika over the stack. Serve immediately so the garlic-butter gloss is still warm and the kernels invite that joyful, messy bone-sucking pull.
Making It Your Own
Try swapping the smoked paprika for chipotle powder if you like a little heat; it gives Corn ribs a deep, smoky kick that pairs well with a squeeze of lime. For a fresh, herb-forward twist, mix grated Parmesan and lemon zest into the garlic butter and sprinkle over the hot ribs.
For a vegan option, brush with olive oil and a garlic-herb paste instead of butter and finish with a drizzle of vegan aioli on the side. In winter, roast the ribs in the oven with a little extra oil to help them brown evenly. Regional spins, like adding curry powder or zaatar, work beautifully too and create completely different tasting Corn ribs experiences.
How to Serve
When hosting, arrange the Corn ribs on a long platter so guests can grab them like little bones. Offer skewers or cocktail forks for cleanliness, and place small bowls of dipping sauces—sour cream with lime and smoked paprika, a tangy pink sauce, or a fresh herb yogurt—so people can customize.
For larger crowds, double the recipe and use multiple baking sheets or a grill rack to speed cooking. For a family dinner, pair Corn ribs with grilled chicken, a bright salad, and crusty bread so everyone has something to balance the buttery sweetness. For an elegant presentation, stack ribs in a fan and finish with micro herbs and a light sprinkle of coarse salt.
Storage and Reheating Tips
Store leftover Corn ribs in an airtight container in the refrigerator for up to 2 days. Cool them to room temperature before sealing to avoid sogginess from trapped steam.
Reheat gently in a hot oven or air fryer to revive the caramelized edges; 8 to 10 minutes at 180 C (350 F) usually brings them back to life. Avoid microwaving if you want to keep the texture crisp, but if you must, use short bursts and finish in a hot skillet for a minute to re-crisp the kernels.
Oops-Proofing: Mistakes to Avoid
Don’t skip the sharp knife. Blunt blades make cutting corn dangerous and uneven. Take your time to stabilize the cob and quarter it with confident, controlled cuts.
Also, don’t be tempted to overload the pan or grill. Crowding prevents proper caramelization and reduces the chance of those lovely charred bits. Give each rib space so the heat can do its job.
Final Thoughts
Give Corn ribs a try the next time you buy fresh corn. They’re playful, quick, and impossible not to enjoy—perfect for weeknight dinners, weekend barbecues, or as a show-stopping side. Once you taste that sweet, smoky, buttery combo, you’ll understand why I keep coming back to this recipe.
Frequently Asked Questions.
- What are Corn ribs and how do I eat them? Corn ribs are quartered corn cobs cooked until the kernels caramelize into a rib-like shape; eat them like ribs by holding the narrow end and nibbling down the kernels.
- Can I make Corn ribs without a grill? Yes, you can roast them in a hot oven or sear in a cast-iron skillet; high heat is key to getting good color and caramelization.
- How do I keep Corn ribs from getting soggy? Don’t cover them while hot and avoid overcrowding the pan; high, dry heat helps the kernels crisp and brown properly.
- Can I prepare Corn ribs ahead of time? You can cut and season them a couple hours ahead and refrigerate; cook them just before serving for best texture and flavor.
- Is there a vegan version of this Corn ribs recipe? Absolutely; skip the butter and use a garlic-herb olive oil or a vegan butter alternative, then finish with a zesty vegan dip.

Corn ribs
Make Corn ribs with smoky paprika and garlic butter for a quick, shareable side that dazzles.
Ingredients
Instructions
Step 1: Cut the corn into ribs
Start by trimming the base and pointy tip of each cob to create stable ends, then stand a cob upright and quarter it lengthwise to make long corn “ribs.” If you prefer shorter, easier-to-handle pieces, halve each cob lengthwise instead. Use a sharp knife and a non-slip cutting board; imagine gently rocking the blade down the cob or, if you’re comfortable, the quick controlled tapping-technique to drive the knife through. The goal is long, even pieces with intact kernel rows—these proud, raw rib shapes are the building blocks for the next steps.
Step 2: Make the garlic butter
Melt the unsalted butter slowly in a small saucepan until liquid, then stir in the finely minced garlic and remove from heat after a quick 20 seconds so the garlic becomes fragrant without browning. Keep the garlic butter warm and fluid in a small ceramic bowl or jug so it’s ready to brush or pour over the cooked ribs later; you want a glossy, molten patina that will cling to the charred kernels.
Step 3: Mix the oil and seasoning, then toss the cut corn
Pour olive oil into a large mixing bowl and sprinkle in the garlic powder, smoked paprika, salt and black pepper; toss briefly so the oil carries the spices into a cohesive orange-red coating. Add the cut corn ribs and toss gently but thoroughly so each rib is evenly coated—expect a lot of the seasoning to nestle between kernels, promising those tasty seasoned “bones.” Once the corn looks uniformly glossy, speckled with paprika and pepper, you’re ready for the heat.
Step 4: Cook until charred and curling
Transfer the seasoned ribs to your hot grill or roast in the oven until the kernels caramelize and dark flecks appear—on the BBQ they will curl dramatically into rib-like shapes and show distinct char marks; in the oven they will brown more evenly without as much curl. Cook each exposed cut side briefly to get caramelized edges. What you want to see is golden-yellow kernels with deep amber caramelization, small blackened char spots, and the individual ribs slightly tightened and curling from the heat.
Step 5: Butter and finish
Return the hot cooked ribs to the mixing bowl and immediately pour over the warm garlic butter, tossing so molten butter soaks into the crevices and sheens the kernels. Taste and add a last light dusting of smoked paprika for color if you like. Scatter the chopped parsley or cilantro over the glossy ribs to introduce a bright green contrast against the warm yellows and charred browns.
Step 6: Plate and serve to eat like ribs
Pile the buttered, charred corn ribs on a shallow oval plate or platter, arrange them so the curled “bones” are visible and easy to grab. Add a small ceramic ramekin of the optional pink dipping sauce alongside and finish with a final pinch of paprika over the stack. Serve immediately so the garlic-butter gloss is still warm and the kernels invite that joyful, messy bone-sucking pull.
Notes
- Use the freshest corn you can find for the sweetest results.
- Keep the garlic butter warm so it glazes the ribs immediately after cooking.
- Don’t overcrowd the grill or pan to ensure good caramelization.
- Reheat in an oven or air fryer to revive crisp edges.
- Substitute neutral oil for olive oil if cooking at very high heat.