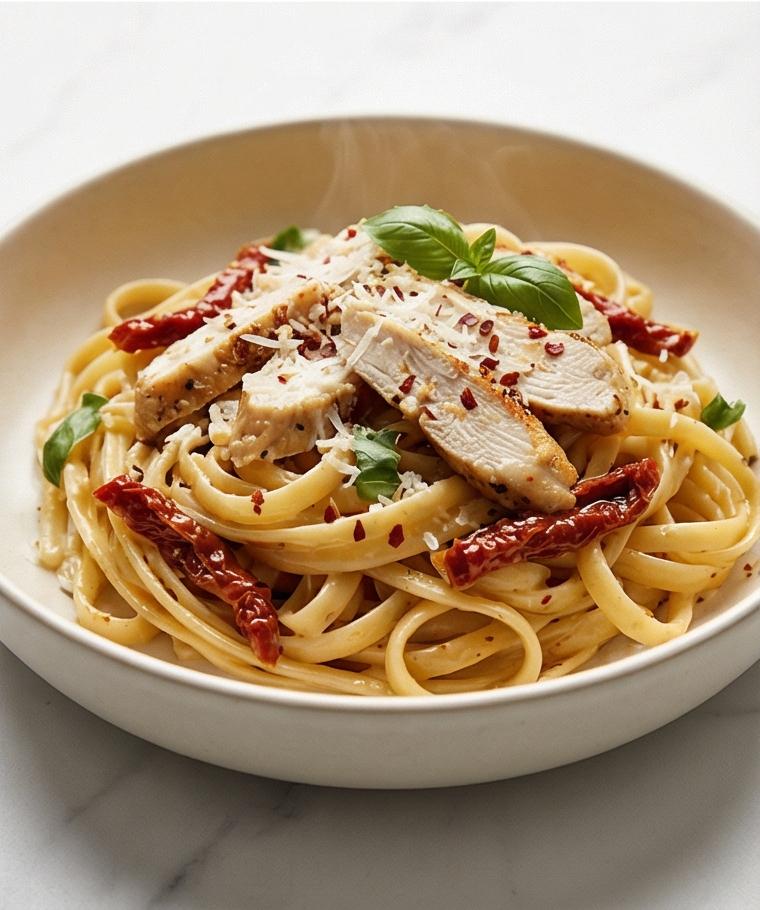
Marry Me Chicken Recipe is one of those comfort-in-a-skillet meals I return to again and again. I first learned it when a neighbor insisted I bring something impressive to a weeknight dinner, and the results made everyone ask for the recipe. The sauce is unexpectedly addictive: silky cream, tangy sun-dried tomatoes, and bright basil that lift the whole dish. I love how Marry Me Chicken Recipe feels fancy but comes together fast on a busy evening.
There is something magnetic about the name Marry Me Chicken Recipe; it promises richness and a little drama on the plate, and it delivers every time.
When a Simple Dinner Turned Into a Memory
I remember the first time I cooked Marry Me Chicken Recipe for friends: the apartment smelled like warm garlic and sun-dried tomatoes within minutes, and the clinking of glasses paused as everyone leaned in to taste. The sear on the chicken gave way to a tender center while the cream sauce shimmered and thickened, flecked with crimson tomato ribbons and bright green basil. We ate around a tiny table, napkins forgotten, using slices of crusty bread to rescue every last drop of sauce. It felt indulgent but effortless, like a small celebration after a long week. That evening taught me that a few pantry staples and good technique can create something that feels celebratory.
Primary Ingredients and Why They Matter
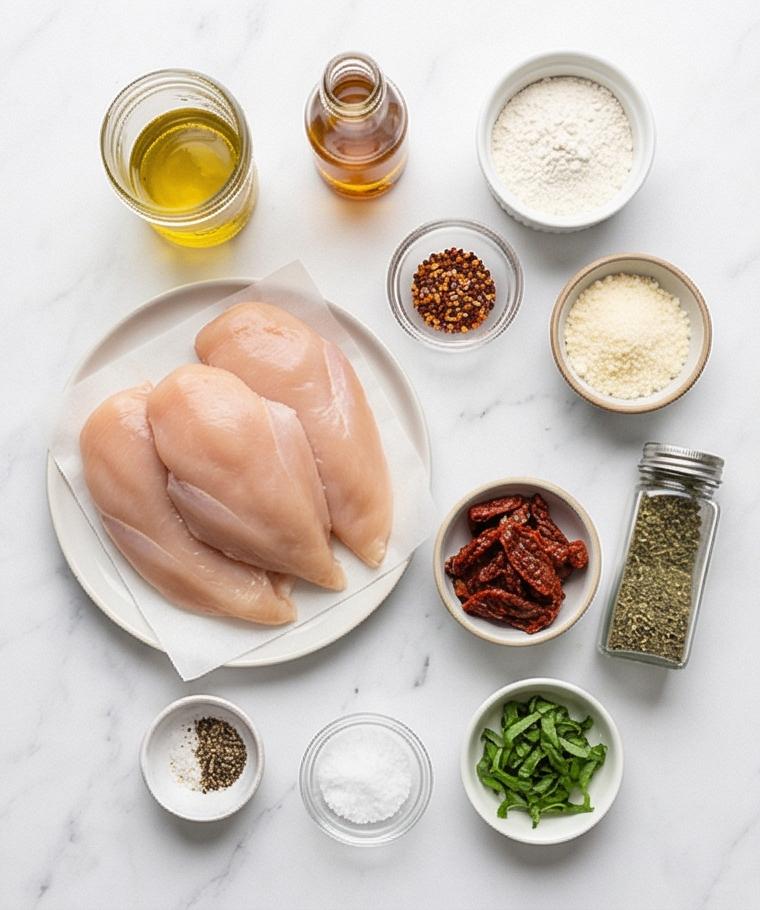
- Chicken Breasts: The star protein; choose even-thickness breasts or pound them for uniform cooking. Substitute boneless thighs for more flavor but slightly different cooking time.
- Garlic: Builds the aromatic base; fresh is best. Use 1/2 teaspoon garlic powder in a pinch.
- Sun-Dried Tomatoes: Give concentrated tomato flavor and chewy texture; jarred in oil is easiest. For a lighter touch, use roasted cherry tomatoes.
- Heavy Cream: Creates the luscious sauce and mouthfeel; half-and-half will thin the sauce, so reduce slightly and simmer longer.
- Parmesan Cheese: Adds umami and helps thicken; Pecorino Romano is a saltier substitute — reduce added salt if you use it.
Essential Kitchen Tools and Why They Help
A short intro: the right tools make Marry Me Chicken Recipe simple and reliable. Invest in a few pieces and you get consistent results.
- Oven-Safe Skillet: Allows seamless sear-to-oven transition; use a heavy 10–12 inch stainless or cast-iron skillet for even heat.
- Tongs: For turning breasts while preserving the crust; a fish spatula works too.
- Microplane or Fine Grater: For freshly grating Parmesan; pregrated cheese won’t melt as smoothly.
- Wooden Spoon or Spatula: For deglazing and stirring without scratching pans.
- Meat Thermometer: Ensures safe doneness without overcooking; aim for 160–165°F as the final resting temp.
Step-by-Step Preparation Guide
Step 1: Preheat and ready the oven-safe skillet
Preheat the oven to 375°F (190°C) and position a rack in the center so everything that follows will finish evenly. Have a large 10–12 inch oven-safe skillet at hand and a sheet of foil for tenting; this is housekeeping so the cook can move quickly when the sauce is ready. Treat this as the first small action—getting temperature and the right tool in place makes the rest effortless.
Step 2: Prepare and flatten the chicken
Pat the four boneless, skinless chicken breasts dry and, if any are very thick, slice them horizontally into cutlets about 3/4 inch (2 cm) thick so they cook evenly. Lay the pieces on a clean cutting board, blotting any remaining moisture so the dredge and sear will cling and brown properly. Keep the trimmed pieces arranged neatly—visual order matters for an even sear.
Step 3: Season and dredge for a light crust
In a small bowl combine fine sea salt, freshly ground black pepper, sweet paprika and garlic powder; press this seasoning onto both sides of the cutlets so it adheres. Spread 1/2 cup of all-purpose flour on a shallow plate and lightly coat each breast, shaking off excess—the coating should be thin and even to form a delicate golden crust and later help thicken the sauce. Set the floured pieces aside briefly while you heat the skillet.
Step 4: Sear to a golden crust
Heat the oven-safe skillet on medium-high with olive oil and butter until the butter is melted and foamy but not browned. Add the floured chicken in a single layer and sear 4–5 minutes per side until each piece has a golden, lightly crisped exterior; the interior will still be slightly underdone. Transfer the seared breasts to a plate and tent loosely with foil, leaving the fond in the skillet—those browned bits are concentrated flavor.
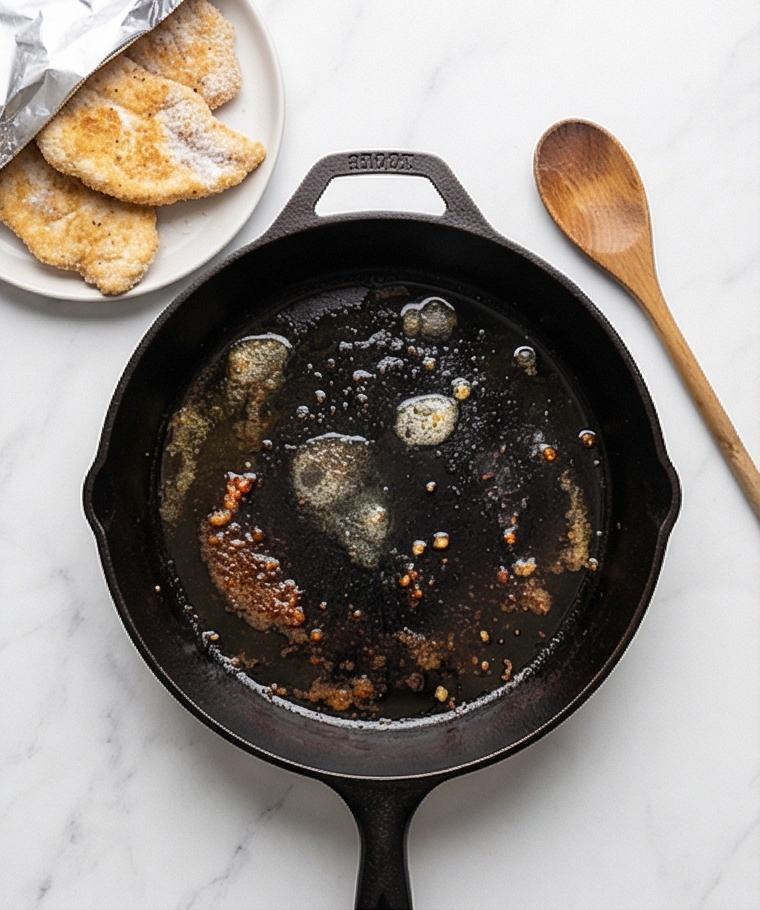
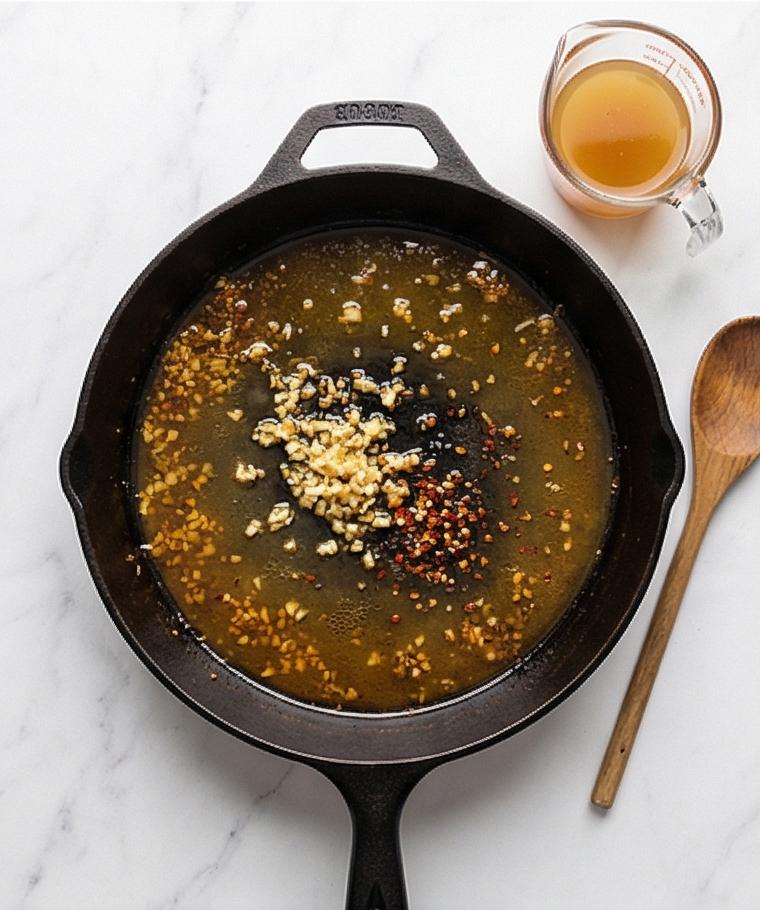
Step 5: Build the aromatic base and deglaze
Reduce the heat to medium, add a tablespoon of olive or sun-dried tomato oil if the pan looks dry, then add minced garlic and crushed red pepper flakes; stir constantly for just 30–45 seconds until aromatic and glossy but not browned. Pour in chicken broth and scrape the skillet with a wooden spoon to lift all the fond; bring to a gentle simmer and reduce for a couple minutes so the liquid concentrates into a flavorful pan sauce. This glossy, reduced broth is the backbone for the creamy finish.
Step 6: Add cream, sun-dried tomatoes and herbs to thicken
Turn the heat to medium-low and stir in heavy cream, thinly sliced sun-dried tomatoes, dried thyme, oregano and basil. Simmer gently with small bubbles at the edges, stirring occasionally, until the sauce begins to thicken and become velvety—about 3–4 minutes. Watch the texture: it should change from watery to a cohesive pale-ivory emulsion studded with deep-red tomato ribbons.
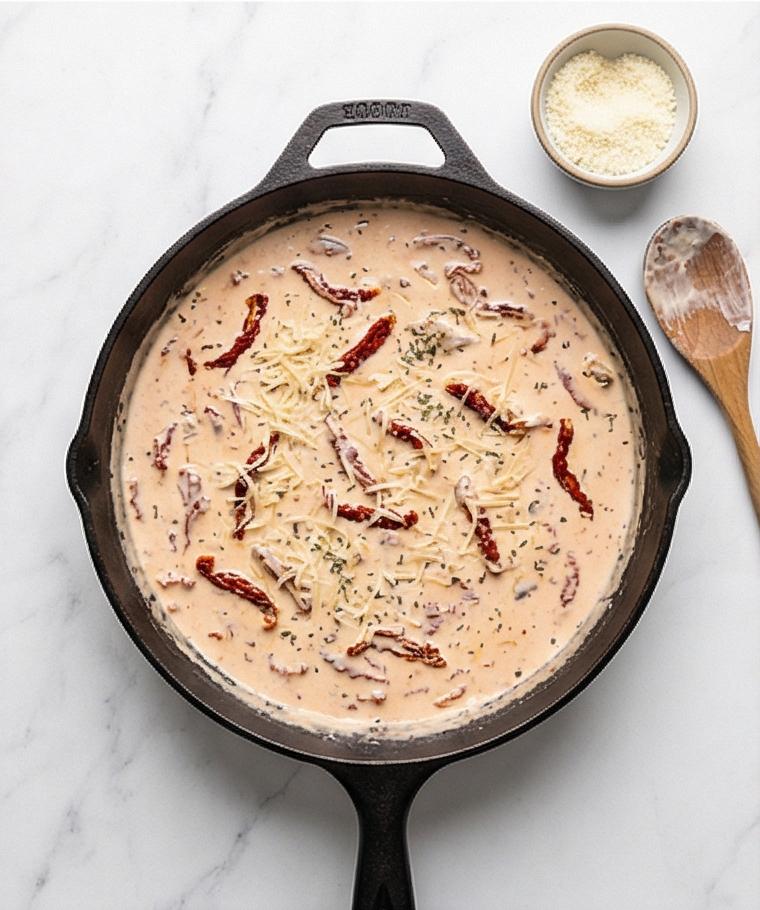
Step 7: Enrich with Parmesan and nestle the chicken
Gradually add freshly grated Parmesan, stirring constantly until it melts into a glossy, clingy sauce that coats a spoon. Taste and adjust seasoning with additional salt and pepper as needed. Return the seared chicken to the skillet, turning each piece to coat in the sauce and spooning sun-dried tomatoes over the tops—this is the moment the components become one coherent dish.
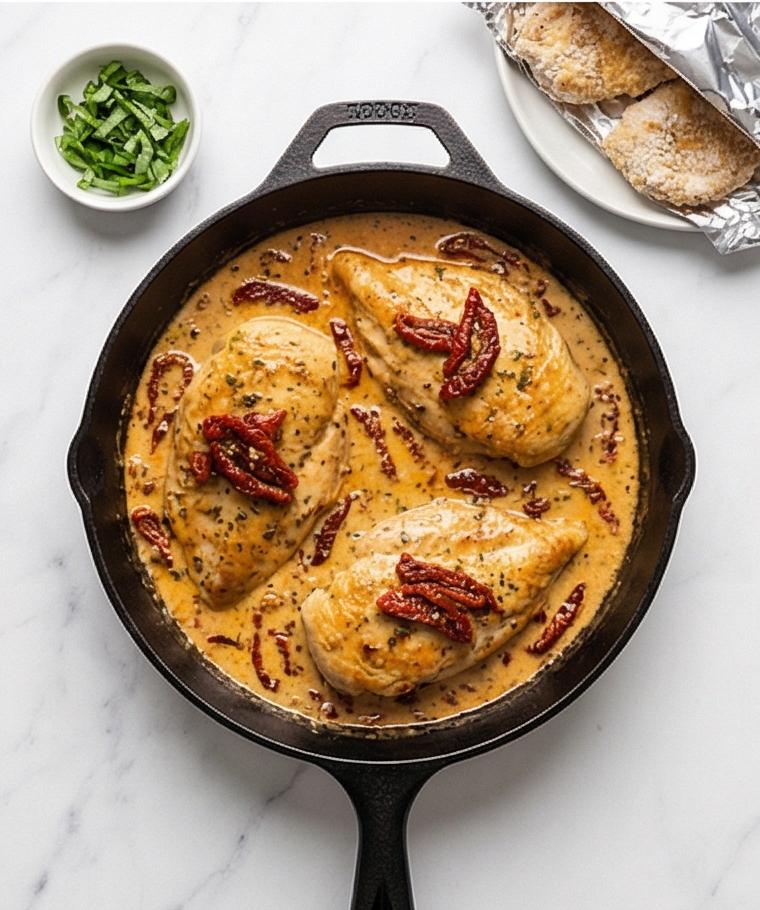
Step 8: Bake until just cooked and finish with basil
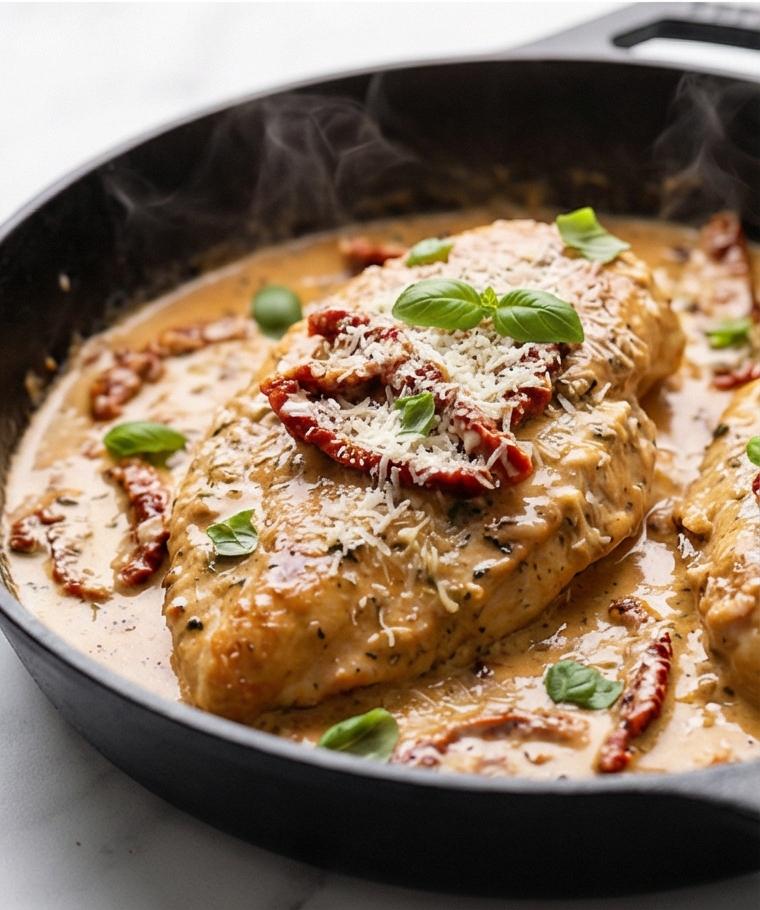
Transfer the skillet to the preheated oven and bake 12–15 minutes, or until the thickest part of the chicken reaches safe doneness and the sauce bubbles gently around the edges. Remove and let rest in the sauce for 3–5 minutes; then stir in 2–3 tablespoons of finely sliced fresh basil and reserve a few small leaves for garnish. If the sauce needs loosening, add a splash of hot chicken broth or pasta water; if it needs thickening, simmer briefly over low heat.
Step 9: Serve, garnish, and store leftovers
Serve the chicken hot, spooning extra sauce and sun-dried tomatoes over each piece. Top with additional freshly grated Parmesan and small fresh basil leaves; pair with cooked pasta, mashed potatoes or crusty bread to soak up the sauce. Store leftovers in an airtight container in the refrigerator up to 3 days and reheat gently with a splash of broth or cream to preserve texture.
Making It Your Own
I like to experiment with Marry Me Chicken Recipe by swapping proteins or adjusting heat. For a heartier winter version I use bone-in thighs and add a splash of dry white wine during deglazing. In summer, I swap sun-dried tomatoes for blistered cherry tomatoes and fold in fresh oregano.
For a lighter, dairy-free take I substitute coconut cream and skip the Parmesan, then finish with a squeeze of lemon and extra basil. For a low-carb plate, serve the chicken over riced cauliflower or sautéed greens instead of pasta.
Trying small tweaks—more chilies, smoked paprika, or a handful of spinach—lets you find the version your family will ask for again.
How to Serve
If I am hosting, I plan for 12 ounces of dry pasta per two people or a big platter of mashed potatoes for a cozy table. Serve the skillet family-style so guests can spoon sauce directly onto their plates; it looks generous and invites conversation. Garnish with extra grated Parmesan and a scattering of basil leaves for color.
For larger parties double the sauce and keep chicken pieces warm in a low oven. Plate individually for a dinner party: a bed of pasta, a chicken breast, then spooned sauce and a basil sprig. Offer crusty bread to sop up any remaining sauce.
Storage and Reheating Tips
Let leftovers cool to room temperature for no more than two hours before refrigerating in an airtight container. Stored this way, Marry Me Chicken Recipe keeps well for up to 3 days.
Reheat gently on the stove over low heat with a splash of chicken broth or cream to revive the sauce. If reheating in the microwave, warm in short bursts and stir between intervals to prevent separation.
Oops Moments and How to Fix Them
If the sauce splits, don’t panic: whisk in a tablespoon of cold water or a little extra cream off heat to bring it back together. Keeping the heat moderate when adding dairy prevents this.
If the chicken dries, it likely sat in the oven too long. Use a thermometer next time and remove at 160°F, letting carryover heat bring it to 165°F while resting in the sauce.
Final Encouragement
Give Marry Me Chicken Recipe a try this week. It rewards attention to simple technique and will likely become a fast favorite for easy weeknight meals or a small celebration.
Frequently Asked Questions.
- What can I serve with Marry Me Chicken Recipe? Serve with pasta, mashed potatoes, or crusty bread to soak up the sauce; roasted vegetables also pair nicely.
- Can I make Marry Me Chicken Recipe ahead of time? Yes, you can prepare the sauce and sear the chicken ahead, then finish baking before serving for best texture.
- Is there a dairy-free version of Marry Me Chicken Recipe? Yes, substitute coconut cream or a cashew cream and skip the Parmesan; add a little lemon to brighten the sauce.
- How spicy is Marry Me Chicken Recipe? It has a gentle heat from red pepper flakes; adjust 1/2 to 1 teaspoon to match your preference.
- Can I use chicken thighs for Marry Me Chicken Recipe? Absolutely; bone-in thighs add flavor but change the oven time and may need longer to reach safe doneness.

Marry Me Chicken Recipe
Make Marry Me Chicken Recipe tonight: seared chicken in a creamy sun-dried tomato sauce for 4 servings.
Ingredients
Instructions
Step 1: Preheat and ready the oven-safe skillet
Preheat the oven to 375°F (190°C) and position a rack in the center so everything that follows will finish evenly. Have a large 10–12 inch oven-safe skillet at hand and a sheet of foil for tenting; this is housekeeping so the cook can move quickly when the sauce is ready. Treat this as the first small action—getting temperature and the right tool in place makes the rest effortless.
Step 2: Prepare and flatten the chicken
Pat the four boneless, skinless chicken breasts dry and, if any are very thick, slice them horizontally into cutlets about 3/4 inch (2 cm) thick so they cook evenly. Lay the pieces on a clean cutting board, blotting any remaining moisture so the dredge and sear will cling and brown properly. Keep the trimmed pieces arranged neatly—visual order matters for an even sear.
Step 3: Season and dredge for a light crust
In a small bowl combine fine sea salt, freshly ground black pepper, sweet paprika and garlic powder; press this seasoning onto both sides of the cutlets so it adheres. Spread 1/2 cup of all-purpose flour on a shallow plate and lightly coat each breast, shaking off excess—the coating should be thin and even to form a delicate golden crust and later help thicken the sauce. Set the floured pieces aside briefly while you heat the skillet.
Step 4: Sear to a golden crust
Heat the oven-safe skillet on medium-high with olive oil and butter until the butter is melted and foamy but not browned. Add the floured chicken in a single layer and sear 4–5 minutes per side until each piece has a golden, lightly crisped exterior; the interior will still be slightly underdone. Transfer the seared breasts to a plate and tent loosely with foil, leaving the fond in the skillet—those browned bits are concentrated flavor.
Step 5: Build the aromatic base and deglaze
Reduce the heat to medium, add a tablespoon of olive or sun-dried tomato oil if the pan looks dry, then add minced garlic and crushed red pepper flakes; stir constantly for just 30–45 seconds until aromatic and glossy but not browned. Pour in chicken broth and scrape the skillet with a wooden spoon to lift all the fond; bring to a gentle simmer and reduce for a couple minutes so the liquid concentrates into a flavorful pan sauce. This glossy, reduced broth is the backbone for the creamy finish.
Step 6: Add cream, sun-dried tomatoes and herbs to thicken
Turn the heat to medium-low and stir in heavy cream, thinly sliced sun-dried tomatoes, dried thyme, oregano and basil. Simmer gently with small bubbles at the edges, stirring occasionally, until the sauce begins to thicken and become velvety—about 3–4 minutes. Watch the texture: it should change from watery to a cohesive pale-ivory emulsion studded with deep-red tomato ribbons.
Step 7: Enrich with Parmesan and nestle the chicken
Gradually add freshly grated Parmesan, stirring constantly until it melts into a glossy, clingy sauce that coats a spoon. Taste and adjust seasoning with additional salt and pepper as needed. Return the seared chicken to the skillet, turning each piece to coat in the sauce and spooning sun-dried tomatoes over the tops—this is the moment the components become one coherent dish.
Step 8: Bake until just cooked and finish with basil
Transfer the skillet to the preheated oven and bake 12–15 minutes, or until the thickest part of the chicken reaches safe doneness and the sauce bubbles gently around the edges. Remove and let rest in the sauce for 3–5 minutes; then stir in 2–3 tablespoons of finely sliced fresh basil and reserve a few small leaves for garnish. If the sauce needs loosening, add a splash of hot chicken broth or pasta water; if it needs thickening, simmer briefly over low heat.
Step 9: Serve, garnish, and store leftovers
Serve the chicken hot, spooning extra sauce and sun-dried tomatoes over each piece. Top with additional freshly grated Parmesan and small fresh basil leaves; pair with cooked pasta, mashed potatoes or crusty bread to soak up the sauce. Store leftovers in an airtight container in the refrigerator up to 3 days and reheat gently with a splash of broth or cream to preserve texture.
Notes
- Let chicken rest in the sauce 3-5 minutes after baking to keep it juicy.
- Use freshly grated Parmesan for the creamiest, smoothest sauce.
- Reheat gently with a splash of chicken broth or cream to prevent sauce separation.
- For extra flavor, reserve a tablespoon of sun-dried tomato oil to finish the sauce.
- Use a meat thermometer to avoid overcooking: remove at 160°F and let rest.
