Croissants have been a kitchen obsession of mine for years, and I still get a thrill when the oven door opens and that buttery aroma rolls out. I learned early that patience and a good rolling pin make all the difference, and this recipe captures those small, reliable rituals. If you love flaky pastry and a warm, buttery curl in the morning, these Croissants are worth the time they ask for. They feel fancy but are deeply satisfying to make on a slow weekend.
How This Recipe Became My Rainy-Day Favorite
I remember the first time I made Croissants on a wet, gray afternoon. The house smelled like warm butter and yeast, and I sat by the kitchen table with a mug of coffee, watching the dough breathe as it rose. The rhythm of rolling and folding became soothing, almost meditative, and when I finally slid a tray of deep-golden crescents from the oven, every small frustration of the day seemed to melt away. The first bite was a revelation: a crisp shell that shivered into thin layers, and an interior that was tender and slightly chewy, with rich butter notes. Sharing them with a neighbor felt like sharing a secret, and since then these Croissants have been my answer to a tough week or a slow, celebratory morning.
Main Ingredients and How They Work
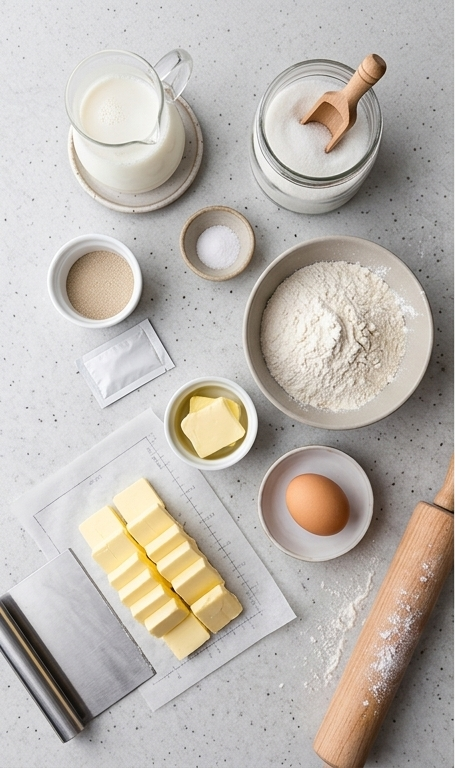
- Milk: Softens the dough and supplies lactose for browning. Whole milk gives a richer crumb; if needed, use 2% plus a pat of extra butter.
- Instant yeast: Provides the lift and a quick, reliable rise. Active dry can replace it but proof first.
- Granulated sugar: Feeds the yeast and adds subtle sweetness and color. Honey can be used but will change flavor.
- Salt: Balances flavor and strengthens gluten. Use fine salt for even distribution.
- Unsalted butter (room temp and chilled): Room-temp butter adds richness to dough; the chilled block creates laminations. Use European-style butter for higher fat and flavor.
- All-purpose flour: Builds structure. For a slightly stronger dough, substitute half with bread flour.
- Egg and extra milk: Make the glossy egg wash. Use a whole egg plus milk for shine and color.
Essential Kitchen Tools and Why They Matter
A few reliable tools make Croissants much easier and keep results consistent. A stand mixer with a dough hook saves your arms and gives a uniform gluten development; if you don’t have one, mix by hand and knead a bit longer. A heavy rolling pin helps compress the butter block and roll even layers; a French-style wooden pin or a stainless steel pin both work. A sharp bench scraper or pizza cutter keeps edges clean when trimming; a dull blade drags the dough. Parchment paper prevents sticking and helps form the butter block. Finally, a baking sheet and an instant-read thermometer are lifesavers for checking dough and oven temperature.
Step-by-Step Preparation Guide
Step 1: Prepare the milk and activate the yeast
Warm the milk to about 110–115°F, then combine it with the instant yeast and the tablespoon of granulated sugar in a small glass jug or bowl and stir gently until the yeast has dissolved and the mixture looks slightly frothy. In the bowl of a stand mixer fitted with the dough hook, add the flour, salt, and the 2 tablespoons of room-temperature unsalted butter, then pour in the warmed milk-yeast mixture and mix on low until the dough just comes together. Continue mixing on low speed for 5–6 minutes until the dough is smooth and slightly elastic. Shape into a tight ball, transfer to a lightly oiled bowl, cover, and let rise undisturbed until doubled in size, about 1–1½ hours.
Step 2: Build the butter block
On a large piece of parchment with a measured 8×6″ square faintly marked on the reverse, arrange the ½ cup of chilled, sliced butter into the square so the pieces fill most of the area. Fold the parchment tightly over the butter, then use a heavy rolling pin to compress and roll the butter into an even, cohesive block roughly within that rectangle, taking care not to tear the paper. Return the sealed butter block to the refrigerator to chill for 30 minutes so it firms up again while the dough finishes its first rise.
Step 3: Enclose the butter and chill the dough
Once the dough has doubled, gently deflate it and roll it into a 6×14″ rectangle. Place the chilled butter block centered on the dough and fold each long side over so the two edges meet and the butter is fully enclosed; press and pinch the seam to seal. Cover the folded dough and refrigerate for 30 minutes to relax and firm the butter-dough package before beginning the turns.
Step 4: First and second turns (lamination begins)
With the seam running lengthwise, roll the dough in that same direction to a roughly 18×8″ rectangle, keeping corners as square as possible. Perform a letter fold (fold the bottom third up, then the top third down) to complete one turn; rotate so the open edges face you, roll to the same rectangle size again and repeat the letter fold for a second turn. After these two turns, cover and refrigerate for 1 hour to keep the butter cold and the layers distinct.
Step 5: Final two turns and resting
Remove from the fridge and repeat the rolling and letter-fold sequence two more times, taking care to keep the dough cold and the edges sharp; after these final turns, chill the dough for 2 hours to relax the gluten and consolidate the laminations before shaping.
Step 6: Roll, trim, and cut into triangles
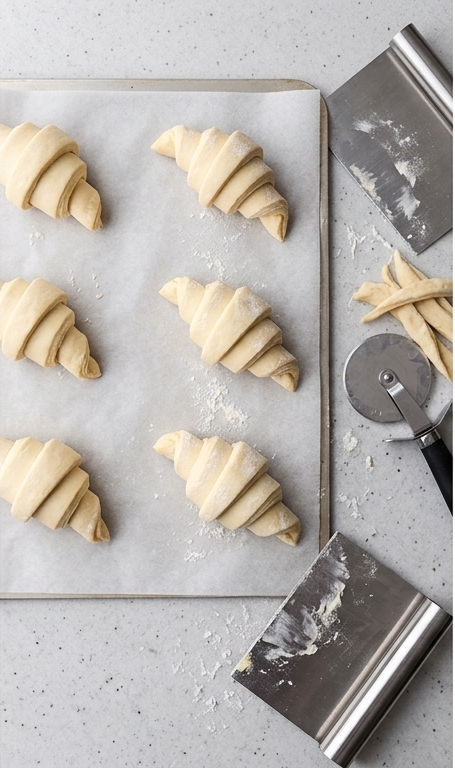
With the exposed folded edges facing you, roll the fully laminated dough into a long rectangle about 24×8″, using quick, confident strokes and stretching the corners by hand to maintain square edges. If you want crisp, sharp edges, trim a scant ¼” from both long sides with a very sharp pizza cutter or bench scraper. Cut the rectangle into six 8×4″ sections, then cut each rectangle diagonally into two triangles. Make a ½” slit at the base of each triangle and roll each from base to point, tucking the point under to form classic crescent shapes; place the shaped croissants on a parchment-lined baking sheet with spacing for expansion.
Step 7: Proof the shaped croissants
Cover the baking sheet lightly with plastic wrap or a clean kitchen towel and let the croissants proof at room temperature until noticeably puffy and jiggly, about 2–2½ hours. They should increase in size and show delicate wrinkles where the layers are separating a little.
Step 8: Egg wash and bake
Whisk the whole egg together with 2 tablespoons of milk to make a glossy egg wash, then gently brush one thin coat over each croissant and let it dry for 5 minutes before applying a second coat. Transfer the sheet (one at a time) to the oven to bake until deeply golden—first at a higher temperature to encourage lift, then lowered to finish through—until the exterior is a deep, even golden brown and the layers are crisp and audible when you tap them. Allow the croissants to cool for about 20 minutes to set and to let the interior finish steaming.
Step 9: Plate and serve
Nestle the warm, flaky croissants into a shallow, rustic bowl lined with a soft gray-and-white striped cloth so the golden, multi-layered curves are visible and inviting. Let them rest briefly so the butter smell fills the air, then serve warm, allowing the flaky crescents and delicate interior layers to be enjoyed immediately.

Making It Your Own
I often experiment with small changes to these Croissants. Sometimes I fold in a thin layer of almond paste for an indulgent twist. Other times I scatter finely grated lemon zest on the butter block for a bright note that cuts the richness. For a savory turn, I add a sprinkle of grated Gruyere into the triangle before rolling.
If you need dietary swaps, use a plant-based butter block and a non-dairy milk for a vegan option, but expect a slightly different texture. For a quicker version, make smaller croissants to reduce proofing time. Seasonal spices like cinnamon or cardamom work well during colder months.
How to Serve
When hosting, warm the Croissants briefly in a low oven for 5 minutes to regain crispness and serve on a large wooden board with small dishes of jam, honey, and softened butter. For brunch, offer a platter with sliced fruits, smoked salmon, and a cheese selection so guests can build savory or sweet bites.
To stretch servings, cut mini croissants for bite-sized hors d’oeuvres. For a dinner party, pair warm Croissants with a hearty soup or a composed salad to balance richness. Label items so guests know which are plain, almond, or savory.
Storage and Reheating Tips
Room temperature storage for fresh Croissants is fine for up to 24 hours in an airtight container, but they are best the same day. If you need to store longer, freeze cooled Croissants in a sealed bag for up to one month.
To reheat, thaw in the refrigerator if frozen, then warm in a preheated 325 F oven for 8 to 12 minutes until crisp and warmed through. Avoid the microwave for more than a few seconds, since it makes the exterior soggy.
Common Mistakes and How to Avoid Them
Overworking the dough or letting the butter soften too much will meld the layers. Keep everything cool and handle the dough with quick, confident strokes. Chill more often than you think if the butter starts to smear.
Not rolling square or trimming edges can give uneven layers. Use a sharp cutter and keep corners clean. Finally, rushing proofing means less lift, so give the Croissants time to become puffy and jiggly.
Final Thoughts
I hope this Croissants recipe invites you into a slow, rewarding baking ritual. Take your time with the turns, enjoy the sensory rewards, and share the warm results. Youll be surprised how satisfying homemade Croissants can be.
Frequently Asked Questions.
- Q: How long does it take to make Croissants from start to finish? A: From start to finish expect several hours of chilling and proofing; plan half a day or up to a full day depending on proof times.
- Q: Can I use active dry yeast instead of instant? A: Yes, but proof it in warm water or milk first and reduce the proofing time slightly if your yeast is very active.
- Q: Will butter temperature affect laminations? A: Absolutely, butter that is too soft will smear and ruin the layers; too hard and it will break. Aim for pliable but cool.
- Q: Can I freeze Croissants before baking? A: Yes, shaped croissants freeze well. Thaw in the fridge and then proof fully before baking for best results.
- Q: Why didnt my Croissants puff properly? A: Common reasons include weak yeast, over-chilled dough that needs warming, or underproofing. Check yeast freshness and proof until puffy.

Croissants
Make flaky, buttery Croissants at home with this hands-on recipe for crisp layers and golden crescents.
Ingredients
Instructions
Step 1: Prepare the milk and activate the yeast
Warm the milk to about 110–115°F, then combine it with the instant yeast and the tablespoon of granulated sugar in a small glass jug or bowl and stir gently until the yeast has dissolved and the mixture looks slightly frothy. In the bowl of a stand mixer fitted with the dough hook, add the flour, salt, and the 2 tablespoons of room-temperature unsalted butter, then pour in the warmed milk-yeast mixture and mix on low until the dough just comes together. Continue mixing on low speed for 5–6 minutes until the dough is smooth and slightly elastic. Shape into a tight ball, transfer to a lightly oiled bowl, cover, and let rise undisturbed until doubled in size, about 1–1½ hours.
Step 2: Build the butter block
On a large piece of parchment with a measured 8×6" square faintly marked on the reverse, arrange the ½ cup of chilled, sliced butter into the square so the pieces fill most of the area. Fold the parchment tightly over the butter, then use a heavy rolling pin to compress and roll the butter into an even, cohesive block roughly within that rectangle, taking care not to tear the paper. Return the sealed butter block to the refrigerator to chill for 30 minutes so it firms up again while the dough finishes its first rise.
Step 3: Enclose the butter and chill the dough
Once the dough has doubled, gently deflate it and roll it into a 6×14" rectangle. Place the chilled butter block centered on the dough and fold each long side over so the two edges meet and the butter is fully enclosed; press and pinch the seam to seal. Cover the folded dough and refrigerate for 30 minutes to relax and firm the butter-dough package before beginning the turns.
Step 4: First and second turns (lamination begins)
With the seam running lengthwise, roll the dough in that same direction to a roughly 18×8" rectangle, keeping corners as square as possible. Perform a letter fold (fold the bottom third up, then the top third down) to complete one turn; rotate so the open edges face you, roll to the same rectangle size again and repeat the letter fold for a second turn. After these two turns, cover and refrigerate for 1 hour to keep the butter cold and the layers distinct.
Step 5: Final two turns and resting
Remove from the fridge and repeat the rolling and letter-fold sequence two more times, taking care to keep the dough cold and the edges sharp; after these final turns, chill the dough for 2 hours to relax the gluten and consolidate the laminations before shaping.
Step 6: Roll, trim, and cut into triangles
With the exposed folded edges facing you, roll the fully laminated dough into a long rectangle about 24×8", using quick, confident strokes and stretching the corners by hand to maintain square edges. If you want crisp, sharp edges, trim a scant ¼" from both long sides with a very sharp pizza cutter or bench scraper. Cut the rectangle into six 8×4" sections, then cut each rectangle diagonally into two triangles. Make a ½" slit at the base of each triangle and roll each from base to point, tucking the point under to form classic crescent shapes; place the shaped croissants on a parchment-lined baking sheet with spacing for expansion.
Step 7: Proof the shaped croissants
Cover the baking sheet lightly with plastic wrap or a clean kitchen towel and let the croissants proof at room temperature until noticeably puffy and jiggly, about 2–2½ hours. They should increase in size and show delicate wrinkles where the layers are separating a little.
Step 8: Egg wash and bake
Whisk the whole egg together with 2 tablespoons of milk to make a glossy egg wash, then gently brush one thin coat over each croissant and let it dry for 5 minutes before applying a second coat. Transfer the sheet (one at a time) to the oven to bake until deeply golden—first at a higher temperature to encourage lift, then lowered to finish through—until the exterior is a deep, even golden brown and the layers are crisp and audible when you tap them. Allow the croissants to cool for about 20 minutes to set and to let the interior finish steaming.
Step 9: Plate and serve
Nestle the warm, flaky croissants into a shallow, rustic bowl lined with a soft gray-and-white striped cloth so the golden, multi-layered curves are visible and inviting. Let them rest briefly so the butter smell fills the air, then serve warm, allowing the flaky crescents and delicate interior layers to be enjoyed immediately.
Notes
- Keep all ingredients and the dough cold to preserve distinct layers
- Use a sharp cutter and a light touch when trimming to avoid compressing laminations
- Freeze shaped but unbaked croissants for up to one month and bake from thawed after proofing


