Cheesy Breadsticks Recipe has been my go-to for cozy nights and last-minute guests. I remember pulling a hot pan of these from the oven and watching the room go quiet as everyone dove in. The balance of garlicky butter, melty mozzarella, and bright Parmesan makes the Cheesy Breadsticks Recipe feel like a hug you can eat. I love how approachable the dough is; with a little patience it rewards you with golden, cheesy breadsticks that vanish fast.
How This Recipe Became My Weeknight Crowd-Pleaser
The first time I made the Cheesy Breadsticks Recipe, it was for a simple movie night with friends after a rainy hike. I kneaded the dough with chilled fingers, listening to rain on the windows, and the kitchen filled with warm, yeasty aroma as the first rise turned the ball of dough into a soft, billowy dome. When the cheese bubbled in the oven and browned at the edges, everyone paused mid-conversation to take the first pull. The mix of butter, garlic, and melted mozzarella felt both indulgent and homey. That evening taught me the joy of small rituals: a clean countertop, a favorite wooden spoon, and the tiny, satisfying task of scoring the dough before baking. Those details turned a simple recipe into a memory.
Key Ingredients and Why They Matter
- Warm Water and Yeast: The starter that wakes the dough; use 105-115°F water and instant or active dry yeast. If you need a substitute, try a sourdough starter (adjust hydration). Choose reliable yeast and check the expiration date.
- Bread Flour: Gives structure and chew; all-purpose will work but expect a softer crumb.
- Mozzarella and Parmesan: Mozzarella for melt, Parmesan for flavor and bite; swap provolone for a milder melt or Pecorino for sharper notes.
- Olive Oil and Butter: Oil keeps dough tender; garlic butter is the finishing touch. Use good extra-virgin olive oil and unsalted butter so you control seasoning.
Essential Kitchen Tools and Why They Help
A few simple tools make the Cheesy Breadsticks Recipe easier and more consistent. A reliable kitchen thermometer ensures your water is in the 105-115°F range so the yeast blooms without getting shocked. A roomy mixing bowl gives the dough room to grow during the first rise. A sturdy wooden spoon or dough scraper helps form a shaggy dough before kneading. For shaping, a rolling pin and a lightly floured surface keep the sheet even. A 9×13-inch pan is the perfect size for this recipe; a pizza cutter or pastry wheel makes neat scoring quick and safe. Finally, a wire rack helps the breadsticks cool without getting soggy.
- Measuring cups and spoons: precise measurements matter.
- Kitchen thermometer: avoids killing the yeast.
- Large mixing bowl: room to rise.
- Wooden spoon or dough scraper: for mixing.
- Rolling pin: for even thickness.
- 9×13-inch pan: for baking the sheet.
- Pastry wheel or pizza cutter: for clean scoring.
- Wire rack: for resting and cooling.
Step-by-Step Preparation Guide
Step 1: Activate the yeast and warm water
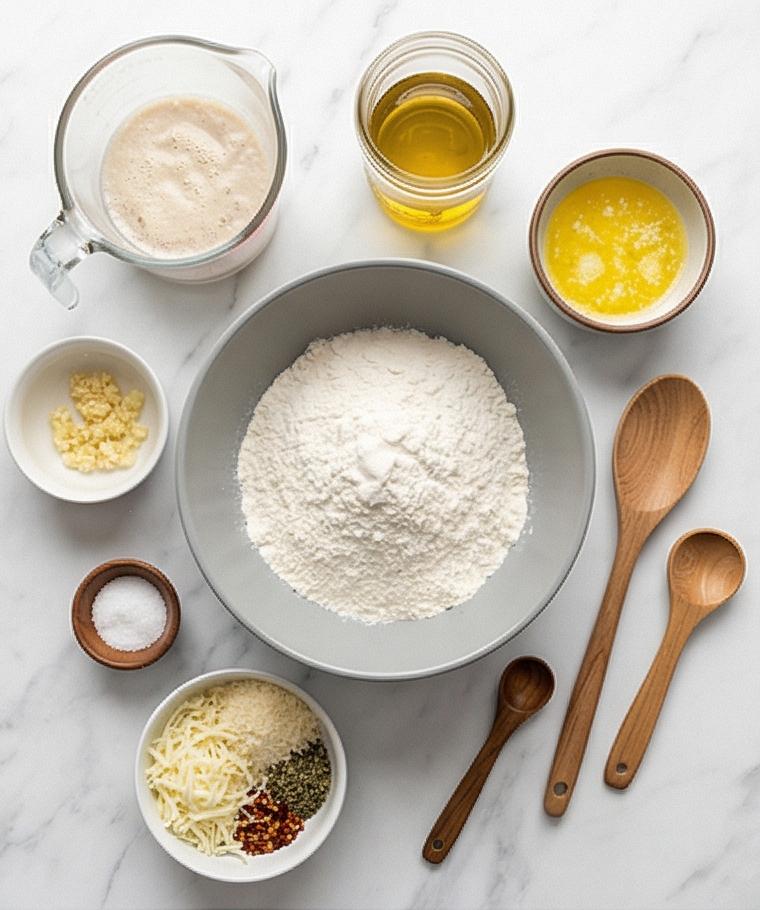
Warm a cup of water to a gentle 105–115°F (40–46°C) and stir in the active dry yeast and a teaspoon of sugar until dissolved. Set the clear glass measuring cup on the marble and wait 5–10 minutes until the surface is lively and foamy; this is the tiny, breathable cloud that tells you the yeast is alive and ready. Keep the vessel nearby so you can visually confirm the delicate foam and tiny bubbles before moving on.
Step 2: Combine dry ingredients and form a shaggy dough
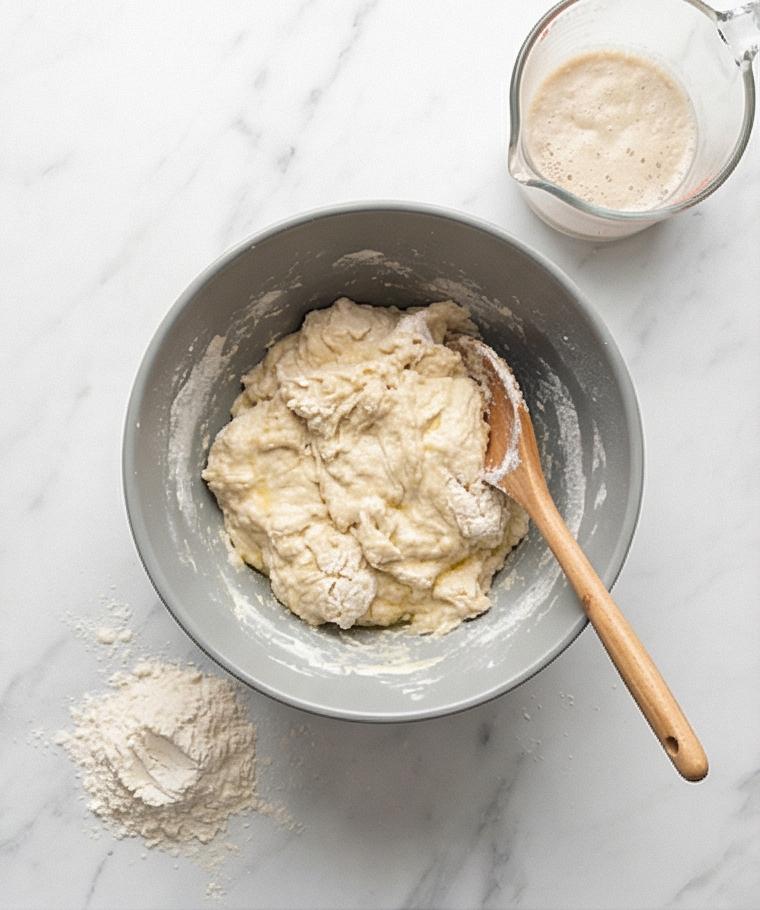
In a large matte grey ceramic mixing bowl, whisk together the bread flour, fine sea salt, and garlic powder until evenly distributed. Make a shallow well in the center, pour in the foamy yeast mixture and the olive oil, and stir with a wooden spoon until a rough, shaggy mass forms with no dry pockets—an irregular, floury surface dotted with strings of hydrated dough and sticky clumps. Let the texture speak: rough, tacky, and promising.
Step 3: Knead until smooth and elastic
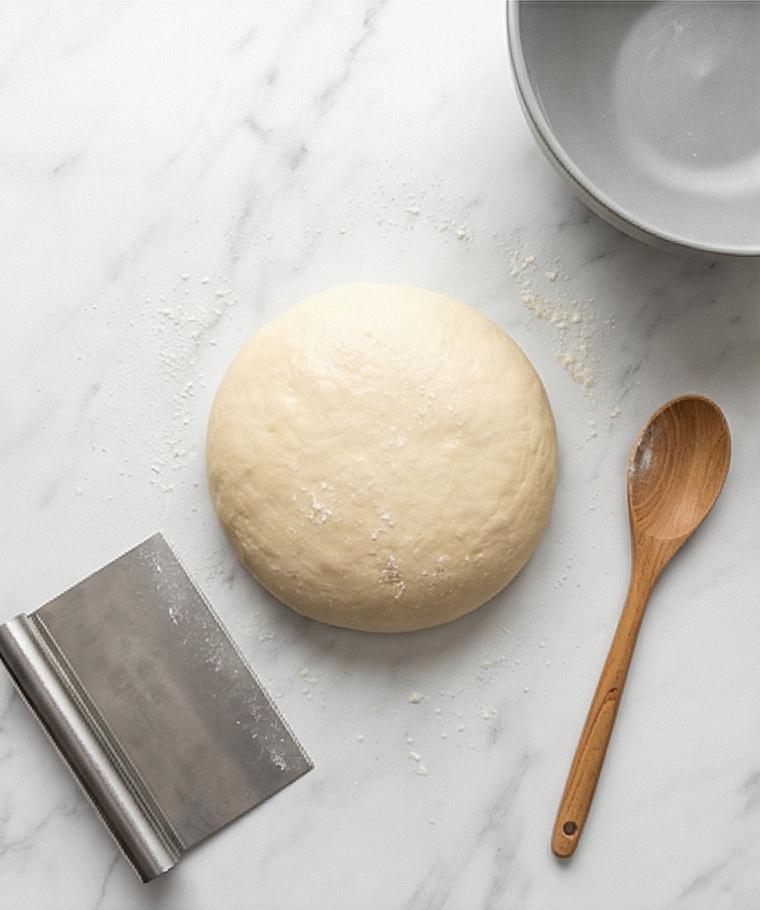
Lightly dust the Carrara marble with a tablespoon or two of reserved flour and turn the dough out. Knead by hand—fold, push, rotate—until the dough becomes smooth, slightly glossy, and stretches without tearing; it should feel elastic and resilient, still slightly tacky but not wet. Shape it into a tight, smooth ball with faint surface seams and a soft skin of flour dust that highlights the dough’s suppleness.
Step 4: Oil the bowl and allow the first rise
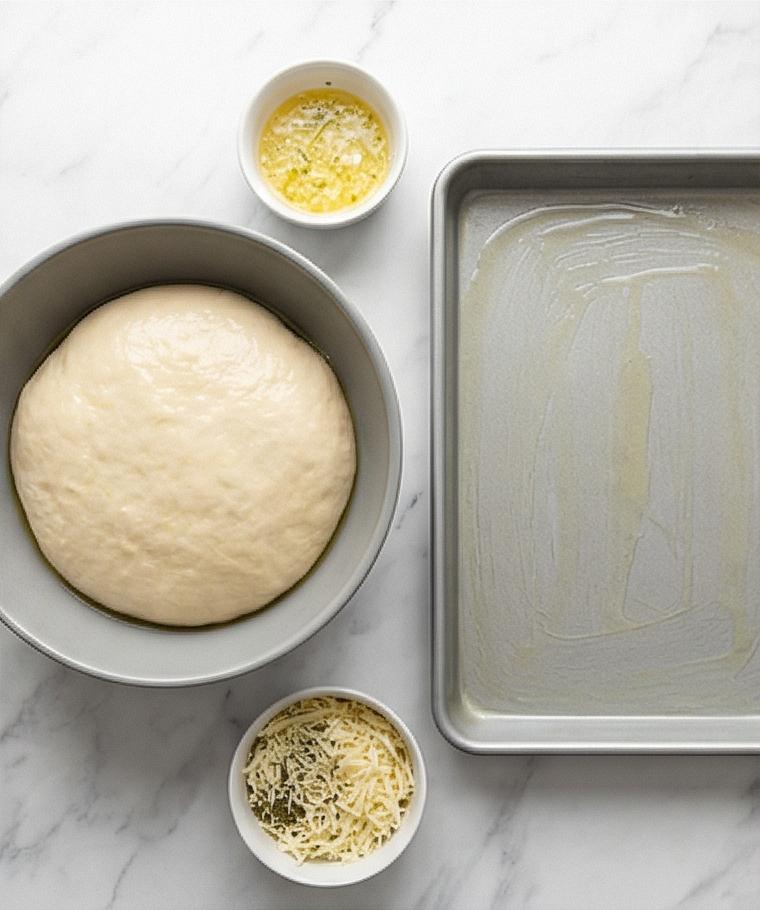
Brush a little olive oil into the same matte grey bowl, nestle the dough inside, and turn it once to coat. Cover loosely with a clean kitchen towel and set in a warm, draft-free spot to rise 45–60 minutes until doubled and noticeably puffy—soft to the touch and slowly springing back when poked. The risen dome should show a delicate sheen where the oil touched and a gentle network of tiny surface pores.
Step 5: Prepare pan and cheesy garlic topping while the dough rises
While the dough proofs, lightly grease a 9×13-inch rectangular pan with olive oil until the bottom and corners glisten faintly. In a small white ceramic bowl whisk together melted butter, minced garlic, and a pinch of salt; in a second bowl toss shredded low-moisture mozzarella with grated Parmesan, oregano, dried parsley, and optional red pepper flakes until evenly combined. Arrange these bowls and the oiled pan together on the marble so everything is ready in a clean, orderly composition.
Step 6: Deflate, shape, and roll to a 9×13 rectangle
Gently punch down the dough to release gas, transfer it back to the lightly floured surface, and shape it into a rough rectangle. Use a rolling pin to roll the dough to an even 9×13-inch rectangle about 1/2 inch thick, keeping the surface taut and the edges even. Carefully lift and transfer the sheet into the greased 9×13 pan, coaxing it into the corners so it fills the pan without tearing.
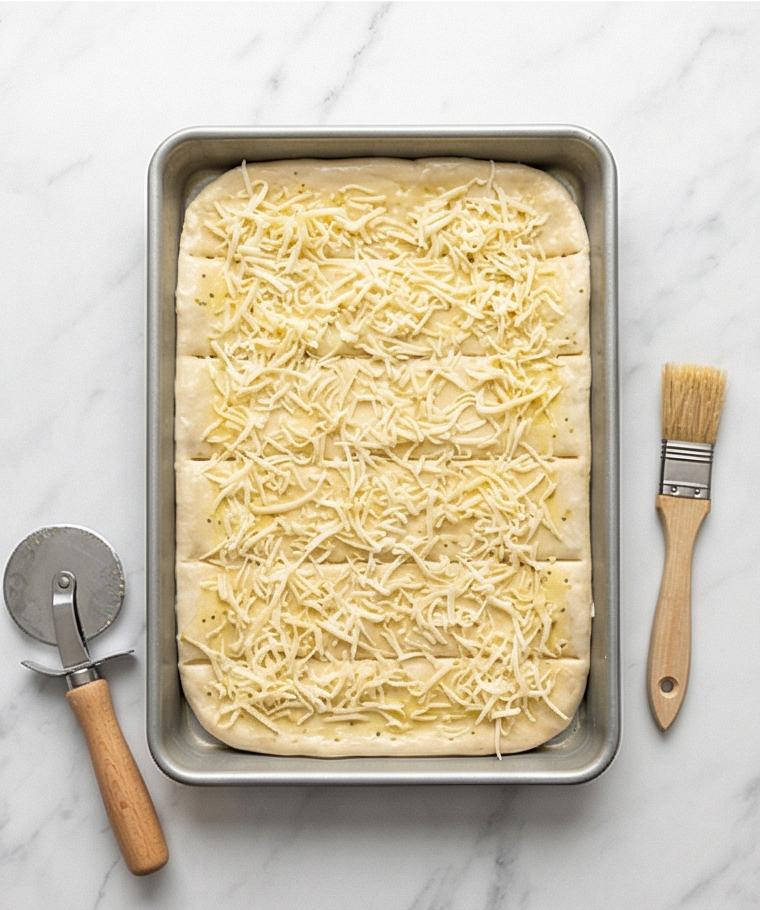
Step 7: Brush with garlic butter, top with cheese, and score
Generously brush the entire surface with the garlic butter, reaching every corner, then sprinkle the cheese mixture across the dough so it covers edge-to-edge. Press the cheese gently into the surface so it adheres. With a sharp pastry wheel or pizza cutter, lightly score the dough into breadstick shapes (four long strips by three across for twelve pieces), cutting only through the cheese and surface without slicing entirely to the pan.
Step 8: Final short rise and preheat oven
Cover the pan loosely and let the topped dough relax and puff for 15–20 minutes until slightly airy. Meanwhile preheat your oven to 425°F (220°C) until fully hot. The dough after this short rise should look pillowy under the cheese, the scored lines clear and the surface glossy with butter.
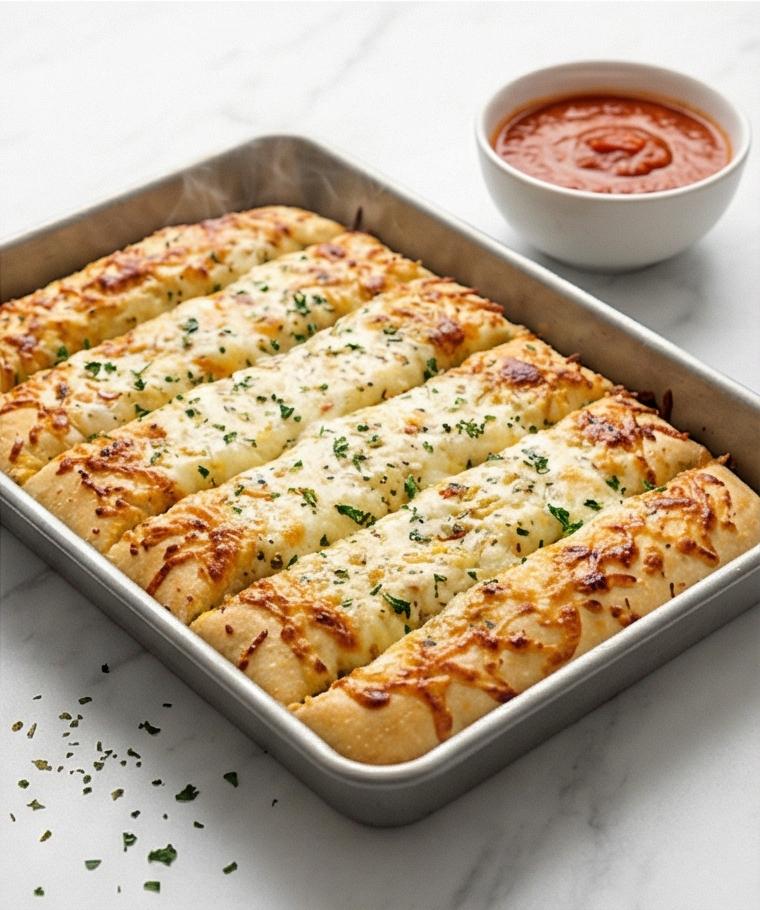
Step 9: Bake, finish, cut, and serve warm
Bake until the cheese is melted, bubbling, and spotting light golden brown and the edges of the breadsticks are golden and just crisp—about 12–15 minutes. Remove the rectangular pan to a wire rack, brush immediately with reserved garlic butter for extra shine, cool for 5–10 minutes so the cheese sets slightly, then cut fully along the scored lines into individual sticks. Sprinkle dried parsley and optional fresh chopped parsley, and serve warm with a small bowl of warm marinara on the side.
Making It Your Own
I like to experiment with the Cheesy Breadsticks Recipe depending on the season. In cooler months I add a pinch of smoked paprika to the cheese mix and swap half the mozzarella for smoked provolone to deepen the flavor. For summer gatherings I fold thinly sliced fresh basil into the butter before brushing so the aroma is bright and herbal. If you need a gluten-free option, try a store-bought gluten-free pizza dough and watch baking time closely; texture will be different but the cheesy topping still sings.
How to Serve
When hosting, serve the Cheesy Breadsticks Recipe straight from the pan so everyone can grab warm sticks while they are at their peak. For a dinner party, place the pan on a wooden board with small bowls of warm marinara, a herbed ricotta dip, and a tangy olive oil and balsamic dip. If you need to stretch servings, slice into thinner sticks and pair with a hearty salad and roasted vegetables to make a meal. For kids, skip the red pepper flakes and offer a mild ranch alongside.
Storage and Reheating Tips
Leftovers keep well for a day or two at room temperature in a loosely covered container, or up to 3 days refrigerated in an airtight container. To preserve crispness, layer parchment between pieces so they do not stick.
When reheating, warm individual sticks in a 350°F oven for 8-10 minutes or until cheese is melty and edges are crisp. For a quick fix, use a toaster oven for 4-6 minutes. Avoid microwaving if you want crisp edges; it will make the bread soft and the cheese rubbery.
Common Mistakes and How to Avoid Them
Underproofing the dough is a frequent slip. If the dough has not doubled, give it more time in a warm spot so the texture becomes airy and the crumb opens up. Over-kneading is less obvious at home but can make the breadsticks tough; stop kneading once the dough is smooth and elastic.
Another trap is brushing too much butter before baking which can lead to soggy pockets. Use the garlic butter generously but evenly, and reserve a little to brush on immediately after baking for shine.
Final Thoughts
Try the Cheesy Breadsticks Recipe this weekend and see how quickly it becomes a favorite in your rotation. It rewards gentle attention and a little patience, and the payoff is warm, cheesy bread that brings people together.
Frequently Asked Questions.
- Q: Can I make the dough ahead of time and refrigerate it? A: Yes, you can retard the dough in the refrigerator for up to 24 hours after the first knead. Bring it to room temperature and let it finish its rise before shaping.
- Q: What if my yeast doesn’t foam? A: If there is no foam after 10 minutes, the yeast may be old or the water was too hot or cold. Start over with fresh yeast and check the water temperature.
- Q: Can I use all-purpose flour instead of bread flour? A: Yes, all-purpose will work but expect a slightly softer, less chewy crumb.
- Q: How do I get the cheese to brown without burning the bread? A: Bake at the recommended temperature and watch the last few minutes; if the cheese browns too quickly, tent lightly with foil for the final bake.
- Q: Are these freezer-friendly? A: Yes, once cooled, wrap tightly and freeze for up to 1 month. Reheat from frozen in a 350°F oven until warmed through.

Cheesy Breadsticks Recipe
Make Cheesy Breadsticks Recipe: warm, garlicky, and melty breadsticks perfect for parties and weeknights.
Ingredients
Instructions
Step 1: Activate the yeast and warm water
Warm a cup of water to a gentle 105–115°F (40–46°C) and stir in the active dry yeast and a teaspoon of sugar until dissolved. Set the clear glass measuring cup on the marble and wait 5–10 minutes until the surface is lively and foamy; this is the tiny, breathable cloud that tells you the yeast is alive and ready. Keep the vessel nearby so you can visually confirm the delicate foam and tiny bubbles before moving on.
Step 2: Combine dry ingredients and form a shaggy dough
In a large matte grey ceramic mixing bowl, whisk together the bread flour, fine sea salt, and garlic powder until evenly distributed. Make a shallow well in the center, pour in the foamy yeast mixture and the olive oil, and stir with a wooden spoon until a rough, shaggy mass forms with no dry pockets—an irregular, floury surface dotted with strings of hydrated dough and sticky clumps. Let the texture speak: rough, tacky, and promising.
Step 3: Knead until smooth and elastic
Lightly dust the Carrara marble with a tablespoon or two of reserved flour and turn the dough out. Knead by hand—fold, push, rotate—until the dough becomes smooth, slightly glossy, and stretches without tearing; it should feel elastic and resilient, still slightly tacky but not wet. Shape it into a tight, smooth ball with faint surface seams and a soft skin of flour dust that highlights the dough’s suppleness.
Step 4: Oil the bowl and allow the first rise
Brush a little olive oil into the same matte grey bowl, nestle the dough inside, and turn it once to coat. Cover loosely with a clean kitchen towel and set in a warm, draft-free spot to rise 45–60 minutes until doubled and noticeably puffy—soft to the touch and slowly springing back when poked. The risen dome should show a delicate sheen where the oil touched and a gentle network of tiny surface pores.
Step 5: Prepare pan and cheesy garlic topping while the dough rises
While the dough proofs, lightly grease a 9x13-inch rectangular pan with olive oil until the bottom and corners glisten faintly. In a small white ceramic bowl whisk together melted butter, minced garlic, and a pinch of salt; in a second bowl toss shredded low-moisture mozzarella with grated Parmesan, oregano, dried parsley, and optional red pepper flakes until evenly combined. Arrange these bowls and the oiled pan together on the marble so everything is ready in a clean, orderly composition.
Step 6: Deflate, shape, and roll to a 9x13 rectangle
Gently punch down the dough to release gas, transfer it back to the lightly floured surface, and shape it into a rough rectangle. Use a rolling pin to roll the dough to an even 9x13-inch rectangle about 1/2 inch thick, keeping the surface taut and the edges even. Carefully lift and transfer the sheet into the greased 9x13 pan, coaxing it into the corners so it fills the pan without tearing.
Step 7: Brush with garlic butter, top with cheese, and score
Generously brush the entire surface with the garlic butter, reaching every corner, then sprinkle the cheese mixture across the dough so it covers edge-to-edge. Press the cheese gently into the surface so it adheres. With a sharp pastry wheel or pizza cutter, lightly score the dough into breadstick shapes (four long strips by three across for twelve pieces), cutting only through the cheese and surface without slicing entirely to the pan.
Step 8: Final short rise and preheat oven
Cover the pan loosely and let the topped dough relax and puff for 15–20 minutes until slightly airy. Meanwhile preheat your oven to 425°F (220°C) until fully hot. The dough after this short rise should look pillowy under the cheese, the scored lines clear and the surface glossy with butter.
Step 9: Bake, finish, cut, and serve warm
Bake until the cheese is melted, bubbling, and spotting light golden brown and the edges of the breadsticks are golden and just crisp—about 12–15 minutes. Remove the rectangular pan to a wire rack, brush immediately with reserved garlic butter for extra shine, cool for 5–10 minutes so the cheese sets slightly, then cut fully along the scored lines into individual sticks. Sprinkle dried parsley and optional fresh chopped parsley, and serve warm with a small bowl of warm marinara on the side.
Notes
- Use a kitchen thermometer to keep water between 105-115°F for reliable yeast activation.
- Reserve a little garlic butter to brush on after baking for glossy, flavorful finish.
- To freeze, cool completely, wrap tightly in plastic, and freeze up to 1 month. Reheat in a 350°F oven from frozen.
- If you want a softer crumb, substitute half the bread flour with all-purpose flour.
- For a quick, spicy version add extra red pepper flakes to the cheese mix before baking.