There’s something magical about the way a ripe strawberry meets silky chocolate, and I’ve been chasing that perfect bite for years. As a home baker who loves quick indulgences, Chocolate Covered Strawberries have become my go-to treat for gatherings and quiet evenings alike. The simple ingredients let the flavors shine, and the process feels like a tiny celebration in the kitchen. I love sharing this recipe because it’s as rewarding to make as it is to eat.
A Sweet Summer Memory
I still remember the first time I made Chocolate Covered Strawberries for my sister’s birthday when I was twelve. The kitchen smelled of fresh berries and melted cocoa, and my grandma showed me how to pat each fruit dry with a soft towel—her hands steady, her smile wide. As the chocolate set, we laughed about the sticky mess on our aprons, and the final glossy berries looked like tiny jewels on a white plate. That night, the strawberries disappeared in minutes, and the memory of that sweet, sticky joy stayed with me. Now, whenever I dip a berry, I think back to that summer evening, the warm glow of the kitchen light, and the simple pleasure of sharing something homemade and delicious.
The Star Players
- Dark Semi-Sweet Chocolate: The rich backbone of the dish, it provides the glossy coat and deep flavor. Choose a chocolate with at least 60% cocoa for a balanced bite. If you prefer a milder taste, substitute with milk chocolate, but expect a sweeter result. Look for chocolate that snaps when broken – that’s a sign of good temper.
- Strawberries: Fresh, ripe, and firm berries give the perfect contrast to the smooth chocolate. Pick berries that are bright red, with green caps still attached. If strawberries are out of season, try frozen berries that have been thawed and patted dry, though texture may differ.

Tools of the Trade
- Microwave‑Safe Glass Bowl: Allows even heating of chocolate without scorching. If you don’t have glass, a ceramic bowl works too.
- Heat‑Proof Spatula: Essential for stirring the chocolate smoothly. A silicone spatula is ideal.
- Clean Kitchen Towel: Used to pat the strawberries dry; a lint‑free towel prevents stray fibers.
- Waxed Paper: Provides a non‑stick surface for the dipped berries to set.
- Refrigerator: Quickens the setting process; a brief chill works well.
Step-by-Step Preparation Guide
Step 1: Rinse and Completely Dry the Strawberries
Gently rinse the strawberries under cool water, then spread them out on a clean kitchen towel and pat each berry completely dry; moisture is the silent enemy of glossy chocolate coatings. Leave the bright green calyxes intact – they provide a natural handle and a vibrant color contrast – and arrange the fully dry, plump berries in a single layer so they’re ready for dipping without crowding or moisture transfer.
Step 2: Melt the Dark Chocolate in a Microwave‑Safe Bowl
Place roughly chopped dark semi‑sweet chocolate (or pre‑broken pieces) into a medium microwave‑safe glass bowl. Microwave on high for 30 seconds, remove and vigorously stir with a heat‑proof spatula, then repeat short bursts and stirring until the chocolate is homogenous, silky, and free of graininess – stop while it is smooth and glossy to avoid seizing. Keep the spatula resting in the bowl when not stirring; a little smear of temper‑like sheen on the rim signals the correct molten viscosity for coating.
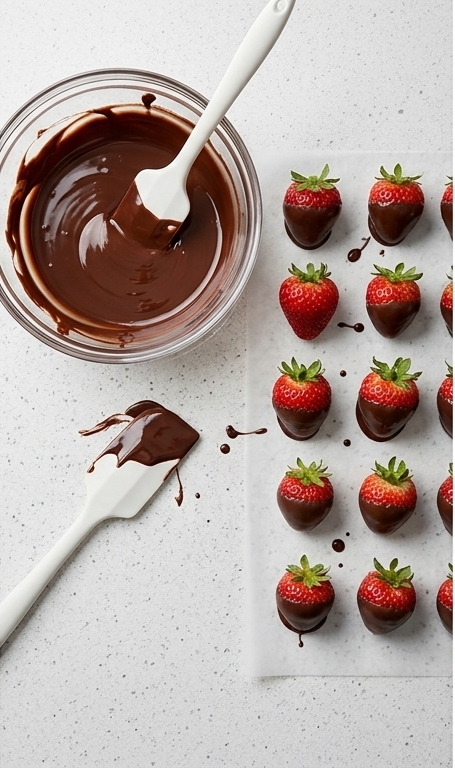
Step 3: Dip Each Berry and Let Them Cool on Waxed Paper
Holding each berry by the leaves, dip the lower half into the warm, glossy chocolate, twist slightly as you lift so the chocolate forms an even, dripping‑free shell, then place the dipped berry on a sheet of waxed paper on the Luna Pearl surface. Alternate some fully dipped, some half‑dipped, and a few plain berries to create visual variety and to show progression from raw to coated. Use the spatula to scrape the bowl’s rim and to create small chocolate puddles for occasional decorative touches.
Step 4: Chill or Serve Once Set
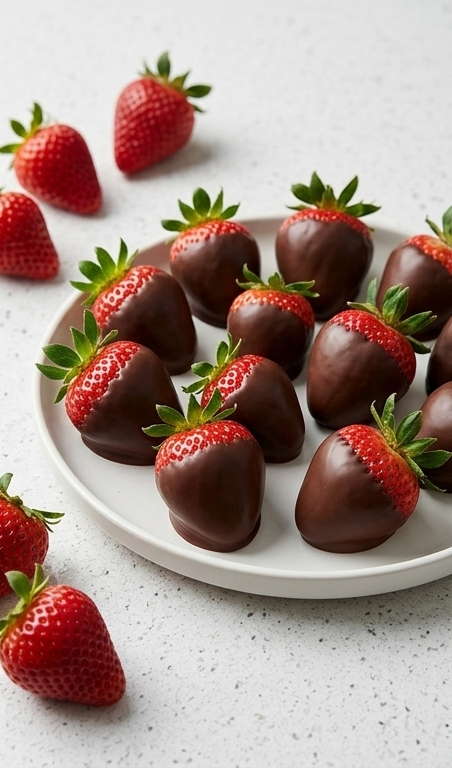
Allow the dipped berries to sit at room temperature until the chocolate firms to a satiny finish, or refrigerate briefly for a quicker, harder set – either yields a glossy, snap‑within‑a‑quiet‑bite coating. Arrange the finished berries on a shallow matte white ceramic platter for serving, leaving some uncoated strawberries nearby to highlight contrast.
Creative Twists
I love experimenting with Chocolate Covered Strawberries, and a few simple tweaks keep the recipe fresh. Swap the dark chocolate for white chocolate and sprinkle toasted coconut for a tropical vibe, or drizzle a thin line of caramel for a salty‑sweet combo. Seasonal fruit additions like thinly sliced kiwi or orange zest add a pop of color and zing. For a festive touch, dust the finished berries with powdered sugar or edible glitter. If you’re catering to dietary needs, use dairy‑free chocolate and organic strawberries for a vegan version that still tastes indulgent.
Serving & Presentation
When I host a dinner party, I arrange the berries on a tiered marble stand, alternating colors and dipping styles for visual drama. A small bowl of fresh mint leaves nearby adds a fragrant garnish and a pop of green. For larger gatherings, I double the batch and serve them on a chilled glass platter; the cool surface helps keep the chocolate firm. Pair the berries with a glass of sparkling rosé or a rich espresso for a balanced palate experience. Adjust the quantity based on guest count—about two berries per person works well as a light dessert or a sophisticated palate cleanser.
Storage & Reheating
From my experience, the best way to store Chocolate Covered Strawberries is in an airtight container lined with parchment paper, placed in the refrigerator. They stay glossy and fresh for up to two days; just let them sit at room temperature for ten minutes before serving to bring back the melt‑in‑your‑mouth texture. If you need to re‑heat a few berries, a quick 10‑second burst in the microwave will soften the chocolate without melting the fruit. Avoid stacking them directly on top of each other, as that can cause the chocolate to stick together.
Common Pitfalls
One frequent mistake is dipping berries that aren’t fully dry; even a tiny droplet of water will cause the chocolate to seize and become grainy. I always pat them dry and let them air‑dry for a minute before dipping. Another slip‑up is overheating the chocolate—stirring in short bursts prevents scorching. If the chocolate does become thick, a splash of neutral oil can bring back its smooth flow.
Final Thoughts
I hope you enjoy making and sharing Chocolate Covered Strawberries as much as I do. Their simple elegance makes them perfect for any occasion, and the joy of creating that glossy coating is truly satisfying. Give them a try, and let the sweet, chocolate‑kissed berries bring a smile to your table.
Frequently Asked Questions
- Can I use milk chocolate instead of dark? Yes, milk chocolate works, but the flavor will be sweeter and less intense.
- How long can I keep them? Store in the fridge for up to two days; bring to room temperature before serving.
- Do I need a thermometer? No, just melt until smooth and glossy; watch for any graininess.
- Can I freeze them? Freezing is not recommended as the chocolate may develop bloom.
- What’s the best way to melt chocolate? Microwave in short bursts, stirring often, or use a double boiler for gentle heat.

Chocolate Covered Strawberries
Make irresistible Chocolate Covered Strawberries at home - quick, elegant, and perfect for any celebration.
Ingredients
Instructions
Step 1: Rinse and Completely Dry the Strawberries
Gently rinse the strawberries under cool water, then spread them out on a clean kitchen towel and pat each berry completely dry; moisture is the silent enemy of glossy chocolate coatings. Leave the bright green calyxes intact — they provide a natural handle and a vibrant color contrast — and arrange the fully dry, plump berries in a single layer so they’re ready for dipping without crowding or moisture transfer.
Step 2: Melt the Dark Chocolate in a Microwave-Safe Bowl
Place roughly chopped dark semi-sweet chocolate (or pre-broken pieces) into a medium microwave-safe glass bowl. Microwave on high for 30 seconds, remove and vigorously stir with a heatproof spatula, then repeat short bursts and stirring until the chocolate is homogenous, silky, and free of graininess—stop while it is smooth and glossy to avoid seizing. Keep the spatula resting in the bowl when not stirring; a little smear of temper-like sheen on the rim signals the correct molten viscosity for coating.
Step 3: Dip Each Berry and Let Them Cool on Waxed Paper
Holding each berry by the leaves, dip the lower half into the warm, glossy chocolate, twist slightly as you lift so the chocolate forms an even, dripping-free shell, then place the dipped berry on a sheet of waxed paper on the Luna Pearl surface. Alternate some fully dipped, some half-dipped, and a few plain berries to create visual variety and to show progression from raw to coated. Use the spatula to scrape the bowl’s rim and to create small chocolate puddles for occasional decorative touches.
Step 4: Chill or Serve Once Set
Allow the dipped berries to sit at room temperature until the chocolate firms to a satiny finish, or refrigerate briefly for a quicker, harder set—either yields a glossy, snap-within-a-quiet-bite coating. Arrange the finished berries on a shallow matte white ceramic platter for serving, leaving some uncoated strawberries nearby to highlight contrast.
Notes
- Pat strawberries completely dry before dipping.
- Use high‑quality chocolate with at least 60% cocoa for best texture.
- Store in an airtight container with parchment paper in the fridge.
- Let berries sit at room temperature 10 minutes before serving for optimal bite.
- If chocolate seizes, add a teaspoon of neutral oil and stir gently.