I love simple recipes that taste like they took longer to make than they actually did, and this Lemon Garlic Green Beans Recipe is one of my go-to weeknight side dishes. It brightens any plate with that fresh lemon tang and the warm, savory note of garlic and butter. I first started making the Lemon Garlic Green Beans Recipe when I needed a quick, reliable side for casual dinners, and it never fails to draw compliments. If you want a vegetable dish that feels special without fuss, this Lemon Garlic Green Beans Recipe is the one to keep in your back pocket.
How This Recipe Became My Rainy-Day Favorite
I remember the first time I made these green beans on a gray, rainy evening when friends were stopping by unexpectedly. The kitchen smelled like warm butter and bright lemon within minutes, and the sound of the beans sizzling in the pan felt like an instant comfort. I kept checking them as if I were watching a tiny, delicious performance: little pops as the garlic hit the hot fat, the beans blistering and glinting with glossy, lemon-speckled sheen. We ate them straight from the pan, mouths bright with citrus, and I felt proud that something so simple could lift the whole room. That memory keeps me returning to the recipe whenever I want a small, reliable moment of joy.
The Primary Ingredients and Why They Matter
- Green Beans: The canvas of the dish. Use fresh, crisp beans for the best texture; snap-test them to check freshness. If you can find haricots verts, they work beautifully as a slightly slimmer alternative.
- Unsalted Butter and Olive Oil: The flavor bed. Butter gives richness while olive oil raises the smoke point; together they prevent burning and create a glossy finish. Substitute with ghee for nuttier notes.
- Garlic: The aromatic backbone. Finely mince so it releases flavor quickly without large raw bites. Shallots can be used for a milder, sweeter touch.
- Lemon (zest and juice): The brightener. Zest brings perfume while juice adds lively acidity. Use unwaxed lemons if possible; bottled lemon juice will do in a pinch.
- Salt and Pepper: Essential seasonings. Kosher salt for blanching and finishing, freshly ground pepper for bite. Adjust to taste.

Essential Kitchen Tools and Why They Help
A few simple tools make this Lemon Garlic Green Beans Recipe easy and reliable. Good knives and a stable cutting board help you trim and zest quickly; a sharp knife keeps the garlic fine and even so it flavors without burning. A large pot gives the beans space to blanch evenly, while a bowl big enough for an ice bath stops cooking instantly and preserves color. A roomy skillet is essential for sautéing so the beans can blister rather than steam. Finally, a colander and clean towels are critical to get the beans dry before they hit the pan, which keeps them crisp.
- Chef’s Knife: For trimming, zesting, and mincing garlic.
- Cutting Board: Stable surface to prep safely.
- Large Pot: To boil the beans without crowding.
- Large Bowl: For the ice bath to shock the beans.
- Colander: For quick draining.
- Large Skillet: Wide surface to sauté and blister the beans.
- Tongs: For tossing and serving; helps avoid piercing and losing juices.
Step-by-Step Preparation Guide
Step 1: Trim and Rinse the Green Beans
Start by rinsing the green beans under cold running water, then trim off the stem ends and remove any tough strings. Gently pat the beans completely dry with a clean kitchen towel so they won’t steam later; arrange them in a neat single layer on the towel or a small sheet of parchment while you bring the water to a boil. Keep a pair of stainless steel tongs nearby for use in later steps.
Step 2: Blanch and Shock to Lock Bright Color
Bring a large pot of heavily salted water to a rolling boil, add the trimmed green beans and cook just 3–4 minutes until they turn a vibrant emerald and are crisp-tender. Immediately transfer the beans to a prepared ice bath to stop cooking and preserve that vivid green color. The beans should look glossy, taut, and deeply saturated from the blanch: firm but yielding.
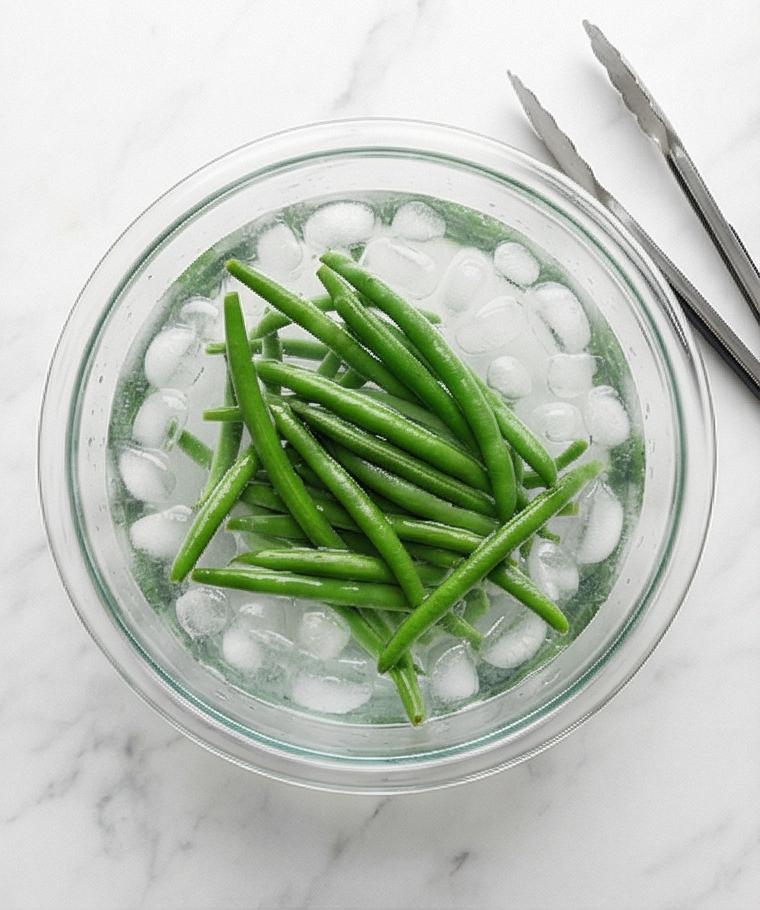
Step 3: Drain and Thoroughly Dry
Lift the cooled beans from the ice bath and drain them well in a colander, shaking to remove excess water, then spread them on a clean kitchen towel and pat completely dry. The goal is beans that are matte where water clings and glossy where the surface fat will sit — no puddles, just a satin sheen where moisture remains. Keep the same stainless steel tongs and a clean towel in frame.

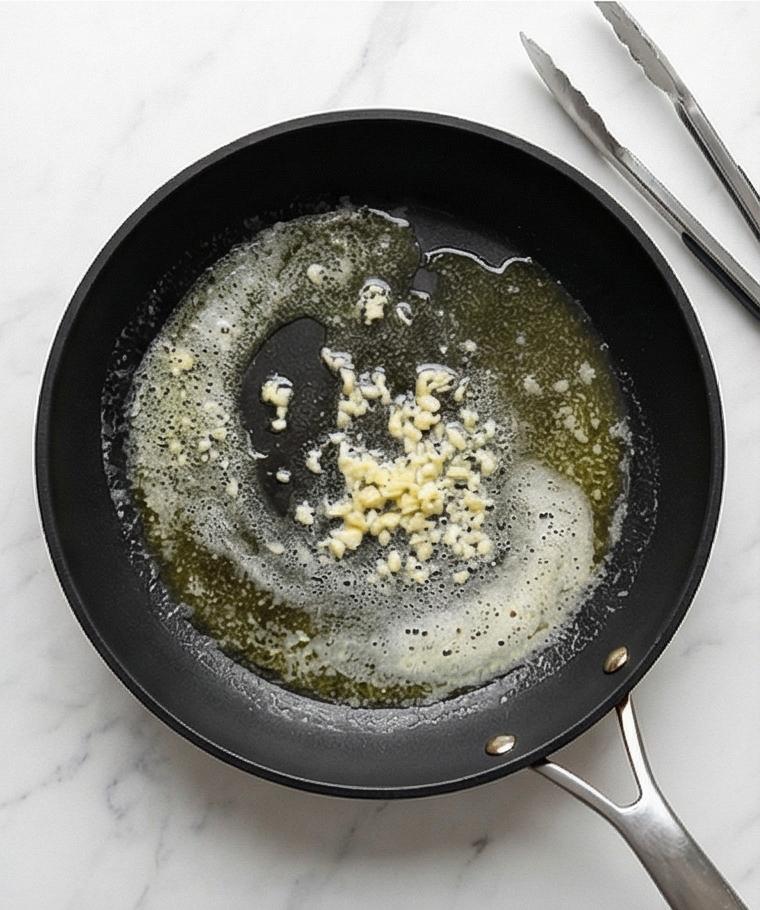
Step 4: Melt Butter, Warm Oil, and Gently Sauté Garlic
Preheat a large skillet briefly, then add room-temperature butter and a splash of extra-virgin olive oil; let the butter fully melt and foam, coating the pan in a glossy lacquer. Add the finely minced garlic and red pepper flakes and stir only until fragrant and just beginning to sizzle — pale and aromatic, not browned. This stage is all about the butter’s foamy microbubbles and the tiny translucent threads of garlic.
Step 5: Toss, Sauté Until Blistered, and Brighten with Lemon
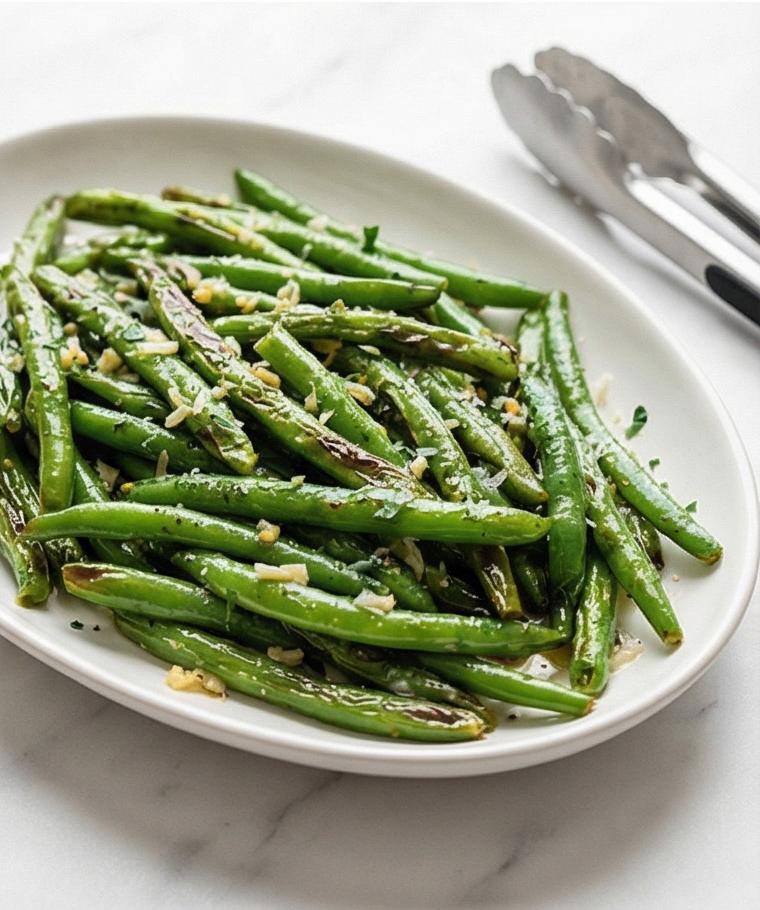
Add the very dry green beans to the buttery garlic, tossing immediately so each bean is evenly coated. Sauté until tender-crisp and lightly blistered in spots, glossy with fat and dotted with tiny golden garlic specks. Season with kosher salt and freshly ground black pepper, then turn the heat to low and finish by tossing with finely grated lemon zest and a generous squeeze of fresh lemon juice — the citrus will bloom into tiny beaded droplets across the glossy beans. Transfer the beans to a warm shallow serving platter so the buttery garlic pool comes with them.
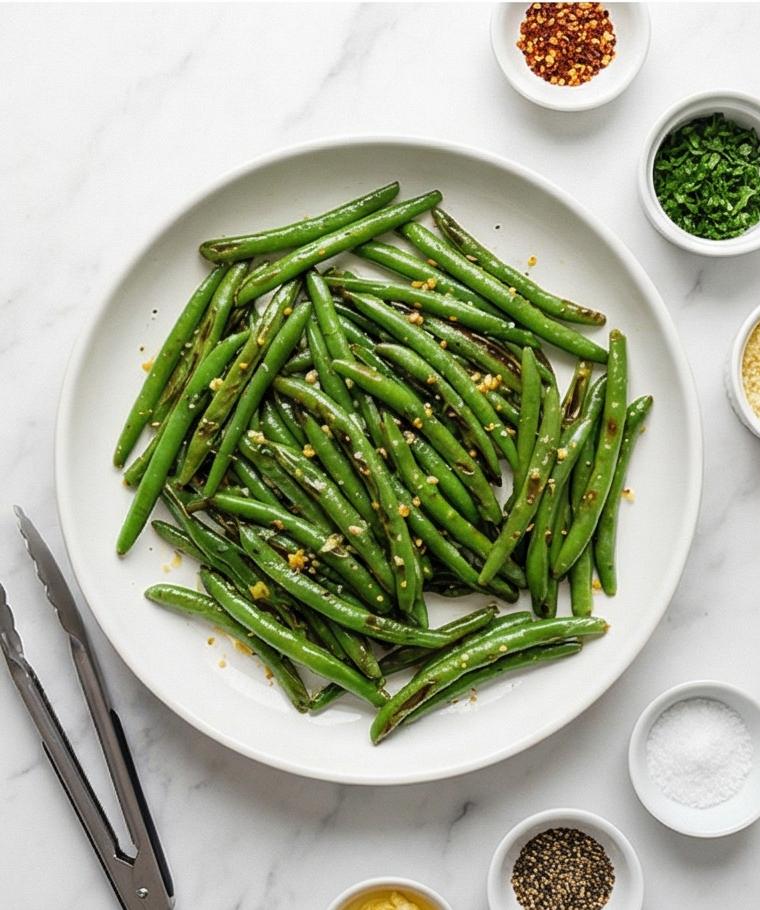
Step 6: Garnish and Serve Immediately
Finish with a scattering of finely chopped fresh flat-leaf parsley and a light dusting of finely grated Parmesan if using — the herb flecks add verdant texture, the cheese a whisper of granular ivory. Present immediately while still hot and crisp-tender so the surface shows blistered skins, shimmering buttery lemon pockets, and scattered herb and cheese accents.
Seasonal Twists and Variations
I like to tinker with this Lemon Garlic Green Beans Recipe depending on what is in season or what I have in the pantry. For a smoky spin, toss in a handful of toasted pine nuts or chopped almonds at the end for crunch and warmth. To make it vegan, swap butter for extra olive oil or a plant-based buttery spread; add a sprinkle of nutritional yeast instead of Parmesan for savory depth.
For a Mediterranean twist, fold in sliced olives and a few capers for briny contrast. If you want a richer winter version, sauté a few strips of pancetta first, remove them, then finish the beans with the crisped pancetta on top. Each tiny experiment changes the character but keeps the essential bright lemon and garlic lift.
How to Serve
Think of these Lemon Garlic Green Beans Recipe as a flexible partner at the table. For a casual weeknight, serve them family style right from the skillet with roasted chicken and mashed potatoes. At a dinner party, arrange them on a warm platter, scatter the parsley and Parmesan, and tuck little lemon wedges around the edge so guests can add an extra squeeze. For larger gatherings, double the recipe and use two skillets or roast briefly in the oven at 400 F for 8 minutes after tossing with butter and garlic to keep them hot.
If you need to stretch the servings, add roasted baby potatoes or blanched asparagus to bulk the platter while keeping the same bright flavor profile. These beans pair especially well with grilled fish, steak, or a lemony grain salad.
Storage and Reheating Tips
These beans are best eaten fresh, but you can store leftovers for 2 to 3 days in an airtight container in the refrigerator. Let them cool to room temperature before sealing to avoid condensation. Reheat gently to keep them crisp-tender rather than soggy.
To reheat, warm a skillet over medium-low heat with a teaspoon of butter or oil and toss the beans until warmed through, about 2 to 3 minutes. If they lost a little brightness, add a tiny splash of lemon juice and a pinch of salt before serving to revive the flavors.
Oops-Proofing: Common Mistakes and How to Avoid Them
One common mistake is not drying the beans thoroughly after the ice bath. Any excess water will steam them in the skillet and keep them from blistering; pat them dry and you will get the best texture. Another slip is letting the garlic brown — cook it only until fragrant so it stays sweet and aromatic without bitterness.
Finally, over-salting at the blanch stage can make the beans too salty; taste and adjust at the end. A fresh squeeze of lemon at the finish will balance salt and brighten the whole dish if it feels flat.
Final Encouragement
Give this Lemon Garlic Green Beans Recipe a try the next time you want a side that is quick, impressive, and full of bright flavor. It rewards small attention to detail — sharp trimming, a true ice bath, and a careful sauté — and the result is a glossy, lemon-kissed vegetable that complements almost any main. You might find, like I did, that it becomes one of those simple recipes you cook again and again.
Frequently Asked Questions
- Q: Can I use frozen green beans for this Lemon Garlic Green Beans Recipe? A: You can, but the texture will be softer; thaw and pat very dry, then reduce blanch time and be gentle when sautéing.
- Q: How do I make this vegan? A: Substitute the unsalted butter with extra-virgin olive oil or a vegan butter and skip the Parmesan.
- Q: Can I prepare the beans ahead? A: Blanch and shock them ahead of time, dry and refrigerate; finish in the skillet just before serving to preserve the texture.
- Q: What if I don’t have fresh lemons? A: Bottled lemon juice works in a pinch, but start with less and taste; the zest is harder to replace unless you use dried lemon peel sparingly.
- Q: How do I keep the beans bright green? A: Don’t overcook during blanching; immediately transfer to an ice bath and dry thoroughly before sautéing.

Lemon Garlic Green Beans Recipe
Make Lemon Garlic Green Beans Recipe: bright, buttery green beans with garlic and lemon—ready in about 20 minutes.
Ingredients
Instructions
Step 1: Trim and Rinse the Green Beans
Start by rinsing the green beans under cold running water, then trim off the stem ends and remove any tough strings. Gently pat the beans completely dry with a clean kitchen towel so they won’t steam later; arrange them in a neat single layer on the towel or a small sheet of parchment while you bring the water to a boil. Keep a pair of stainless steel tongs nearby for use in later steps.
Step 2: Blanch and Shock to Lock Bright Color
Bring a large pot of heavily salted water to a rolling boil, add the trimmed green beans and cook just 3–4 minutes until they turn a vibrant emerald and are crisp-tender. Immediately transfer the beans to a prepared ice bath to stop cooking and preserve that vivid green color. The beans should look glossy, taut, and deeply saturated from the blanch: firm but yielding.
Step 3: Drain and Thoroughly Dry
Lift the cooled beans from the ice bath and drain them well in a colander, shaking to remove excess water, then spread them on a clean kitchen towel and pat completely dry. The goal is beans that are matte where water clings and glossy where the surface fat will sit — no puddles, just a satin sheen where moisture remains. Keep the same stainless steel tongs and a clean towel in frame.
Step 4: Melt Butter, Warm Oil, and Gently Sauté Garlic
Preheat a large skillet briefly, then add room-temperature butter and a splash of extra-virgin olive oil; let the butter fully melt and foam, coating the pan in a glossy lacquer. Add the finely minced garlic and red pepper flakes and stir only until fragrant and just beginning to sizzle — pale and aromatic, not browned. This stage is all about the butter’s foamy microbubbles and the tiny translucent threads of garlic.
Step 5: Toss, Sauté Until Blistered, and Brighten with Lemon
Add the very dry green beans to the buttery garlic, tossing immediately so each bean is evenly coated. Sauté until tender-crisp and lightly blistered in spots, glossy with fat and dotted with tiny golden garlic specks. Season with kosher salt and freshly ground black pepper, then turn the heat to low and finish by tossing with finely grated lemon zest and a generous squeeze of fresh lemon juice — the citrus will bloom into tiny beaded droplets across the glossy beans. Transfer the beans to a warm shallow serving platter so the buttery garlic pool comes with them.
Step 6: Garnish and Serve Immediately
Finish with a scattering of finely chopped fresh flat-leaf parsley and a light dusting of finely grated Parmesan if using — the herb flecks add verdant texture, the cheese a whisper of granular ivory. Present immediately while still hot and crisp-tender so the surface shows blistered skins, shimmering buttery lemon pockets, and scattered herb and cheese accents.
Notes
- Pat beans completely dry before sautéing to ensure blistering
- Use unwaxed lemons for brighter zest flavor
- Blanch only 3–4 minutes to keep beans crisp-tender
- Reheat gently in a skillet with a splash of oil or butter
- Swap butter for ghee or vegan butter to change flavor
