I still remember the first time I made this S’mores Brownies Recipe for a backyard get-together; the smell of toasted marshmallows and warm chocolate pulled everyone into the kitchen. It quickly became my go-to for celebrations because it combines the campfire nostalgia of s’mores with the dense comfort of brownies. I tinker with the topping and chocolate ratios depending on who I am serving, but the heart of the S’mores Brownies Recipe always stays the same: a crunchy graham base, fudgy chocolate center and gooey marshmallow crown. If you like playful desserts that double as conversation starters, this one will disappear fast.
How This Recipe Became My Rainy-Day Favorite
The first time I baked the S’mores Brownies Recipe it was raining and the house smelled like a campground memory. I can still picture the steam rising when I sliced into the pan, the marshmallows stretching in long, shiny ropes as each square came free. I felt proud handing a warm piece to my neighbor, who closed her eyes and said it tasted like summer. That reaction stuck with me; making these brownies is now my way of turning an ordinary day into a small celebration. The textures and smells make it comfort food that also feels a little indulgent.
Key Ingredients and Why They Matter
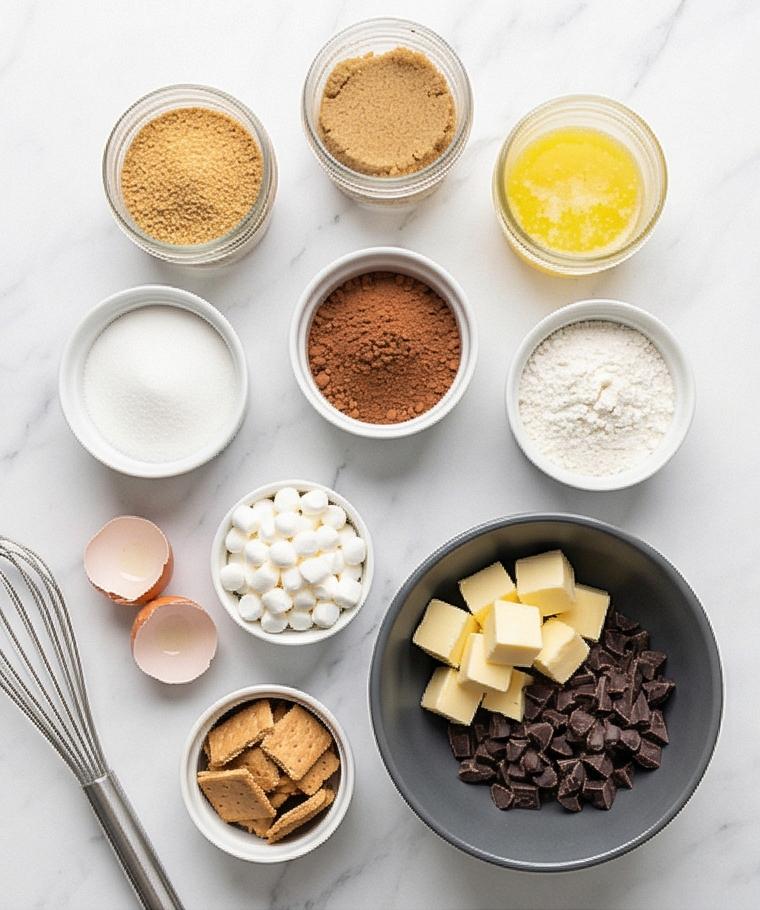
- Graham Cracker Crumbs: Provide a crisp, slightly sweet base that keeps the dessert grounded; you can swap for digestive biscuits or shortbread crumbs for a different flavor.
- Unsalted Butter: Binds the crust and enriches the brownie batter; use cultured butter for a tangier note.
- Semisweet Chocolate: The backbone of the fudge layer; dark chocolate gives more intensity while milk chocolate makes it sweeter.
- Granulated and Brown Sugar: Granulated adds structure, brown adds chew and depth; coconut sugar could be used for a lightly caramel note.
- Eggs and Vanilla: Eggs set the brownies and improve texture; vanilla rounds flavors and can be omitted for a purer chocolate focus.
- Flour and Cocoa: Flour gives structure, unsweetened cocoa boosts chocolate flavor; dutch-process cocoa will change acidity and richness.
- Marshmallows and Chocolate Chips: Create pockets of goo and texture; try vegan marshmallows for a plant-based version.
Essential Kitchen Tools and Why They Help
To make these S’mores Brownies Recipe well, having the right tools removes stress and speeds things up. A sturdy 9 x 13-inch metal baking pan gives even heat and reliable edges. Parchment paper with an overhang makes unmolding the slab simple and neat. A heatproof bowl for melting chocolate lets you control temperature without scorching. Use a flexible spatula to scrape every bit of batter and a whisk for glossy emulsions. For alternatives, a glass baking dish works instead of metal but may require extra baking time, and an offset spatula can replace a flexible one for smoothing the top.
- 9 x 13-inch metal baking pan: Even baking and crisp edges.
- Parchment paper: Easy unmolding and clean cuts.
- Heatproof mixing bowl: Safe chocolate melting and mixing.
- Whisk and flexible spatula: Emulsify and spread batter smoothly.
- Cooling rack and sharp knife: Cool evenly and slice clean squares.
Step-by-Step Preparation Guide.
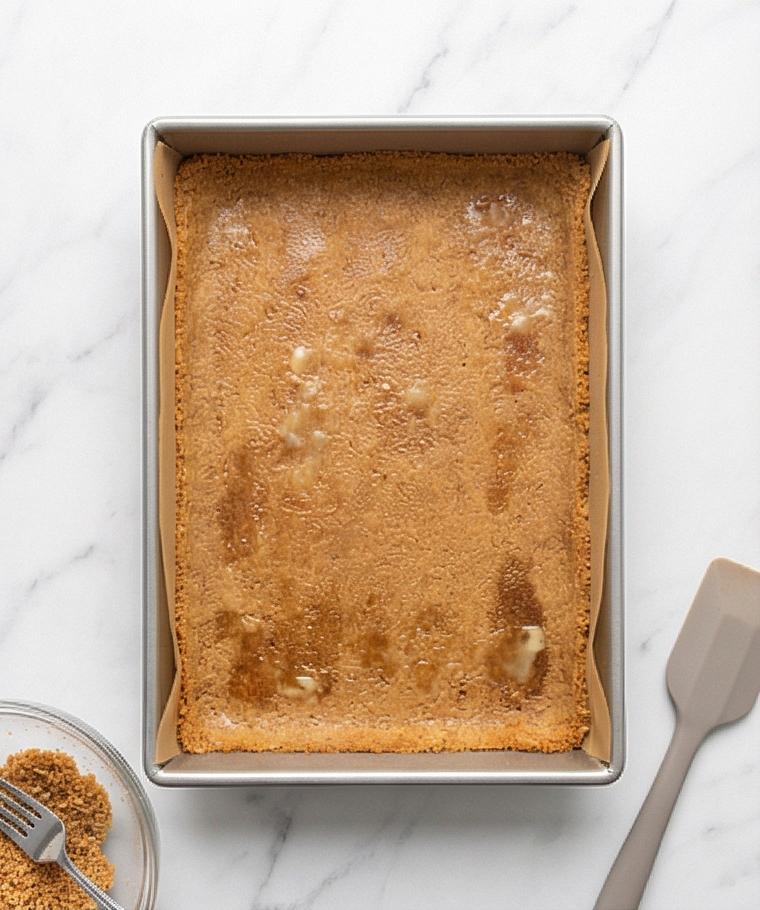
Step 1: Prepare the pan and make the graham cracker crust
Preheat the oven and lightly grease a 9 x 13-inch metal baking pan, then line the bottom and two long sides with parchment paper leaving an overhang for easy removal. In a medium glass bowl combine finely ground graham cracker crumbs with granulated sugar and a pinch of fine sea salt, then pour in melted unsalted butter and mix until the crumbs look uniformly moistened and resemble damp sand. Press the mixture firmly and evenly into the prepared pan, compacting into the corners so the crust will hold together. Bake briefly until the crust smells toasty and looks slightly darker; remove and set the pan on a wire rack to cool just enough to accept batter.
Step 2: Melt chocolate and marry with butter
In a single large matte charcoal-grey heatproof mixing bowl place chopped semisweet chocolate and cubed unsalted butter and melt together until the mixture is completely smooth and glossy. Remove from heat and let cool until warm to the touch (this prevents scrambling the eggs later). The bowl should show a silky, reflective chocolate emulsion clinging to the sides with a stainless whisk resting across the rim — glossy, uniform, and dense.
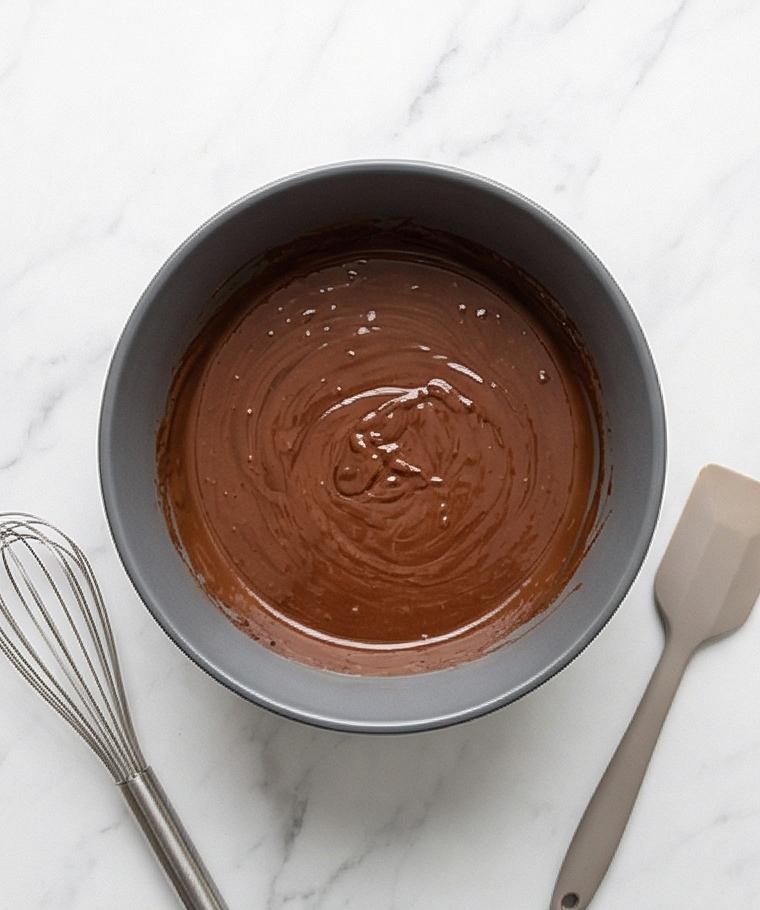
Step 3: Whisk sugars and eggs into the chocolate base
Whisk the granulated and light brown sugars into the warm chocolate until the mixture becomes slightly thickened and homogeneous, then add the room-temperature eggs one at a time, whisking each in until the batter loosens and becomes smoother and a touch lighter in color; finish with the vanilla. The result is a glossy, ribbon-y chocolate batter that looks cohesive and viscous, ready for the dry ingredients.
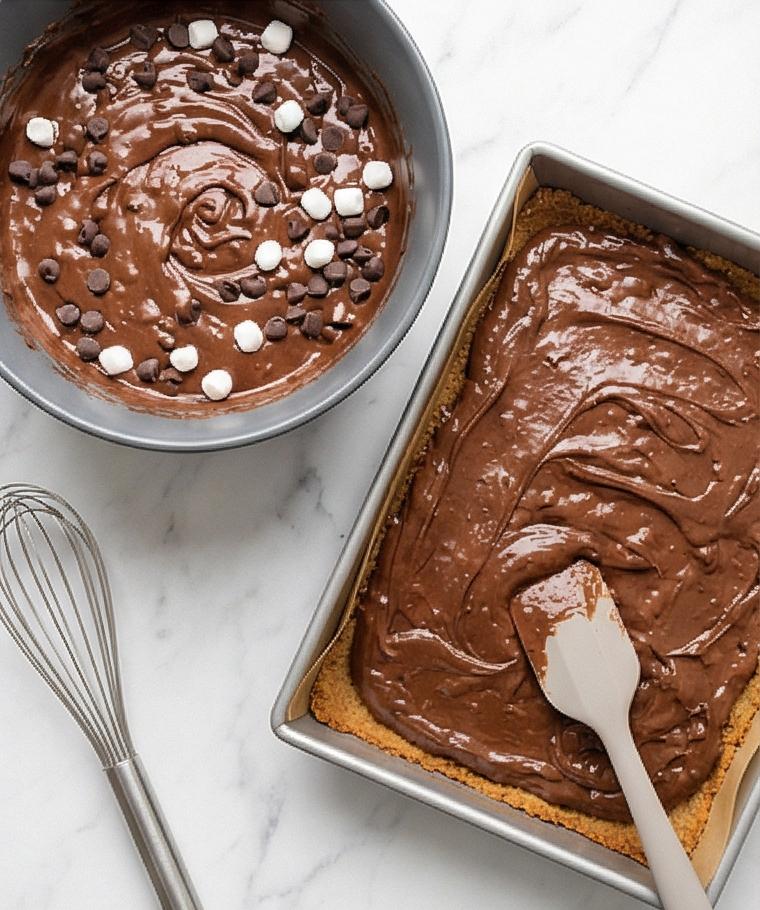
Step 4: Fold dry ingredients, chocolate chips and mini marshmallows, then assemble
Whisk the flour, sifted unsweetened cocoa powder, baking powder and fine salt together in a separate bowl until evenly blended, then fold the dry mix gently into the chocolate base just until no streaks remain. Fold in semisweet chocolate chips and mini marshmallows so they appear suspended through the thick, fudgy batter. Pour and scrape this dense batter onto the warm graham crust in the prepared rectangular pan, using a flexible spatula to spread into an even layer reaching right into the corners.
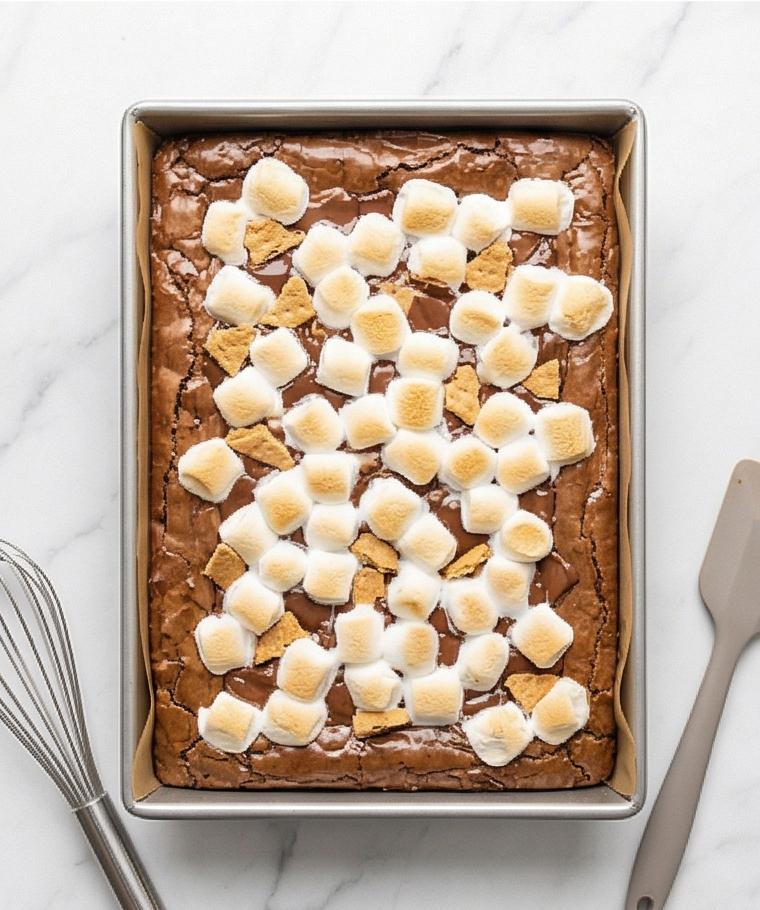
Step 5: Bake, top with marshmallows, chocolate and graham pieces, then finish
Bake the assembled slab until the edges are set and the top is shiny with slight cracks. Immediately scatter a thick blanket of mini marshmallows over the hot brownies, sprinkle chopped milk chocolate and broken graham cracker pieces across the marshmallow layer, pressing lightly so they adhere. Return briefly to heat so the marshmallows puff and melt and the chocolate softens; for deeper color, a very short broil can be used (watch closely). The topping should be pillowy, glossy where melted, with emergent light golden toasty tips.
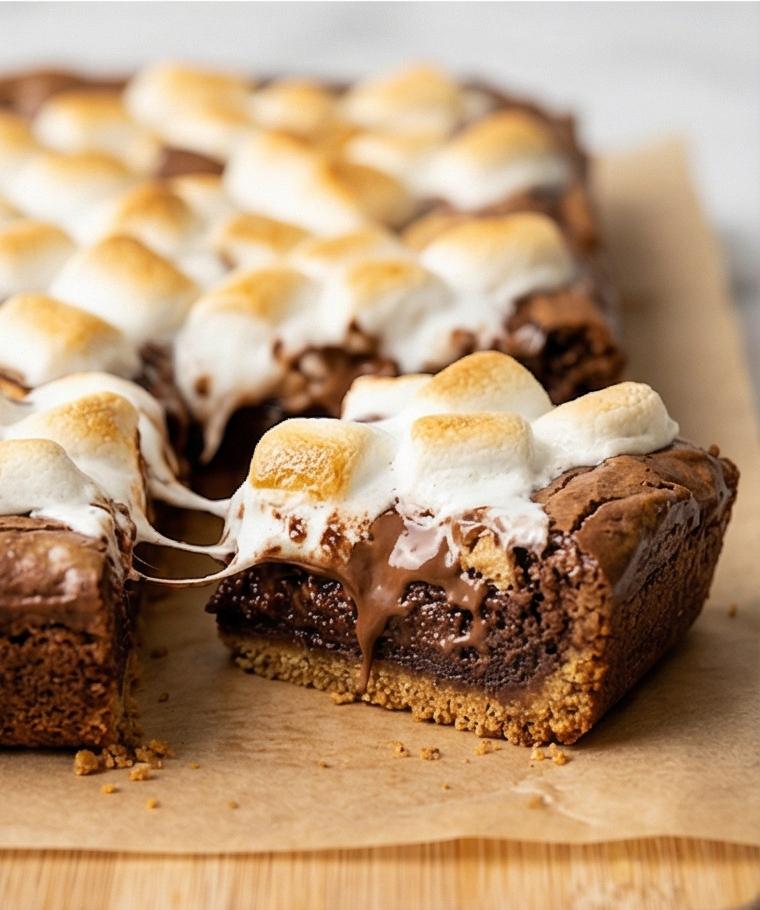
Step 6: Cool, unmold, slice and serve
Let the pan cool until just warm to the touch so the marshmallow cap sets; for cleaner squares chill briefly if desired. Lift the rectangular slab out with the parchment overhang onto a cutting board, gently clean a sharp knife between cuts and slice into neat squares that reveal layered textures: compact, slightly crumbly graham base; dense fudgy brownie; and a soft, toasted marshmallow crown studded with pools of melted chocolate and crunchy graham pieces. Serve at room temperature or slightly warm for gooeyness.
Making It Your Own
I treat these S’mores Brownies Recipe like a laboratory for dessert experiments. For a gluten-free twist, I swap the all-purpose flour for a 1:1 gluten-free blend and press the crust with almond flour for extra nuttiness. To make them vegan, try dairy-free chocolate, vegan butter and plant-based marshmallows; texture will be slightly different but still deeply satisfying. In colder months I swap milk chocolate topping for chunks of dark chocolate and a pinch of espresso powder to deepen flavors. For a summer barbecue, add chopped toasted pecans for crunch between the layers.
How to Serve
When I serve the S’mores Brownies Recipe at a small gathering, I aim for drama and ease. Cut the slab into rustic squares and place on a large wooden board with extra graham pieces and a bowl of toasted marshmallows. For a plated dessert, warm individual squares and add a scoop of vanilla ice cream with a drizzle of chocolate sauce. If serving a crowd, double the recipe or keep extras warm in a low oven covered with foil. These brownies pair beautifully with coffee or a cold glass of milk.
Storage and Reheating Tips
Store leftover S’mores Brownies Recipe in an airtight container at room temperature for up to two days to keep the marshmallow crown soft. If you prefer a firmer texture, refrigerate for up to five days; bring to room temperature before serving so flavors open up.
To reheat, warm individual squares in a 300 F oven for 8 to 10 minutes or microwave briefly for 10 to 15 seconds for gooeyness. If the topping has dried, a quick blast under the broiler for 10 to 20 seconds can revive the toasted look but watch carefully.
Common Mistakes and How to Avoid Them
Underbaking the brownies can leave them too loose; bake until the edges are set and the center still looks slightly soft, then allow cooling to finish the set. Overmixing once the flour is added will create a denser crumb; fold gently and stop as soon as streaks disappear.
Using very hot chocolate when adding eggs may scramble them; let the chocolate cool to warm before whisking in eggs. When toasting the marshmallows under a broiler, stay by the oven and use short intervals to prevent burning.
Final Thoughts
Give the S’mores Brownies Recipe a try this weekend and see how quickly it becomes a new favorite. It rewards small tweaks and always brings a warm, nostalgic smile to the table. You may find yourself making it for simple weeknight treats and big celebrations alike.
Frequently Asked Questions.
- Q: Can I make the S’mores Brownies Recipe ahead of time and reheat them?
A: Yes, make them up to two days ahead at room temperature or refrigerate for up to five days. Reheat briefly in a warm oven for best gooeyness. - Q: Can I use a glass baking dish instead of a metal pan?
A: You can, but glass holds heat and may require a few extra minutes of baking. Reduce risk of overbrowning by tenting with foil if the top gets too dark. - Q: How can I make these gluten-free or vegan?
A: Use a certified gluten-free flour blend and gluten-free graham crackers for gluten-free. For vegan, swap dairy chocolate and butter for plant-based versions and use vegan marshmallows. - Q: My marshmallow topping browned too fast. How can I prevent burning?
A: Use shorter broil bursts or finish under residual oven heat. Keep the pan a bit farther from the broiler and watch closely. - Q: Can I freeze S’mores Brownies Recipe?
A: Yes, wrap squares tightly and freeze up to 2 months. Thaw overnight in the fridge and warm gently before serving.
S'mores Brownies Recipe
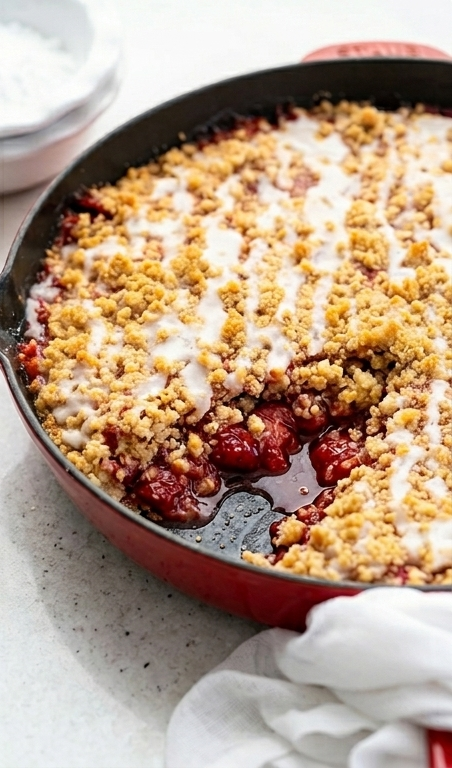
Make S'mores Brownies Recipe: fudgy brownies on a graham crust topped with toasted marshmallows and chocolate.
Ingredients
Instructions
Step 1: Prepare the pan and make the graham cracker crust
Preheat the oven and lightly grease a 9 x 13-inch metal baking pan, then line the bottom and two long sides with parchment paper leaving an overhang for easy removal. In a medium glass bowl combine finely ground graham cracker crumbs with granulated sugar and a pinch of fine sea salt, then pour in melted unsalted butter and mix until the crumbs look uniformly moistened and resemble damp sand. Press the mixture firmly and evenly into the prepared pan, compacting into the corners so the crust will hold together. Bake briefly until the crust smells toasty and looks slightly darker; remove and set the pan on a wire rack to cool just enough to accept batter.
Step 2: Melt chocolate and marry with butter
In a single large matte charcoal-grey heatproof mixing bowl place chopped semisweet chocolate and cubed unsalted butter and melt together until the mixture is completely smooth and glossy. Remove from heat and let cool until warm to the touch (this prevents scrambling the eggs later). The bowl should show a silky, reflective chocolate emulsion clinging to the sides with a stainless whisk resting across the rim — glossy, uniform, and dense.
Step 3: Whisk sugars and eggs into the chocolate base
Whisk the granulated and light brown sugars into the warm chocolate until the mixture becomes slightly thickened and homogeneous, then add the room-temperature eggs one at a time, whisking each in until the batter loosens and becomes smoother and a touch lighter in color; finish with the vanilla. The result is a glossy, ribbon-y chocolate batter that looks cohesive and viscous, ready for the dry ingredients.
Step 4: Fold dry ingredients, chocolate chips and mini marshmallows, then assemble
Whisk the flour, sifted unsweetened cocoa powder, baking powder and fine salt together in a separate bowl until evenly blended, then fold the dry mix gently into the chocolate base just until no streaks remain. Fold in semisweet chocolate chips and mini marshmallows so they appear suspended through the thick, fudgy batter. Pour and scrape this dense batter onto the warm graham crust in the prepared rectangular pan, using a flexible spatula to spread into an even layer reaching right into the corners.
Step 5: Bake, top with marshmallows, chocolate and graham pieces, then finish
Bake the assembled slab until the edges are set and the top is shiny with slight cracks. Immediately scatter a thick blanket of mini marshmallows over the hot brownies, sprinkle chopped milk chocolate and broken graham cracker pieces across the marshmallow layer, pressing lightly so they adhere. Return briefly to heat so the marshmallows puff and melt and the chocolate softens; for deeper color, a very short broil can be used (watch closely). The topping should be pillowy, glossy where melted, with emergent light golden toasty tips.
Step 6: Cool, unmold, slice and serve
Let the pan cool until just warm to the touch so the marshmallow cap sets; for cleaner squares chill briefly if desired. Lift the rectangular slab out with the parchment overhang onto a cutting board, gently clean a sharp knife between cuts and slice into neat squares that reveal layered textures: compact, slightly crumbly graham base; dense fudgy brownie; and a soft, toasted marshmallow crown studded with pools of melted chocolate and crunchy graham pieces. Serve at room temperature or slightly warm for gooeyness.
Notes
- Use parchment paper with an overhang for easy removal
- Let melted chocolate cool to warm before whisking in eggs
- Chill briefly for cleaner slices if you prefer neat squares
- For deeper chocolate flavor, add a teaspoon of espresso powder
- Watch closely if using the broiler; marshmallows brown quickly