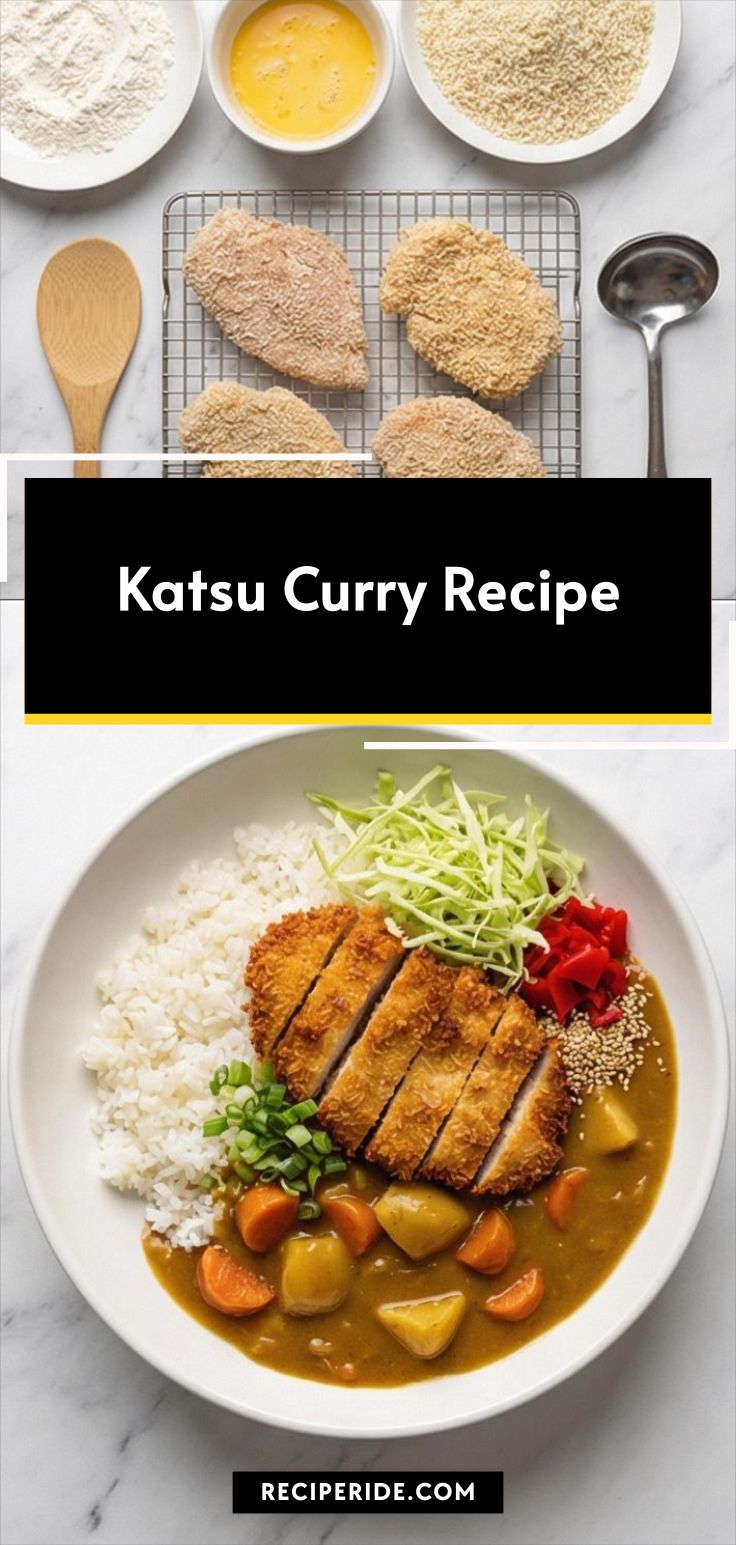
Katsu Curry Recipe has a special way of turning a weeknight into something memorable. I fell for this Katsu Curry Recipe the first time I made it for friends, and the crunch of the katsu with the silky curry sauce still pulls me back. I cook it when I want something cozy but a little theatrical, and I love how the rice, curry, and chicken each hold their own while forming an unforgettable whole. If you like food that comforts and surprises, this Katsu Curry Recipe will become a go-to.
How This Recipe Became My Rainy-Day Favorite
I remember the first rainy Saturday I made this recipe, the apartment smelling like warm spice and fried breading as rain tapped the windows. The onions caramelized slowly, filling the kitchen with a sweet, savory scent that felt like a hug. I was nervous about frying the chicken for the first time, but the sound of the panko hitting hot oil and turning gold eased my anxiety. When we finally sat down, steam rose from the bowl, the curry was glossy and rich, and the katsu crackled under the first bite. Each mouthful combined sweet apple, umami from soy and Worcestershire, and the gentle warmth of curry. That night, between spoonfuls and shared laughter, the simple ritual of making this Katsu Curry Recipe felt like a small ceremony worth repeating.
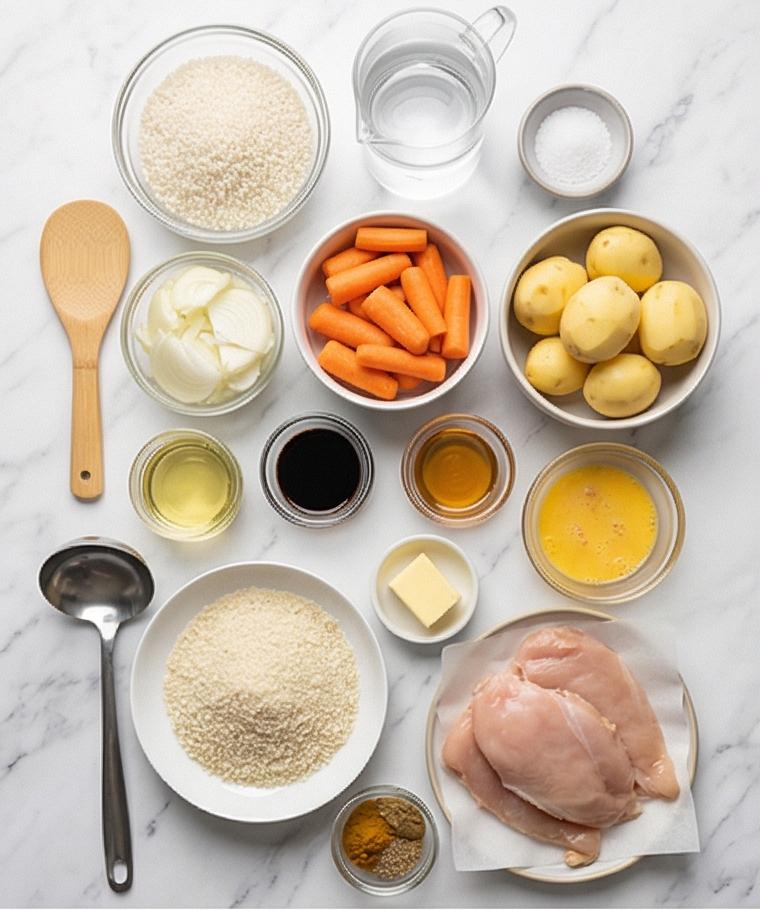
Discussing the Primary Ingredients
- Japanese short-grain rice: The foundation; pick true sushi-style or short-grain for stickiness. Substitute with medium-grain in a pinch, but avoid long-grain rice. Rinse until clear.
- Yellow onions: Build savory sweetness; look for firm, dry skins and avoid soft spots. Sweet onion varieties work too.
- Carrots and potatoes: Provide texture and body; waxy potatoes hold shape best. Swap in sweet potato for a different sweetness.
- Chicken (breasts or thighs): The katsu star; thighs give juicier results, breasts make neat slices. Pound to even thickness.
- Japanese curry powder and stock: Give the sauce its characteristic flavor and depth; adjust curry strength to taste.
Essential Kitchen Tools and Why They Matter
To make this Katsu Curry Recipe as effortless as possible, a few tools will save time and improve results. A medium heavy-bottomed pot keeps heat even for the curry and prevents scorching when you add stock. A good sharp knife and a stable cutting board make quick work of onions and vegetables and keep pieces even so they cook uniformly.
- Heavy-bottomed pot or Dutch oven: For steady simmering and even heat distribution.
- Digital thermometer: Helpful for frying oil temperature control so the katsu crisps but stays juicy.
- Wire rack and baking sheet: Let the fried cutlets drain without getting soggy; a rack keeps the crust crisp.
- Rice paddle or fork: For fluffing rice without crushing grains; a rice cooker is a great alternative.
- Shallow dishes for breading: Keeps flour, egg, and panko organized; use one large plate each if you lack dishes.
Step-by-Step Preparation Guide
Step 1: Rinse and Cook the Rice
Rinse the short-grain rice under cold running water, gently rubbing the grains together until the rinse water runs mostly clear, then drain thoroughly for several minutes. Combine the drained rice with water and a pinch of salt, bring to a gentle simmer, then cover and cook gently until the water is absorbed. Let the rice rest covered for at least ten minutes, then fluff with a rice paddle so the grains are glossy, slightly sticky, and perfectly plump—keep covered and warm while you move on to the curry.
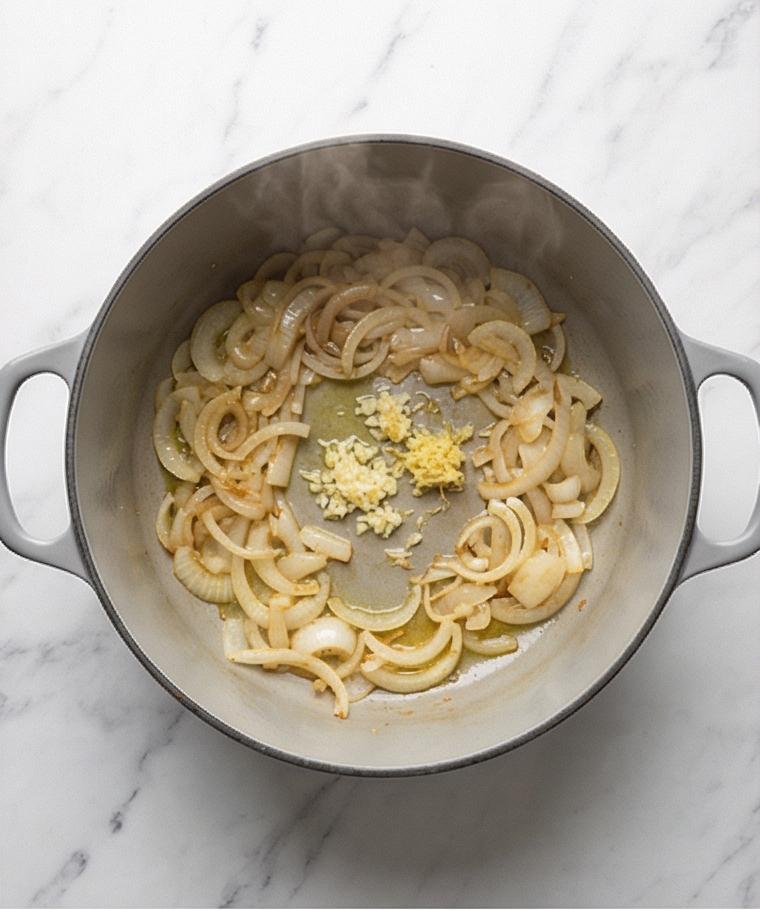
Step 2: Soften the Onions and Add Aromatics
Heat neutral oil until shimmering and add thinly sliced yellow onions with a generous pinch of kosher salt; cook slowly until they become satin-soft, translucent, and just beginning to turn golden at the edges. Stir in minced garlic and grated ginger and cook only until fragrant, about a minute—this stage smells bright, oily, and sweetly savory, the onions developing a soft, silky texture that will become the curry’s backbone.
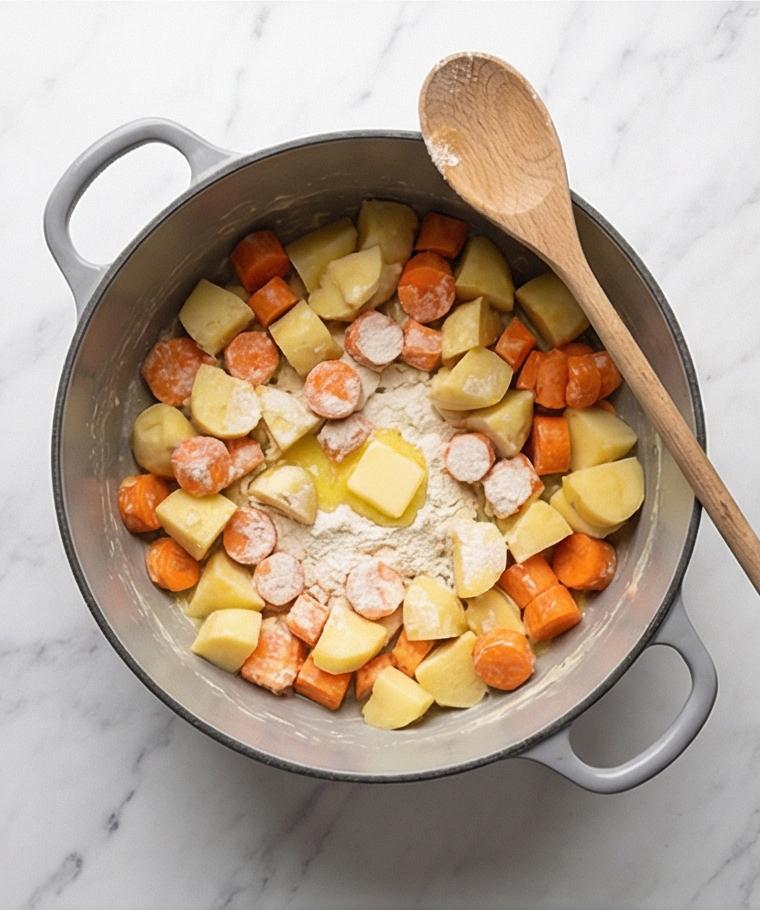
Step 3: Add the Root Vegetables and Make the Roux
Toss in the peeled, chunky carrots and potatoes, coating each piece in the fragrant onion mixture until glossy and slightly softened at the edges. Add butter and then sprinkle the flour over the vegetables, stirring constantly to create a pale, pasty roux that clings to the vegetables—smooth, matte, slightly tacky, and without any raw flour pockets. This is the moment the curry gains body and a faintly nutty aroma.
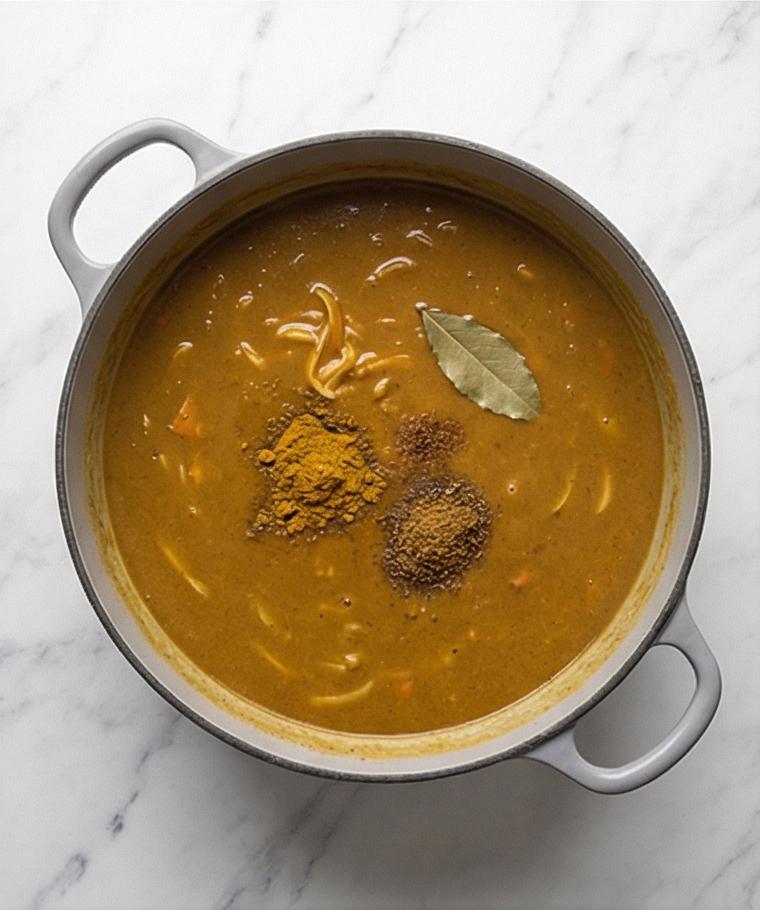
Step 4: Toast Spices and Build the Sauce
Sprinkle in the curry powder, garam masala, and turmeric and toast briefly until fragrant, then gradually whisk in chicken stock in several additions until the mixture becomes a smooth, slightly thick sauce that coats the vegetables. Stir in finely grated apple, soy sauce, Worcestershire, honey, and a bay leaf; bring gently to a simmer to marry the savory and sweet layers, then reduce heat and let it bubble down to a gravy-like consistency.
Step 5: Simmer to Tenderness and Final Seasoning
Cover the pot partially and simmer gently until the carrots and potatoes are very tender and the sauce has become glossy and deeply flavored, stirring occasionally so nothing sticks. Remove the bay leaf, taste, and adjust salt, black pepper, and a touch of cayenne if you want heat—the finished curry should be rich, slightly sweet, and silky-thick, with visible soft chunks of carrot and potato suspended in the gravy.
Step 6: Prepare and Season the Chicken for Breading
Trim and, if necessary, halve or gently pound the chicken to an even 1/2-inch thickness, then season both sides with salt and pepper and let rest briefly at room temperature. Set up a tidy breading station with flour in one shallow dish, beaten eggs loosened with a splash of milk in a second, and panko spread in a third. Work methodically to dredge, egg-wash, and press the panko onto each piece so the crumbs adhere in a thick, even coat; let the breaded cutlets rest on a rack for a few minutes to set.
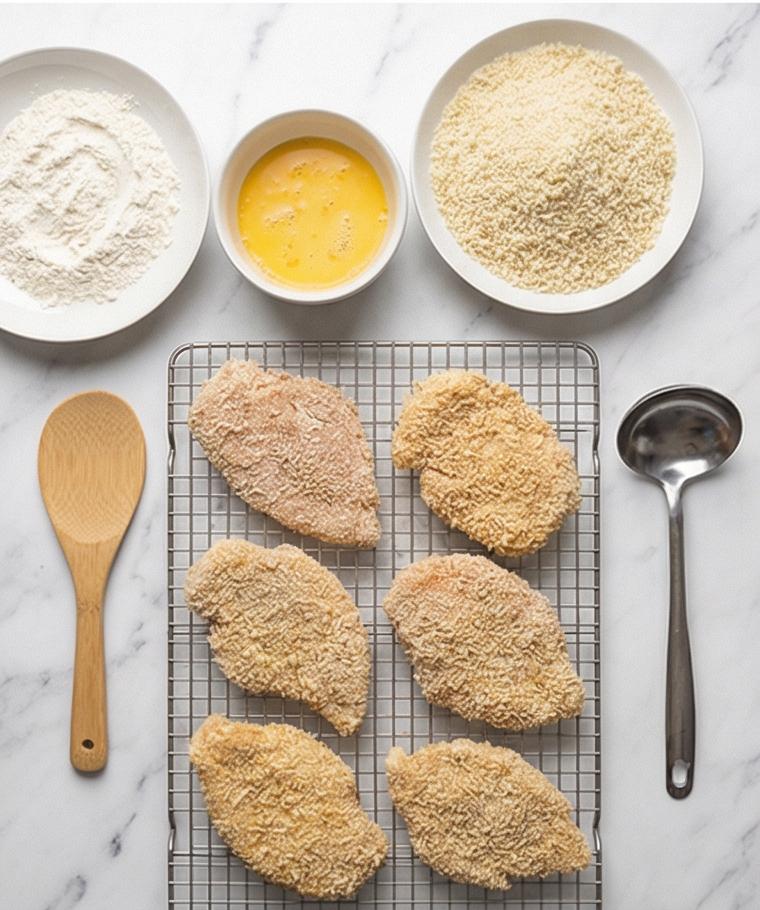
Step 7: Fry, Drain, and Rest the Katsu
Deep-fry the breaded cutlets in oil heated to the proper temperature until the crust is a deep, even golden-brown and very crisp, then transfer to a wire rack to drain and rest so the crust stays crunchy and the interior remains juicy. Allow the pieces to rest at least five minutes, then slice each cutlet into neat 3/4-inch strips, keeping the slices fanned together for a tidy presentation.
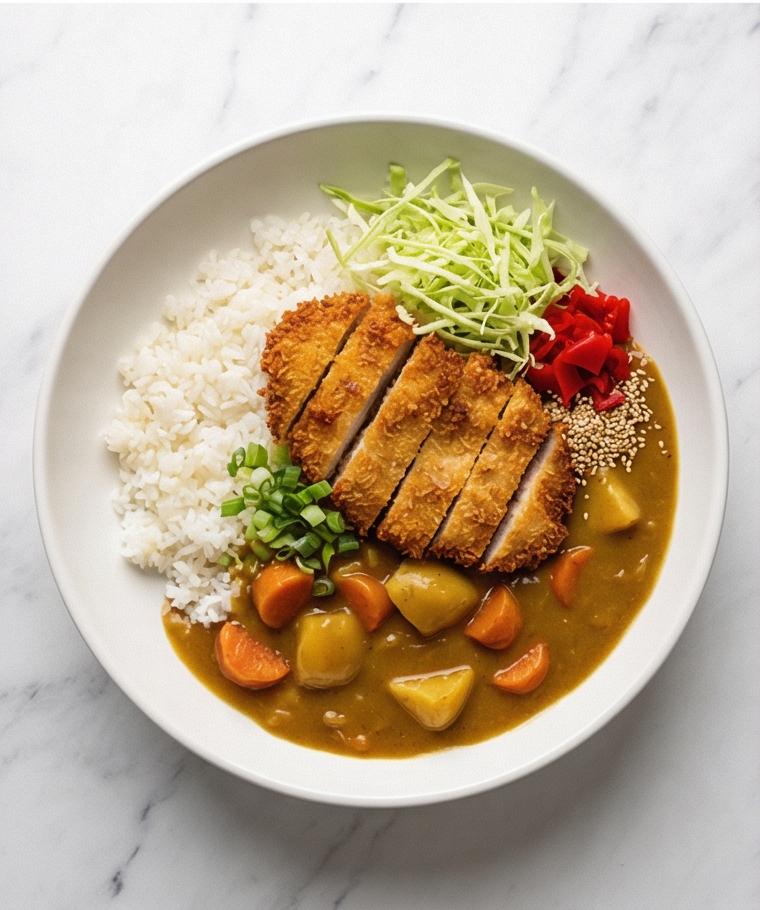
Step 8: Plate, Garnish, and Serve
Mound hot, fluffy rice on one side of a wide shallow serving bowl, place a small tuft of finely shredded cabbage beside it, ladle a generous portion of hot curry with visible carrots and potatoes into the remaining area, and lay the sliced chicken katsu partially over the curry so the crisp crust is clearly visible. Finish with thinly sliced green onions, a scatter of toasted white sesame seeds if using, and a small portion of pickles on the rim; serve immediately so the katsu stays crisp and the curry steams.
Making It Your Own
I often swap the chicken for thin pork cutlets when I want a more traditional tonkatsu feel, and I have tried a vegetarian version using large, breaded portobello caps. For a lighter weeknight option, bake the panko-crusted chicken at 425 F until golden instead of deep-frying; the texture is different but still satisfying.
Try seasonal twists by adding roasted squash in autumn or swapping carrots for parsnips in winter. If you want heat, increase the cayenne or stir in a spoonful of chili oil. For a sweeter, fruitier curry, use a golden apple or a touch more honey. These small experiments kept the Katsu Curry Recipe exciting in my kitchen.
How to Serve
If I am hosting, I make extra curry and rice and shallow-fry the katsu just before guests arrive so the cutlets stay crisp. For a family-style approach, serve the curry in a wide bowl and place rice mounds and sliced katsu on the side so everyone assembles their own bowl.
For larger gatherings, scale the curry base and hold it warm in a covered pot; fry cutlets in batches and keep them on a rack in a low oven to stay crunchy. Pair with a light salad, pickles, and a chilled beer or green tea for balance. Leftovers reheat well as a composed meal or deconstructed bowls for casual serving.
Storage and Reheating Tips
Store the curry separately from the katsu for best results. Keep curry in an airtight container in the fridge for up to 3 days; it often tastes even better the next day as flavors meld. Reheat gently on the stove over low heat, adding a splash of stock if it has thickened too much.
For the katsu, cool completely then refrigerate on a rack so steam does not soften the crust. Re-crisp in a 375 F oven on a wire rack for about 8 to 10 minutes. Avoid microwaving the katsu unless you plan to re-crisp it afterward, because the crust will go soggy.
Common Mistakes and How to Avoid Them
One common mistake is overcrowding the fryer, which drops the oil temperature and yields soggy katsu. Fry in small batches and use a thermometer to keep oil steady.
Another is undercooking the roux or leaving raw flour pockets; stir until the roux smells faintly nutty and looks even. Finally, skipping the rice rinse will give gluey rice; rinse until the water is mostly clear to get plump, separate grains.
Final Thoughts
Give this Katsu Curry Recipe a try even if you are nervous about frying. It is forgiving, comforting, and impressive on the table. Once you taste the contrast of crispy katsu and silky curry, you will want to make it again.
Frequently Asked Questions
- Q: Can I use pork instead of chicken for this Katsu Curry Recipe? A: Yes, thin pork cutlets work beautifully and give a more classic tonkatsu experience.
- Q: Is there a vegetarian version of this Katsu Curry Recipe? A: Absolutely, try breaded and baked eggplant or large portobello mushrooms with the same curry sauce.
- Q: How do I keep the katsu crispy when serving later? A: Drain on a wire rack and hold in a low oven; store separately from the curry until serving.
- Q: Can I make the curry ahead of time? A: Yes, the curry stores well and often tastes deeper after resting overnight.
- Q: What rice is best with the Katsu Curry Recipe? A: Japanese short-grain rice is ideal for its glossy, slightly sticky texture.
Katsu Curry Recipe
Make Katsu Curry Recipe: crispy panko chicken with silky Japanese curry and fluffy short-grain rice. Serve hot and enjoy.
Ingredients
Instructions
Step 1: Rinse and Cook the Rice
Rinse the short-grain rice under cold running water, gently rubbing the grains together until the rinse water runs mostly clear, then drain thoroughly for several minutes. Combine the drained rice with water and a pinch of salt, bring to a gentle simmer, then cover and cook gently until the water is absorbed. Let the rice rest covered for at least ten minutes, then fluff with a rice paddle so the grains are glossy, slightly sticky, and perfectly plump—keep covered and warm while you move on to the curry.
Step 2: Soften the Onions and Add Aromatics
Heat neutral oil until shimmering and add thinly sliced yellow onions with a generous pinch of kosher salt; cook slowly until they become satin-soft, translucent, and just beginning to turn golden at the edges. Stir in minced garlic and grated ginger and cook only until fragrant, about a minute—this stage smells bright, oily, and sweetly savory, the onions developing a soft, silky texture that will become the curry’s backbone.
Step 3: Add the Root Vegetables and Make the Roux
Toss in the peeled, chunky carrots and potatoes, coating each piece in the fragrant onion mixture until glossy and slightly softened at the edges. Add butter and then sprinkle the flour over the vegetables, stirring constantly to create a pale, pasty roux that clings to the vegetables—smooth, matte, slightly tacky, and without any raw flour pockets. This is the moment the curry gains body and a faintly nutty aroma.
Step 4: Toast Spices and Build the Sauce
Sprinkle in the curry powder, garam masala, and turmeric and toast briefly until fragrant, then gradually whisk in chicken stock in several additions until the mixture becomes a smooth, slightly thick sauce that coats the vegetables. Stir in finely grated apple, soy sauce, Worcestershire, honey, and a bay leaf; bring gently to a simmer to marry the savory and sweet layers, then reduce heat and let it bubble down to a gravy-like consistency.
Step 5: Simmer to Tenderness and Final Seasoning
Cover the pot partially and simmer gently until the carrots and potatoes are very tender and the sauce has become glossy and deeply flavored, stirring occasionally so nothing sticks. Remove the bay leaf, taste, and adjust salt, black pepper, and a touch of cayenne if you want heat—the finished curry should be rich, slightly sweet, and silky-thick, with visible soft chunks of carrot and potato suspended in the gravy.
Step 6: Prepare and Season the Chicken for Breading
Trim and, if necessary, halve or gently pound the chicken to an even 1/2-inch thickness, then season both sides with salt and pepper and let rest briefly at room temperature. Set up a tidy breading station with flour in one shallow dish, beaten eggs loosened with a splash of milk in a second, and panko spread in a third. Work methodically to dredge, egg-wash, and press the panko onto each piece so the crumbs adhere in a thick, even coat; let the breaded cutlets rest on a rack for a few minutes to set.
Step 7: Fry, Drain, and Rest the Katsu
Deep-fry the breaded cutlets in oil heated to the proper temperature until the crust is a deep, even golden-brown and very crisp, then transfer to a wire rack to drain and rest so the crust stays crunchy and the interior remains juicy. Allow the pieces to rest at least five minutes, then slice each cutlet into neat 3/4-inch strips, keeping the slices fanned together for a tidy presentation.
Step 8: Plate, Garnish, and Serve
Mound hot, fluffy rice on one side of a wide shallow serving bowl, place a small tuft of finely shredded cabbage beside it, ladle a generous portion of hot curry with visible carrots and potatoes into the remaining area, and lay the sliced chicken katsu partially over the curry so the crisp crust is clearly visible. Finish with thinly sliced green onions, a scatter of toasted white sesame seeds if using, and a small portion of pickles on the rim; serve immediately so the katsu stays crisp and the curry steams.
Notes
- Rinse rice until the water runs mostly clear to get glossy, slightly sticky grains.
- Use a thermometer when frying to maintain oil between 350 F and 365 F for a perfect crust.
- Let breaded cutlets rest a few minutes before frying so the coating sets.
- Store curry separately from katsu to preserve crispness; reheat katsu in oven to re-crisp.
- Adjust curry powder and cayenne to control heat; add more apple or honey for sweetness.
