I fell for this Loaded Hummus Bowl Recipe the first time I needed a meal that felt like a celebration but came together on a weeknight. The bright tahini-lemon hummus and crunchy roasted chickpeas hit every texture note I love, and assembling it always feels a little like plating an edible still life. I make this Loaded Hummus Bowl Recipe when friends drop by or when I want a colorful, healthy solo dinner that doesn’t skimp on flavor. It somehow turns simple pantry staples into something memorable and reliably satisfying.
How This Dish Became My Picnic Staple
The first time I made the Loaded Hummus Bowl Recipe was during a sun-splashed afternoon picnic in the park with leftovers and a stubbornly empty fridge. I remember the way the warm pita steamed when I wrapped it, the lemony hummus smelling bright and almost citrusy in the breeze, and the roasted chickpeas crackling in my mouth like tiny savory popcorn. We ate off a blanket, fingers sticky with olive oil and feta, laughing about nothing. That memory still shapes how I cook it: vibrant, loose, and a little bit indulgent. The textures matter most to me now—the creamy hummus, the soft tomatoes, the crisp chickpeas—and I always pause to toast the nuts because that scent takes me right back to that afternoon.
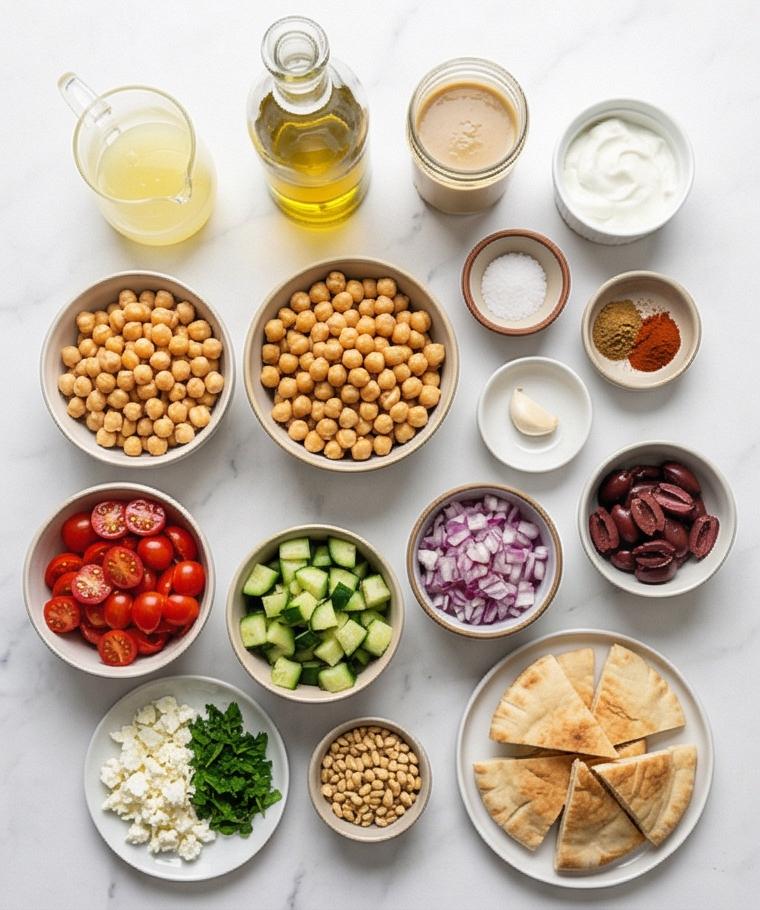
Core Ingredients and What They Do
- Chickpeas: The backbone of both the crunchy topping and the creamy hummus; canned work great for speed. Substitute cooked dried chickpeas for deeper flavor and adjust salt.
- Tahini: Gives the hummus its nutty, silky soul; swap for sunflower seed butter for a sesame-free option.
- Lemon Juice: Brightens everything and balances tahini; use more for extra tang.
- Garlic & Olive Oil: Garlic brings bite, olive oil smooths the emulsion; use good extra-virgin oil for finishing.
- Spices (cumin, smoked paprika, garlic powder): Add warmth and smokiness; adjust to taste or try sumac for tang.
- Fresh veg, feta, herbs: Provide freshness, salt, and herbaceous lift; swap cucumbers or add roasted peppers.
Essential Kitchen Tools and Why They Matter
A few simple tools make this recipe feel easy and elegant. A food processor is the real workhorse for silky hummus; without one you can use a high-powered blender or hand-mash for a chunkier texture. A rimmed baking sheet gives the chickpeas room to roast and crisp, and parchment makes cleanup painless. Sharp knives and a stable cutting board keep your tomatoes and cucumber neat. Finally, small bowls for mise en place help you assemble the bowl prettily.
- Food processor: For smooth, airy hummus; blender is an alternative.
- Rimmed baking sheet and parchment: For even roasting and easy cleanup.
- Measuring spoons and cups: To keep seasoning balanced.
- Sharp chef’s knife and cutting board: For clean, uniform veg.
- Mixing bowls and serving bowl: To assemble and present the dish.
Step-by-Step Preparation Guide
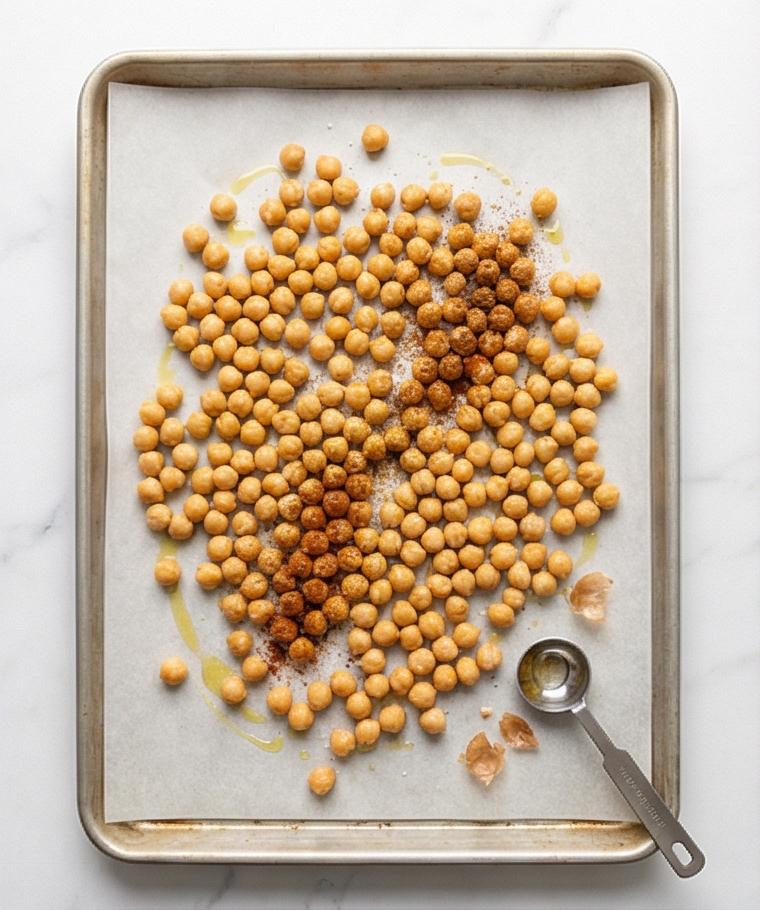
Step 1: Prepare and Season Chickpeas
Drain and rinse the chickpeas, then spread them onto a clean kitchen towel and gently rub until they are completely matte and dry; slip off and discard any loose skins you rub away. Move the dried chickpeas onto a parchment-lined baking sheet, drizzle with extra-virgin olive oil, and dust them evenly with fine sea salt, ground cumin, smoked paprika and garlic powder. Toss them on the sheet so every bean wears a thin, glossy coating of oil and spice, then spread into a single, slightly spaced layer so hot air can crisp every surface.
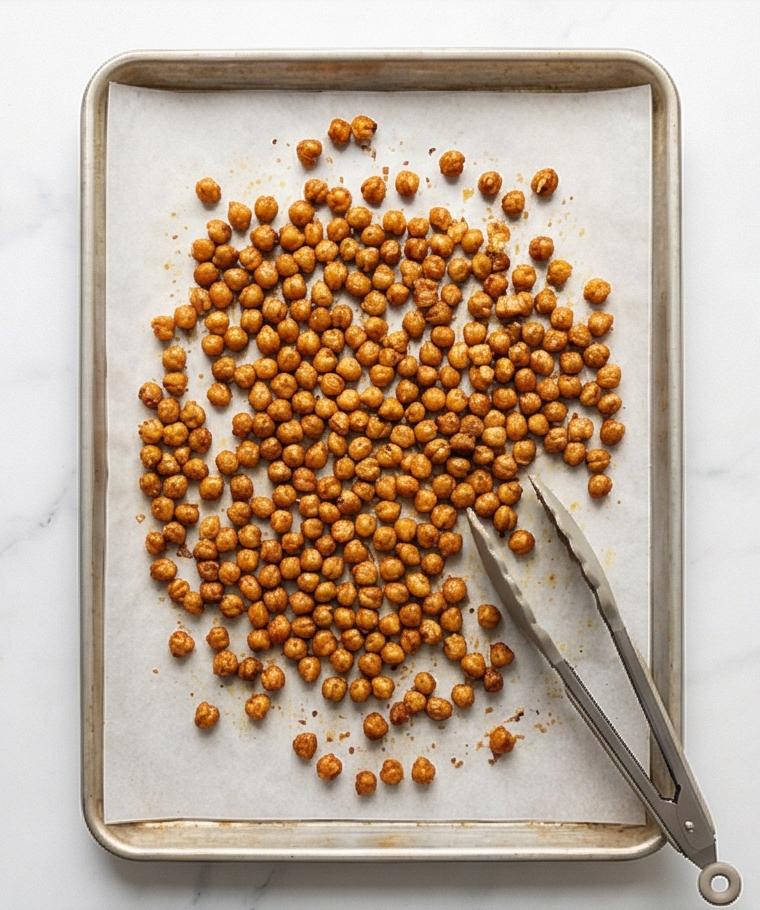
Step 2: Roast to Crisp and Cool
Slide the seasoned tray into a hot oven and roast until the chickpeas are spotted deep golden and sound crisp when shaken—stirring or shaking every 10 minutes to promote even color. Pull the tray when the exteriors are noticeably firmer and dryer, then transfer the beans to cool on the same parchment so they puff and snap as they lose heat; you want visible surface blistering, tiny cracks, and a matte toasted sheen that reads crunchy to the eye. Keep the oven on briefly if you plan to warm pita, but otherwise let the beans cool completely before assembly.
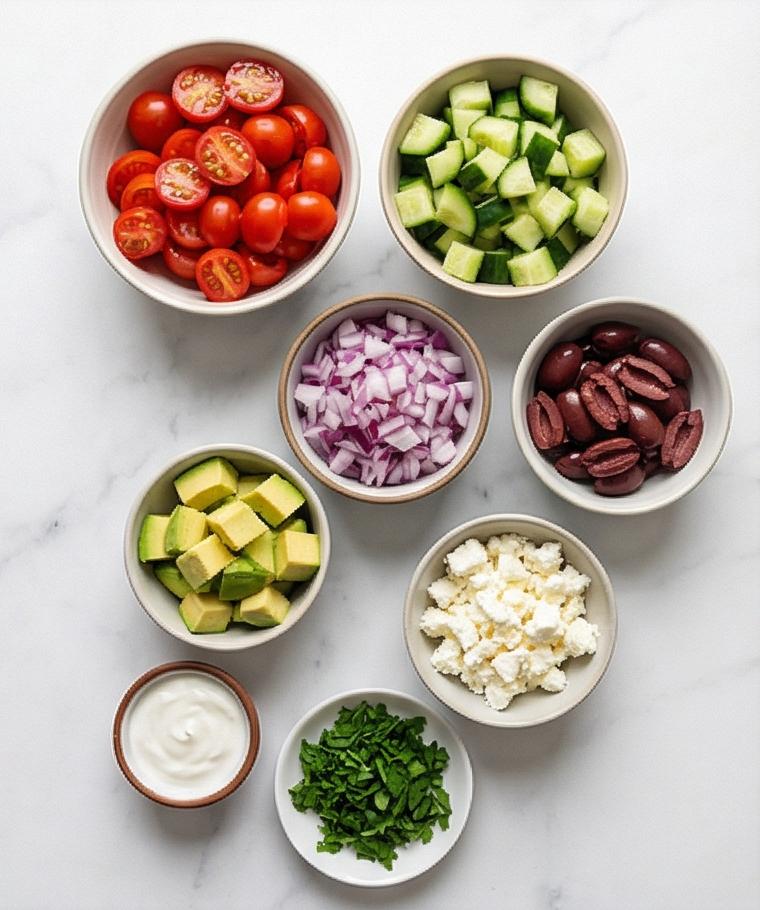
Step 3: Chop and Arrange Fresh Toppings
While the chickpeas roast and cool, halve the cherry tomatoes, dice the cucumber into neat ½‑inch cubes, finely chop the red onion and briefly rinse it to soften its bite, and halve the Kalamata olives. If using avocado, dice it into matching ½‑inch cubes and keep them separate until assembly. Roughly chop parsley and mint, crumble the feta, and toast pine nuts or slivered almonds if you like added crunch. Warm and wedge the pita if desired, then place each prepared component in its own small vessel so color and texture read clearly: glossy tomatoes, crisp cucumber cubes, briny olives, snow‑white feta crumbles, verdant herbs.
Step 4: Whip the Tahini‑Lemon Emulsion and Blend Hummus
Start the hummus by processing lemon juice and room‑temperature tahini until the mixture is visibly lightened and creamy—thick, satiny, and slightly aerated. Add the minced garlic, salt, cumin and olive oil and process again until emulsified and fluffy. Add the second can of drained chickpeas and blend in two stages—short burst to break them up, then a longer run to approach smoothness. With the motor running, drizzle in ice‑cold water tablespoon by tablespoon until the hummus loosens to a silky, pipeable consistency that forms soft peaks; optionally pulse in a spoonful of Greek yogurt for extra silk. Taste and adjust with tiny pinches of salt or drops of lemon to brighten.
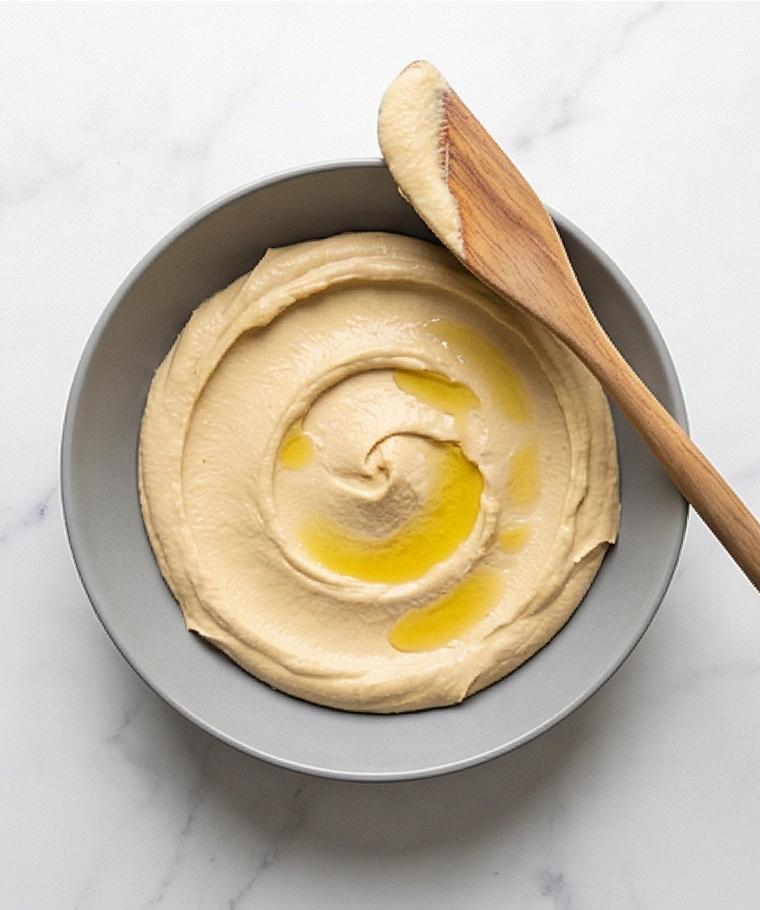
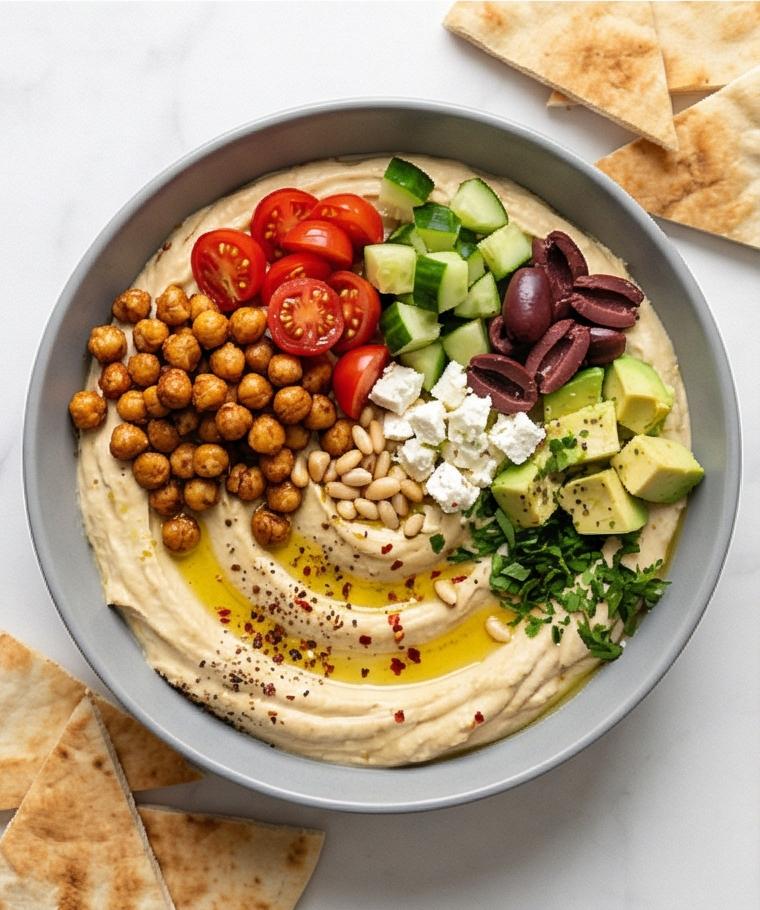
Step 5: Assemble the Loaded Hummus Bowl and Finish
Spoon the finished hummus into a wide, shallow serving bowl and use the back of a spoon to spread it into a ½–¾‑inch layer with shallow wells and ridges to catch oil and toppings. If using greens, scatter them around the outer edge to create a bowl‑style base. Arrange the halved tomatoes, diced cucumber, drained onion, olives, and avocado in separate clusters across the surface so every portion will have a little of each element. Sprinkle the cooled crispy roasted chickpeas and crumble feta over the top, then scatter parsley and mint, toasted nuts if using, and finish with a generous drizzle of extra‑virgin olive oil and a squeeze of lemon. Season with a final pinch of sea salt, a grind of black pepper and optional red‑pepper flakes, and serve immediately with warm pita wedges or chips.
Making It Your Own
I experiment a lot with this base. For a vegan boost, skip the feta and yogurt and add a spoonful more tahini plus a pinch of smoked salt for depth. In winter I fold in roasted squash or beets for sweetness; in summer I double the fresh herbs and thin the hummus with extra ice water for a lighter finish. Swap smoked paprika for zaatar or harissa for a regional spin and toss in roasted red peppers for a smoky-sweet variation. Each change alters the personality of the dish but keeps the same satisfying balance of creamy, crisp, and bright.
How to Serve
When I host, I use a wide, shallow bowl and arrange components in colorful clusters so guests can build their own bites. For a small dinner party of four, make one large platter and place warm pita around the edge. If serving a crowd, double the hummus and keep roasted chickpeas in a shallow pan warmed briefly in a 350 F oven so they stay crunchy.
For more formal plating, pipe hummus into swirl pools and top each portion with a few chickpeas and herbs. Offer lemon wedges, extra olive oil, and a bowl of pita chips on the side so everyone can customize salt and crunch.
Storage and Reheating Tips
Store leftover hummus in an airtight container in the refrigerator for up to 4 days; press a layer of plastic directly onto the surface to minimize oxidation. The hummus might thicken after chilling; stir in a tablespoon or two of water or olive oil before serving to loosen it.
Keep roasted chickpeas separate from the hummus if you want them to stay crunchy. Store cooled chickpeas in an airtight container at room temperature for up to 2 days or in the fridge for 3 to 4 days and re-crisp them in a 350 F oven for 5 to 8 minutes.
Common Slip-Ups and How to Dodge Them
Underdressing the hummus can make it flat; always taste for lemon and salt and add small adjustments until it sings. Overprocessing with too much water will make it runny, so add ice water slowly.
A final mistake is assembling too early—avocado browns and chickpeas lose their crunch. Hold off until just before serving and enjoy the contrasts.
Let’s Eat
Give the Loaded Hummus Bowl Recipe a try the next time you want a relaxed, showy meal with minimal fuss. It rewards small touches like a good olive oil, fresh herbs, and well-roasted chickpeas, and it scales easily. I can’t wait to hear which twist you try first.
Frequently Asked Questions.
- How long does homemade hummus keep in the fridge?
- Homemade hummus keeps well for up to 4 days in an airtight container when refrigerated.
- Can I make the roasted chickpeas ahead of time?
- Yes, you can roast them a day ahead and store at room temperature in a sealed container, then re-crisp in a hot oven for a few minutes.
- Is tahini necessary for this Loaded Hummus Bowl Recipe?
- Tahini gives classic flavor and creaminess, but you can substitute sunflower seed butter for a sesame-free alternative.
- Can I use dried chickpeas instead of canned?
- Absolutely; soak and cook them until tender, then reduce the salt used in the recipe and proceed as written.
- How do I keep the avocado from browning?
- Dice avocado just before serving and toss with a little lemon juice; assemble at the last minute.
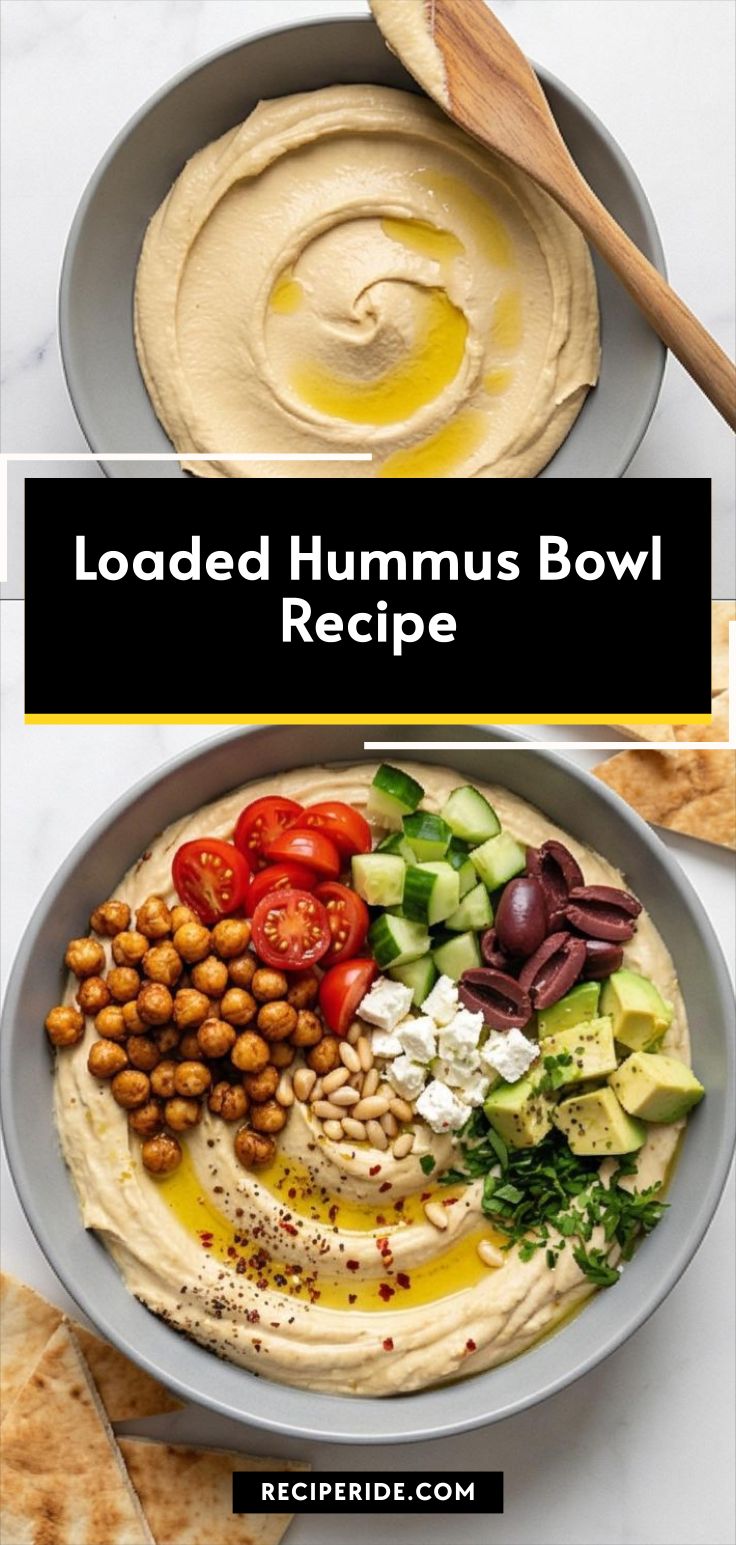
Loaded Hummus Bowl Recipe
Make the Loaded Hummus Bowl Recipe for a creamy, crunchy meal in about 50 minutes.
Ingredients
Instructions
Step 1: Prepare and Season Chickpeas
Drain and rinse the chickpeas, then spread them onto a clean kitchen towel and gently rub until they are completely matte and dry; slip off and discard any loose skins you rub away. Move the dried chickpeas onto a parchment-lined baking sheet, drizzle with extra-virgin olive oil, and dust them evenly with fine sea salt, ground cumin, smoked paprika and garlic powder. Toss them on the sheet so every bean wears a thin, glossy coating of oil and spice, then spread into a single, slightly spaced layer so hot air can crisp every surface.
Step 2: Roast to Crisp and Cool
Slide the seasoned tray into a hot oven and roast until the chickpeas are spotted deep golden and sound crisp when shaken—stirring or shaking every 10 minutes to promote even color. Pull the tray when the exteriors are noticeably firmer and dryer, then transfer the beans to cool on the same parchment so they puff and snap as they lose heat; you want visible surface blistering, tiny cracks, and a matte toasted sheen that reads crunchy to the eye. Keep the oven on briefly if you plan to warm pita, but otherwise let the beans cool completely before assembly.
Step 3: Chop and Arrange Fresh Toppings
While the chickpeas roast and cool, halve the cherry tomatoes, dice the cucumber into neat ½‑inch cubes, finely chop the red onion and briefly rinse it to soften its bite, and halve the Kalamata olives. If using avocado, dice it into matching ½‑inch cubes and keep them separate until assembly. Roughly chop parsley and mint, crumble the feta, and toast pine nuts or slivered almonds if you like added crunch. Warm and wedge the pita if desired, then place each prepared component in its own small vessel so color and texture read clearly: glossy tomatoes, crisp cucumber cubes, briny olives, snow‑white feta crumbles, verdant herbs.
Step 4: Whip the Tahini‑Lemon Emulsion and Blend Hummus
Start the hummus by processing lemon juice and room‑temperature tahini until the mixture is visibly lightened and creamy—thick, satiny, and slightly aerated. Add the minced garlic, salt, cumin and olive oil and process again until emulsified and fluffy. Add the second can of drained chickpeas and blend in two stages—short burst to break them up, then a longer run to approach smoothness. With the motor running, drizzle in ice‑cold water tablespoon by tablespoon until the hummus loosens to a silky, pipeable consistency that forms soft peaks; optionally pulse in a spoonful of Greek yogurt for extra silk. Taste and adjust with tiny pinches of salt or drops of lemon to brighten.
Step 5: Assemble the Loaded Hummus Bowl and Finish
Spoon the finished hummus into a wide, shallow serving bowl and use the back of a spoon to spread it into a ½–¾‑inch layer with shallow wells and ridges to catch oil and toppings. If using greens, scatter them around the outer edge to create a bowl‑style base. Arrange the halved tomatoes, diced cucumber, drained onion, olives, and avocado in separate clusters across the surface so every portion will have a little of each element. Sprinkle the cooled crispy roasted chickpeas and crumble feta over the top, then scatter parsley and mint, toasted nuts if using, and finish with a generous drizzle of extra‑virgin olive oil and a squeeze of lemon. Season with a final pinch of sea salt, a grind of black pepper and optional red‑pepper flakes, and serve immediately with warm pita wedges or chips.
Notes
- Pat canned chickpeas very dry for maximum crispness when roasting.
- Add ice-cold water slowly to the hummus to reach the perfect silky consistency.
- Store hummus and crispy chickpeas separately for best texture.
- Re-crisp chickpeas in a 350 F oven for 5 to 8 minutes before serving.
- Adjust salt carefully if using salty feta or olives.

