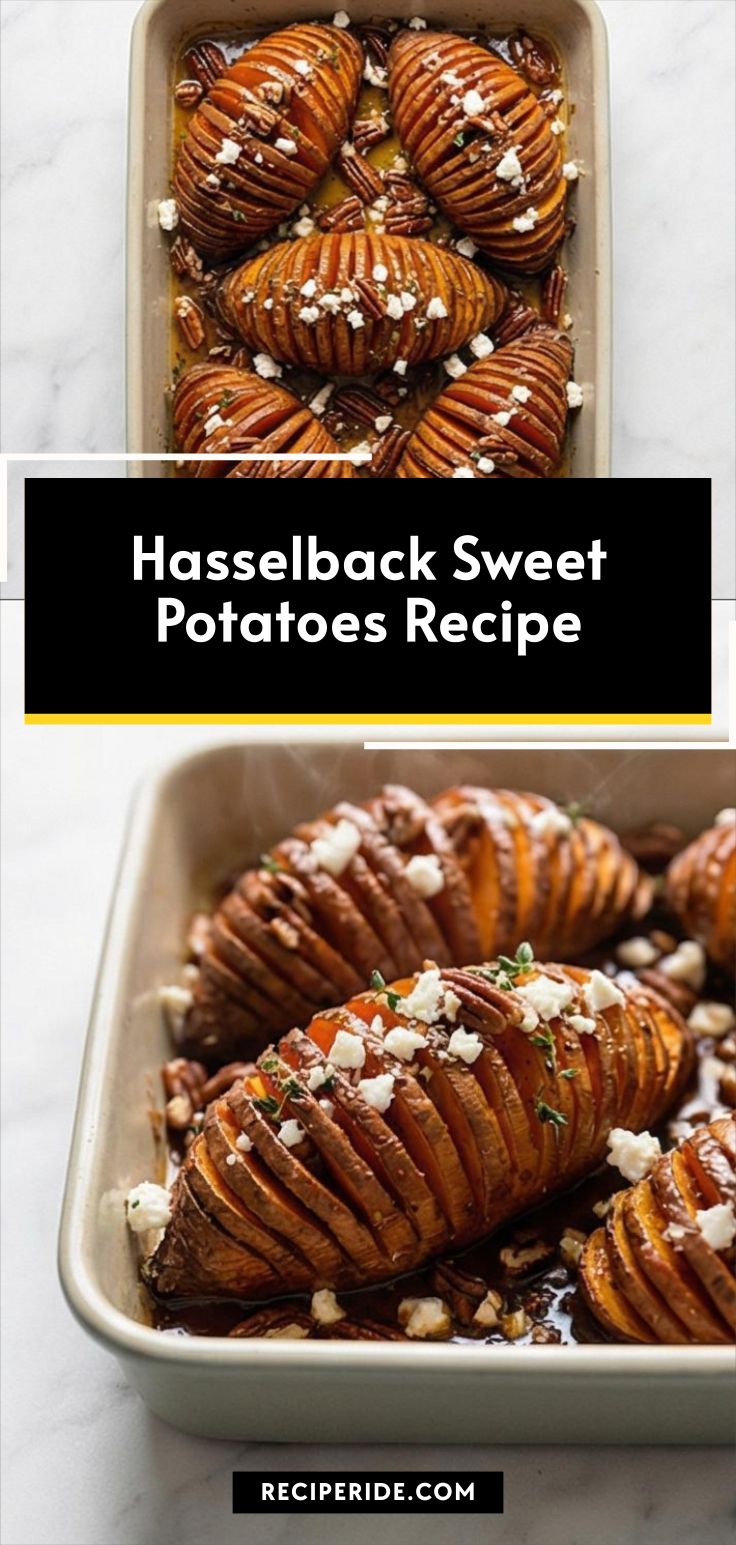
I fell for this Hasselback Sweet Potatoes Recipe the first time the kitchen filled with warm maple and smoke from paprika. It became my go-to side when I wanted something that looks fancy but is impossibly easy to make. I’ve prepared it for weeknight dinners and for a small holiday spread, and each time people ask for the recipe. If you like crisp edges, pillowy centers, and a sticky, herb-speckled glaze, you’ll be making this Hasselback Sweet Potatoes Recipe on repeat.
How This Recipe Became My Cozy-Weekend Staple
The first time I made this Hasselback Sweet Potatoes Recipe was on a rainy Saturday when I needed comfort food and a little show-stopping side. I remember the sound of the knife whispering through the potato skin, the syrupy maple aroma warming the kitchen, and the faint smoke of paprika that made the whole house feel like a professional kitchen. When I pulled the pan from the oven, steam unfurled from between each crisp ridge and the glaze had pooled into amber rivers. My partner and I ate a potato each straight from the pan, a little impatient and a lot happy, savoring the contrast of crunchy edges and soft, buttery insides. That first bake convinced me this method belongs in the regular rotation: it is simple, forgiving, and endlessly tweakable, and it always feels like a tiny celebration at the table.
Primary Ingredients and Why They Matter
- Sweet Potatoes: The backbone of the dish. Choose firm, evenly sized tubers for uniform cooking; smaller to medium sizes work best. Substitute with large carrots for a different sweet-vegetable note.
- Unsalted Butter: Adds richness and helps the glaze caramelize. Use ghee as a lactose-free option.
- Extra-Virgin Olive Oil: Balances the butter and helps the glaze spread. A neutral oil can be used if you want a milder flavor.
- Pure Maple Syrup: Gives glossy sweetness and helps with caramelization; honey is an okay swap but changes flavor.
- Salt and Spices: Salt, smoked paprika, garlic powder, and optional cinnamon create depth; adjust to taste.
- Fresh Herbs and Garnishes: Thyme or rosemary, parsley, toasted nuts, and optional cheese add texture and brightness; toasted seeds are a nut-free alternative.

Essential Kitchen Tools and Why They Help
A few simple tools make this Hasselback Sweet Potatoes Recipe easier and more reliable. A sturdy baking dish holds the potatoes and collects juices, giving you a shallow pool to baste from. A sharp chef’s knife is essential for clean, even slices; dull knives crush rather than slice. A pastry brush lets you coax glaze between the slits so each slice caramelizes. Use chopsticks as slice guards for safety and uniform thickness. If you do not have a pastry brush, a spoon can drizzle glaze, though it is less precise. Finally, a small bowl or jar for the glaze keeps the work surface tidy and the extra glaze ready for basting.
- Rectangular rimmed baking dish or sheet: Holds potatoes and collected juices.
- Sharp chef’s knife: For even, clean slices.
- Wooden chopsticks or spoon handles: As slicing guards to protect the base.
- Pastry brush: For glazing between slits.
- Small bowl or jar: For emulsifying and storing the glaze while you work.
Step-by-Step Preparation Guide
Step 1: Preheat and ready the baking vessel
Preheat the oven to 425°F (220°C) and position a rack in the center. Lightly grease a rectangular rimmed baking dish or sheet with a teaspoon of neutral oil or a quick spray of nonstick—this is the long-lived vessel for the whole bake, so keep it visible and clean on the marble surface while you work. Doing this first means the pan is ready the moment the potatoes are dressed.
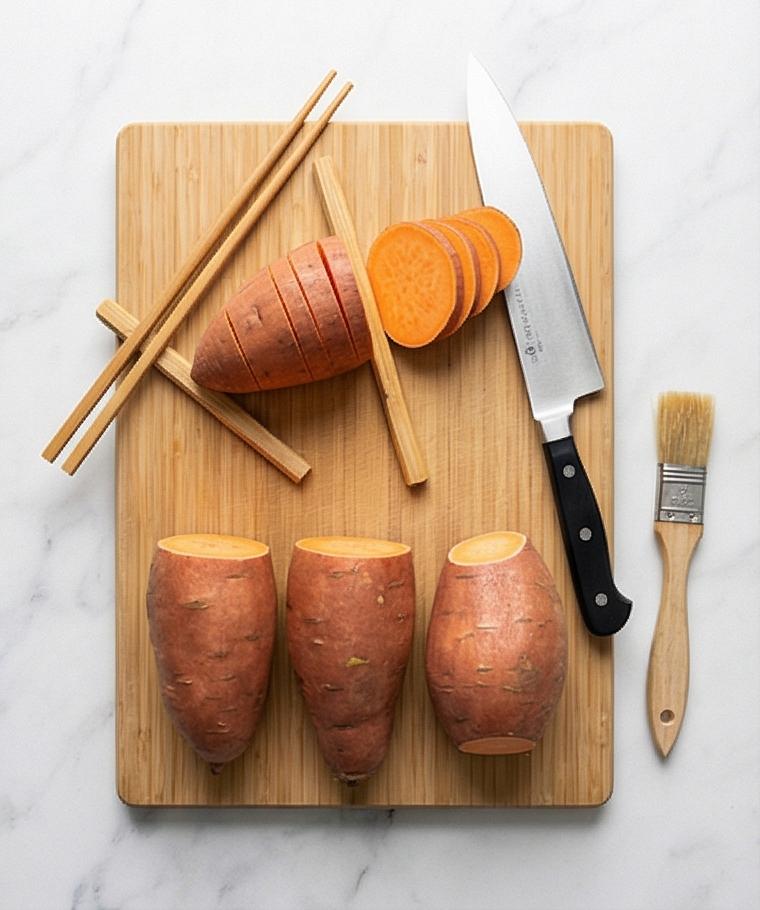
Step 2: Clean, dry, and create a stable base
Scrub each sweet potato under cold running water until any soil is gone, then pat them completely dry with a clean towel—dry skin crisps best in the oven. Trim a very thin slice lengthwise off the bottom of each potato so it sits flat and won’t roll when you slice. For safety and even slices, rest each potato between two wooden chopsticks (or wooden spoon handles) as you make thin parallel cuts about 1/8 inch (3 mm) apart, stopping when the knife hits the guards so the bottom remains intact. The result should be four intact, accordion-like potatoes with neat, evenly spaced slits and dry, matte skins ready for glazing.
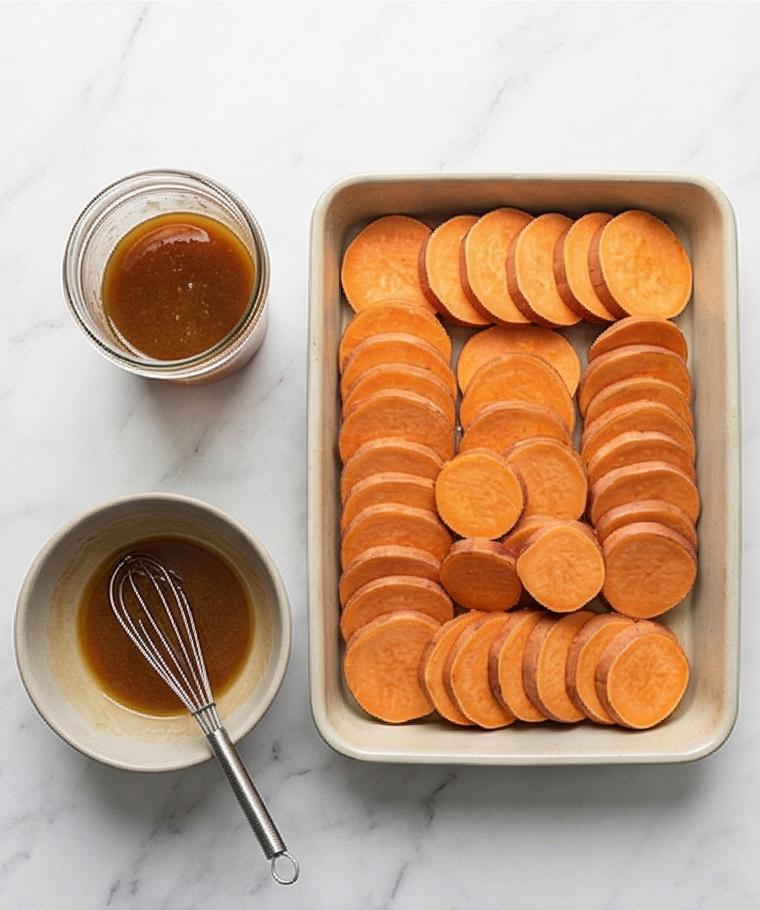
Step 3: Arrange and emulsify the glaze
Arrange the sliced sweet potatoes cut-side up in the prepared rectangular dish with a little breathing room between them so hot air can circulate. In a small bowl, whisk together melted unsalted butter, extra-virgin olive oil, pure maple syrup, fine sea salt, freshly ground black pepper, garlic powder, smoked paprika and the optional pinch of cinnamon until the mixture is fully emulsified and glossy; fold in finely chopped fresh thyme or rosemary so tiny green flecks are suspended through the glaze. Keep half of the mixture set aside in a small glass jar or bowl for basting. The visual result: a tidy row of slitted potatoes beside a small bowl of smooth, amber glaze speckled with herbs.
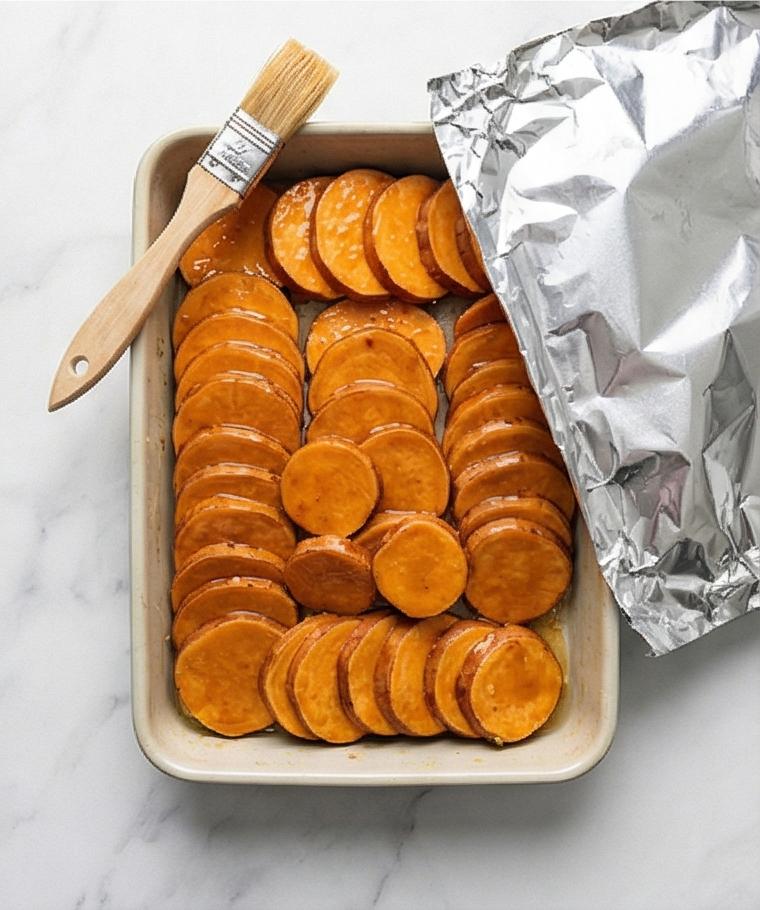
Step 4: Brush with glaze and begin a gentle covered bake
Using a pastry brush, generously paint the tops and sides of the potatoes with about half of the butter-maple glaze, coaxing some of the glaze between slices by gently fanning them open with the brush tip; the glaze should cling in thin ribbons between the slits. Loosely tent the rectangular dish with aluminum foil so it won’t touch the potatoes and set it aside on the marble surface—it’s ready to go into the hot oven. This panel captures the glossy, brushed potatoes in their rectangular pan and the foil tenting that prevents direct over-browning while the centers begin to soften.
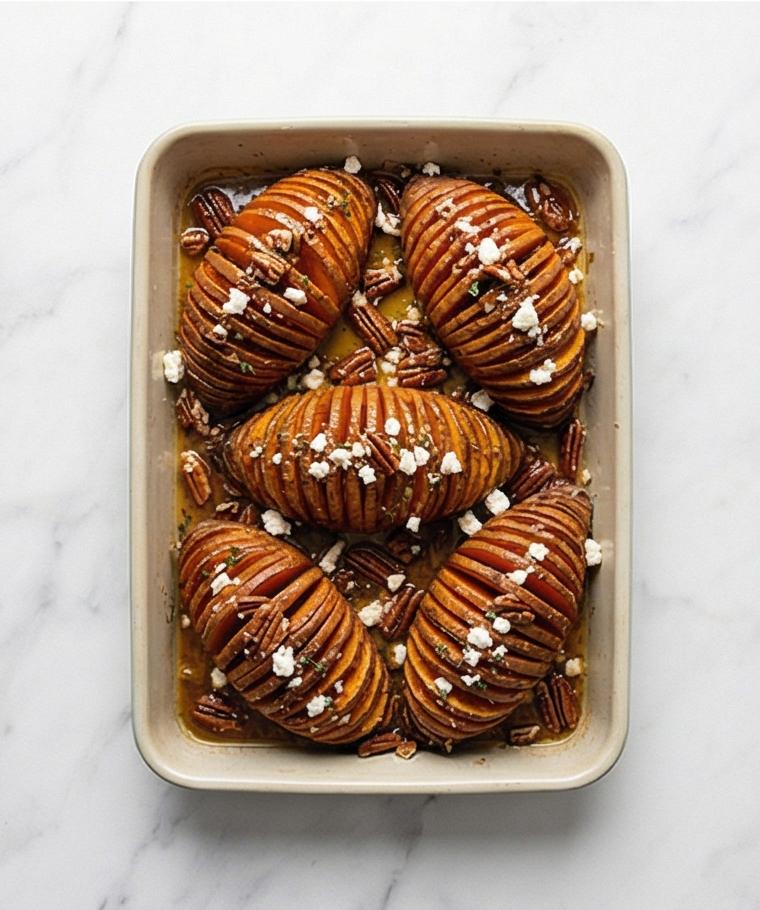
Step 5: Baste, finish baking, and add garnishes
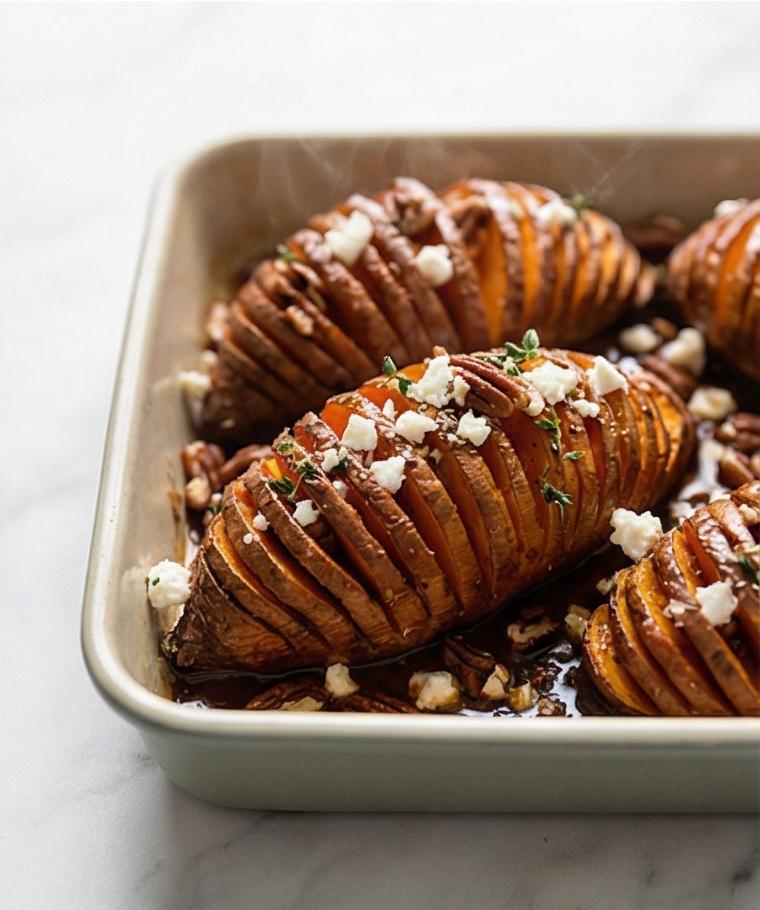
After the initial covered cook, remove the foil and baste the potatoes with reserved glaze and any collected pan juices, returning the dish uncovered for the remainder of the bake. Continue to baste every 10–15 minutes until the centers are tender and the slice edges are caramelized and slightly crisp (total bake ~45–55 minutes depending on size). If the tips darken too fast, loosely tent the dish for the final 10–15 minutes. Once done, brush any remaining glaze over the tops so it pools between slits, then finish with a final sprinkle of flaky sea salt, chopped fresh parsley, toasted pecans or walnuts, and optional crumbled feta or goat cheese—this yields glossy, deeply caramelized ridges, brown crisp edges, and bright herb specks.
Step 6: Rest briefly and serve from the baking dish
Let the rectangular baking dish rest on the marble for five minutes so the glaze thickens and clings; serve hot straight from that same pan as a side (one potato per person). The finished scene is a tight, very-close-up view of the same rectangular pan: steam-soft interiors visible between each crisp, caramelized slice, glossy maple-butter rivers, scattered thyme and parsley, toasted nut fragments and crumbled cheese catching the light.
Making It Your Own
I like to experiment with toppings depending on the season. In autumn I toast pecans and finish with crumbled goat cheese for a creamy contrast. In spring I swap parsley for lemony herb gremolata and use less maple to keep things bright. For a vegan version, replace butter with melted coconut oil or a vegan butter and skip the cheese; toasted pumpkin seeds make a lovely crunchy garnish.
For heat lovers, add a pinch of cayenne or a drizzle of harissa before the final bake. If you want something smoky and savory, brush a little miso-thinned with olive oil into the slits before glazing.
How to Serve
When hosting, I bake the potatoes in the same rectangular dish and bring them, still glossy and steaming, straight to the table. For a small dinner of four, serve one potato per person as a substantial side alongside roasted chicken or a big winter salad. For larger groups, double the batch and use two pans; the potatoes can sit on a warm oven rack for a few minutes while you finish sauces.
Garnish at the last minute with parsley and nuts so they stay crunchy. If you want to plate individually, loosen the slices slightly with a spoon and transfer to plates, topping each with a sprinkle of flaky salt and a little crumbled cheese.
Storage and Reheating Tips
Store cooled Hasselback sweet potatoes in an airtight container in the refrigerator for up to 3 days. Keep any extra glaze separate if you want to refresh the shine before serving again.
To reheat, place potatoes in a 350°F (175°C) oven for 10 to 12 minutes until warmed through and the edges crisp back up. For a quicker option, reheat gently in a skillet over medium-low heat with a splash of oil to revive the glaze and crisp the ridges.
Oops-Proofing: Common Mistakes and Fixes
Cutting too deep through the potato will separate the base, so use chopsticks or spoon handles as guards to keep the bottom intact. If you accidentally slice through, press the base back together and cover with foil for part of the bake to help it hold shape.
Underbaking leaves a starchy, firm center. If your potatoes vary in size, start the larger ones earlier or finish them with a few extra minutes covered if the skins are browning too fast.
Final Thoughts and Encouragement
Give this Hasselback Sweet Potatoes Recipe a try even if you are short on time. It elevates simple sweet potatoes into something with texture, shine, and layers of flavor, and it is forgiving enough for home cooks of all levels. Once you make it, you may find it becoming one of the dishes you rely on to bring warmth and a little wow to any meal.
Frequently Asked Questions.
- Q: Can I make this ahead of time? A: Yes, you can assemble and glaze the potatoes, then refrigerate for a few hours before baking; bring them to room temperature before putting them in the oven for more even cooking.
- Q: What if my potatoes are different sizes? A: Cook larger potatoes a bit longer or start them earlier; check tenderness with a skewer and tent smaller ones with foil if they brown too quickly.
- Q: Can I skip the butter? A: Yes, use melted coconut oil or a neutral oil for a dairy-free version; the texture and flavor will be slightly different but still delicious.
- Q: How do I keep the nuts crunchy? A: Toast nuts briefly in a dry skillet until fragrant and add them at the end so they keep their crunch.
- Q: Can I use regular potatoes instead? A: You can, though cooking times and flavor will change; choose waxy varieties for the best texture and adjust baking time until tender.
Hasselback Sweet Potatoes Recipe
Make this Hasselback Sweet Potatoes Recipe for glossy, caramelized sweet potatoes with a maple-butter glaze.
Ingredients
Instructions
Step 1: Preheat and ready the baking vessel
Preheat the oven to 425°F (220°C) and position a rack in the center. Lightly grease a rectangular rimmed baking dish or sheet with a teaspoon of neutral oil or a quick spray of nonstick—this is the long-lived vessel for the whole bake, so keep it visible and clean on the marble surface while you work. Doing this first means the pan is ready the moment the potatoes are dressed.
Step 2: Clean, dry, and create a stable base
Scrub each sweet potato under cold running water until any soil is gone, then pat them completely dry with a clean towel—dry skin crisps best in the oven. Trim a very thin slice lengthwise off the bottom of each potato so it sits flat and won’t roll when you slice. For safety and even slices, rest each potato between two wooden chopsticks (or wooden spoon handles) as you make thin parallel cuts about 1/8 inch (3 mm) apart, stopping when the knife hits the guards so the bottom remains intact. The result should be four intact, accordion-like potatoes with neat, evenly spaced slits and dry, matte skins ready for glazing.
Step 3: Arrange and emulsify the glaze
Arrange the sliced sweet potatoes cut-side up in the prepared rectangular dish with a little breathing room between them so hot air can circulate. In a small bowl, whisk together melted unsalted butter, extra-virgin olive oil, pure maple syrup, fine sea salt, freshly ground black pepper, garlic powder, smoked paprika and the optional pinch of cinnamon until the mixture is fully emulsified and glossy; fold in finely chopped fresh thyme or rosemary so tiny green flecks are suspended through the glaze. Keep half of the mixture set aside in a small glass jar or bowl for basting. The visual result: a tidy row of slitted potatoes beside a small bowl of smooth, amber glaze speckled with herbs.
Step 4: Brush with glaze and begin a gentle covered bake
Using a pastry brush, generously paint the tops and sides of the potatoes with about half of the butter-maple glaze, coaxing some of the glaze between slices by gently fanning them open with the brush tip; the glaze should cling in thin ribbons between the slits. Loosely tent the rectangular dish with aluminum foil so it won’t touch the potatoes and set it aside on the marble surface—it’s ready to go into the hot oven. This panel captures the glossy, brushed potatoes in their rectangular pan and the foil tenting that prevents direct over-browning while the centers begin to soften.
Step 5: Baste, finish baking, and add garnishes
After the initial covered cook, remove the foil and baste the potatoes with reserved glaze and any collected pan juices, returning the dish uncovered for the remainder of the bake. Continue to baste every 10–15 minutes until the centers are tender and the slice edges are caramelized and slightly crisp (total bake ~45–55 minutes depending on size). If the tips darken too fast, loosely tent the dish for the final 10–15 minutes. Once done, brush any remaining glaze over the tops so it pools between slits, then finish with a final sprinkle of flaky sea salt, chopped fresh parsley, toasted pecans or walnuts, and optional crumbled feta or goat cheese—this yields glossy, deeply caramelized ridges, brown crisp edges, and bright herb specks.
Step 6: Rest briefly and serve from the baking dish
Let the rectangular baking dish rest on the marble for five minutes so the glaze thickens and clings; serve hot straight from that same pan as a side (one potato per person). The finished scene is a tight, very-close-up view of the same rectangular pan: steam-soft interiors visible between each crisp, caramelized slice, glossy maple-butter rivers, scattered thyme and parsley, toasted nut fragments and crumbled cheese catching the light.
Notes
- Use similarly sized sweet potatoes so they cook evenly
- Keep chopsticks or spoon handles handy to avoid slicing through the base
- Reserve half the glaze for basting to build layers of flavor
- Toast nuts just before serving to maintain crunch
- Reheat in the oven to revive crisp edges