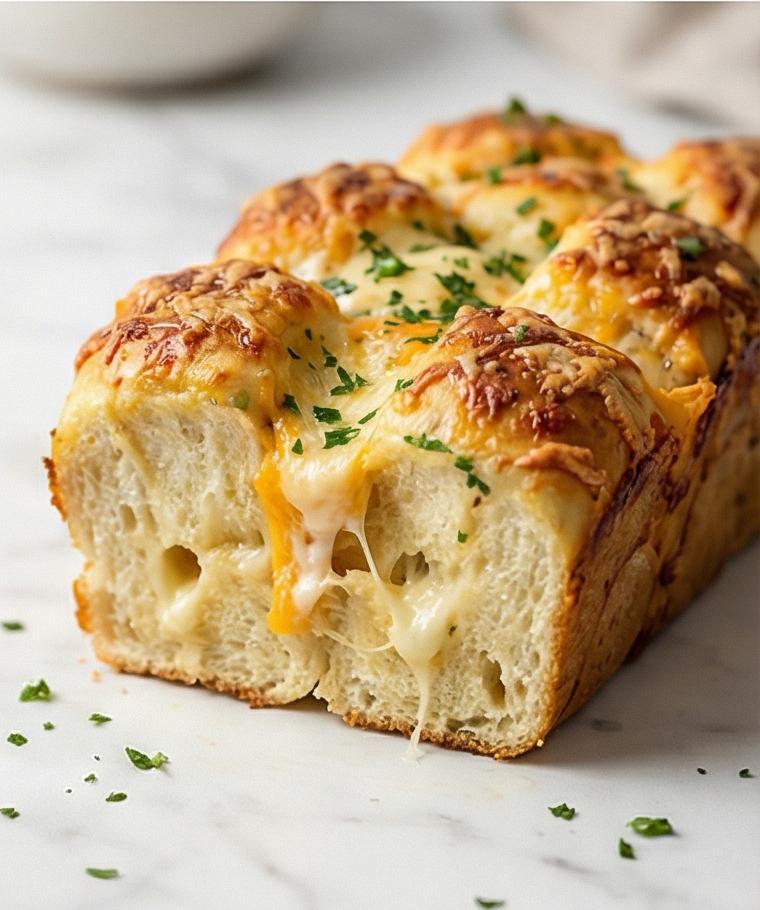
Cheese Pull Apart Bread Recipe has been one of my go-to crowd pleasers for years, and I still get excited every time the kitchen fills with warm, cheesy aroma. I first made this Cheese Pull Apart Bread Recipe on a lazy Sunday, and the way the crust cracked to reveal long, gooey cheese pulls felt like culinary magic. I love that it looks impressive but is forgiving to make, and that tends to win over guests and picky eaters alike. If you want a recipe that turns any evening into a celebration, this one never lets me down.
How This Recipe Became My Rainy-Day Favorite
I remember the afternoon I first tried this Cheese Pull Apart Bread Recipe like a small scene from a movie: rain tapping the windows, a pot of tea steaming on the counter, and this loaf baking until the whole house smelled like garlic and toasted cheese. I was nervous about the yeast, but the dough felt soft and warm under my palms as I shaped the little balls. When the timer finally rang and I pulled the pan from the oven, the top was a deep golden brown and the cheese had bubbled into delectable craters. We gathered around the table with a goofy eagerness usually reserved for birthdays, and the first pull produced those long, gooey strings that made everyone laugh. The bread warmed more than our hands that day; it made the kitchen feel like a cozy invitation, and that memory keeps me returning to this recipe whenever the weather calls for comfort.
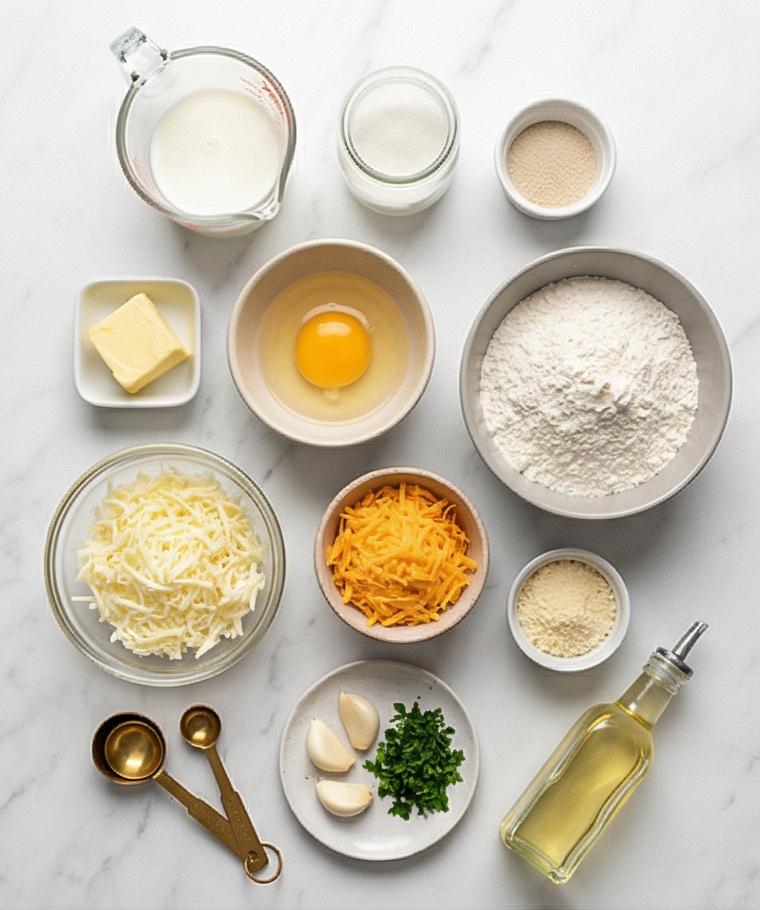
The Ingredients That Do the Heavy Lifting
- Whole Milk: Brings tenderness and a soft crumb. You can substitute with 2% milk for a lighter result or a non-dairy milk like oat if needed, but texture will change slightly.
- Yeast: The lift and airiness come from the instant or rapid-rise yeast; active dry can work if proofed first.
- Egg and Butter: Add richness and structure; an extra egg yolk boosts silkiness, and softened butter folds in better than melted.
- All-Purpose Flour and Salt: Flour builds the gluten network while salt controls flavor and yeast activity — use fine sea salt for even distribution.
- Garlic, Butter, and Cheeses: Garlic-butter and the mix of mozzarella, cheddar, and Parmesan create the signature gooey, savory coating; swap cheeses to taste but keep a melting cheese base.
Essential Kitchen Tools
Start with a short intro: a few simple tools make this recipe effortless. A good digital thermometer helps you warm milk to just the right temperature, which keeps yeast happy. A stand mixer with a dough hook saves elbow work and gives a consistently smooth dough, though you can knead by hand if you enjoy the physical rhythm of bread making.
- Mixing bowls: A large bowl for rising and a smaller one for the cheese mixture.
- Stand mixer or wooden spoon and elbow grease: Mixer speeds kneading; hand kneading builds intuition.
- 9×5-inch loaf pan: Keeps the pull-apart structure neat; you can use a slightly larger pan for a looser arrangement.
- Bench scraper or sharp knife: For dividing and shaping uniform balls.
If you do not have a stand mixer, a manual knead works fine. For a rustic presentation, bake in a round pan and adjust proofing time slightly.
Step-by-Step Preparation Guide.
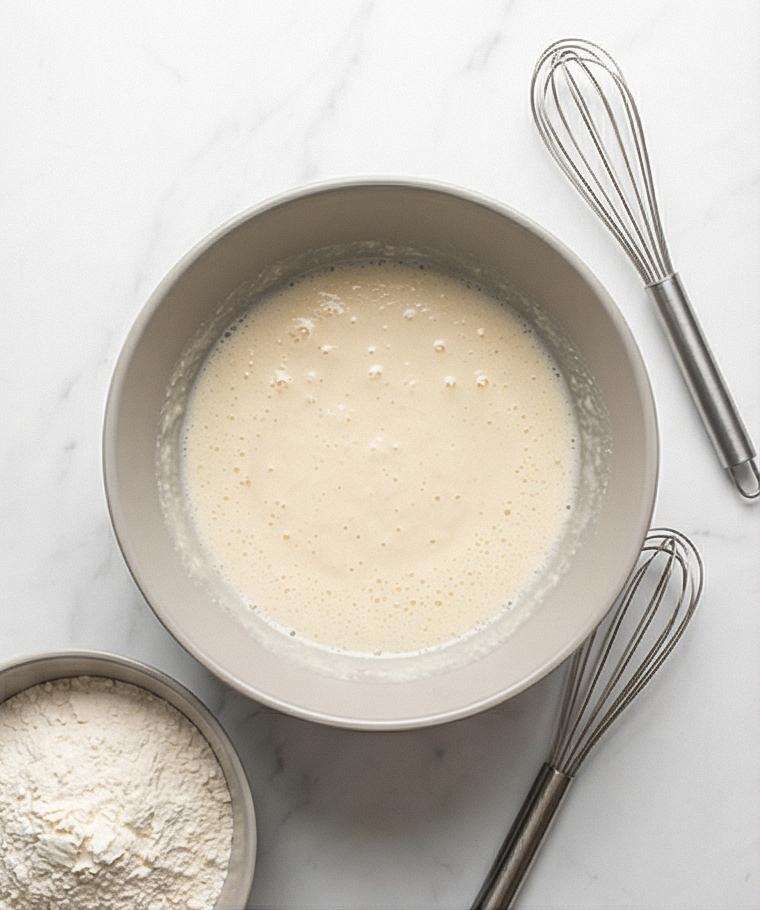
Step 1: Activate the yeast and combine the warm liquids
Warm the milk until it feels pleasantly warm to the wrist, whisk in the sugar, then sprinkle the yeast over the surface and let it rest until the mixture looks slightly foamy and creamy around the edges. Whisk the room-temperature egg into that warm, fragrant base, then stir in the very soft butter so the wet mixture reads as a pale, silky, slightly aerated batter ready to accept flour.
Step 2: Combine dry ingredients and bring the dough together
Stir the flour and fine sea salt together in a separate bowl, then add most of that flour to the wet bowl and mix until a thick batter forms. Gradually fold in the remaining flour until you have a shaggy dough that just starts pulling away from the sides — soft and slightly tacky but workable. If it clings excessively, add flour a tablespoon at a time until manageable, keeping the dough tender.
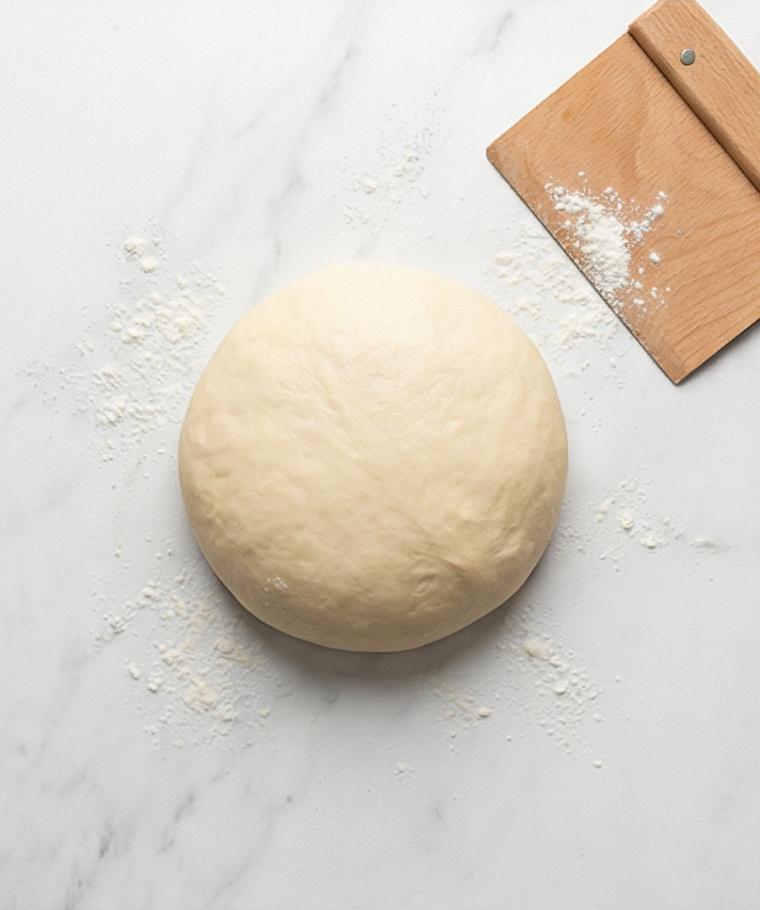
Step 3: Knead until smooth and perform the first rise
Turn the dough onto a lightly floured surface and knead until the texture changes from rough to smooth and elastic: a pliable, uniform ball that yields and slowly springs back when pressed. Lightly oil a clean bowl, nest the dough ball inside, cover, and let it rise in a warm spot until doubled and puffy, the surface slightly domed with a springy indentation when touched.
Step 4: Divide, shape and set up the assembly line
After deflating gently, shape the dough into a rough log and divide it into 30–32 walnut-sized pieces. Roll each piece between your palms to form smooth, tight balls and arrange them nearby on the work surface. In a tidy assembly line place a shallow glass bowl of warm garlic-butter, a matte ceramic bowl of the mixed shredded cheeses and parsley, and the greased rectangular 9×5-inch loaf pan ready to receive the coated balls.
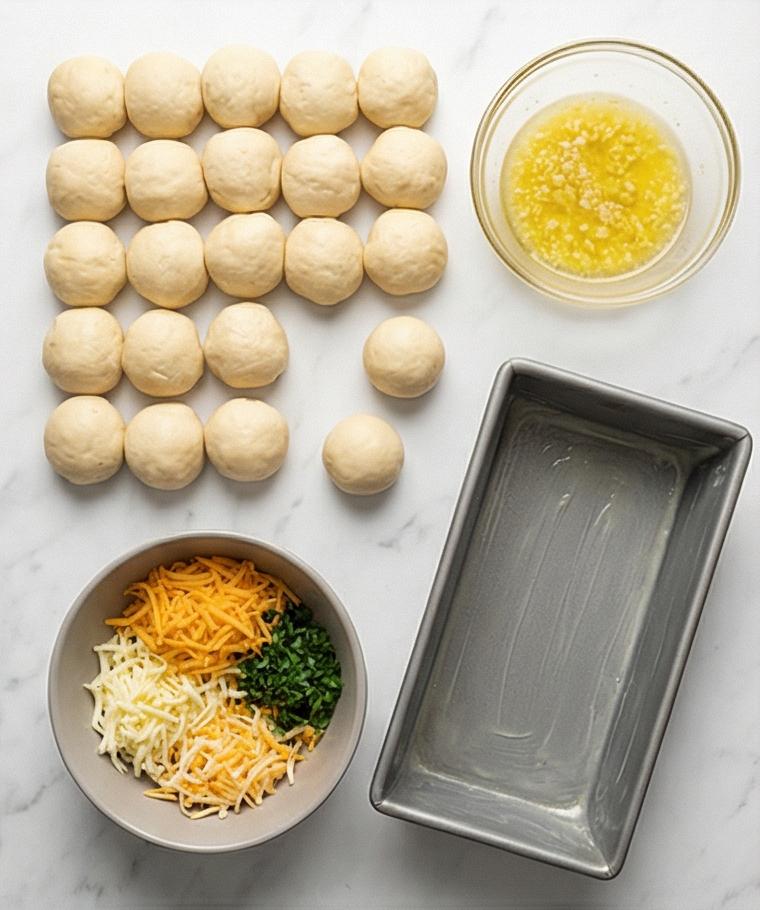
Step 5: Coat each ball, arrange in the loaf pan, and let the final rise
Working a few at a time, dip each dough ball into the garlic-butter so it is evenly coated (let excess drip back), then roll it gently in the cheese-herb mixture so the surface wears a light, even crust of shreddy cheese and flecks of parsley. Nestle the coated balls into the loaf pan in staggered, bricklike layers, sprinkle any remaining cheese across the top, and cover to proof until the balls puff nearly to the pan edges — pillowy, glossy, and ready to bake.

Step 6: Bake, finish, and serve warm
Bake the pan until the top is deep golden brown, the cheese melted and bubbly and the loaf feels set. Let it rest briefly, brush with a little melted butter for sheen if you like, then loosen and lift the rectangular loaf out so it keeps its straight, bricklike profile. Garnish with extra finely chopped parsley and serve immediately so guests can pull apart warm, glossy pieces with long, melty cheese pulls.
Making It Your Own
I like to tinker with fillings, and this Cheese Pull Apart Bread Recipe takes substitutions well. Try swapping half the mozzarella for smoked provolone for a slightly smoky note, or use a Mexican blend and a pinch of cumin for a fiesta-style loaf. For a vegetarian twist, mix finely caramelized onions and roasted red peppers into the cheese coating.
If you need a dairy-free version, use a firm, melting vegan cheese and a dairy-free butter alternative in the garlic mixture; results are slightly different but still crowd-pleasing. For a herby summer version, fold in fresh basil and thin lemon zest to brighten the flavor. Small experiments like swapping cheeses or adding a single herb let you make this recipe your own without changing the technique.
How to Serve
When I host, I bring the loaf to the table right out of the oven with a pair of tongs and a board for tearing pieces. For a casual crowd, cut the loaf into sections and pass it around; everyone can pull their piece and dip into extra garlic butter or marinara. For a dinner party, pair slices with a simple arugula salad dressed in lemon and olive oil to cut through the richness.
To adjust for more guests, bake two loaves and keep one wrapped in foil in a warm oven at 200F until ready to serve. To serve small households, make half the recipe or freeze individual balls uncooked on a tray and bake later for fresh pastries on demand.
Storage and Reheating Tips
Store leftover pull-apart bread at room temperature, wrapped tightly in foil or in an airtight container, for up to two days. The cheese inside will firm up, but the bread will still be delicious when reheated.
For reheating, preheat the oven to 350F, wrap the loaf in foil and heat for 10 to 15 minutes until warm through. For a crispier crust, open the foil for the last 3 minutes. Individual pieces also heat well in a toaster oven or under a broiler for a quick revive.
Common Mistakes and How to Avoid Them
Not proofing the yeast at the right temperature is a frequent issue; if the milk is too hot you may kill the yeast, and if it is too cool the dough will not rise. Use your wrist to test temperature or a digital thermometer for precision.
Another mistake is adding too much flour when the dough seems sticky. It is better to work a slightly tacky dough than a dry brick. Add flour sparingly, a tablespoon at a time, and trust the rise and knead to develop structure.
Final Thoughts
This Cheese Pull Apart Bread Recipe is simple, forgiving, and spectacular to serve. Whether you are feeding a crowd or making a cozy weekend treat, give this loaf a try and let the aroma do half the work in selling it to your guests. You will love how approachable and satisfying it feels to pull apart warm, cheese-filled pieces.
Frequently Asked Questions.
- Can I use active dry yeast instead of instant yeast? Yes, you can use active dry yeast; proof it in the warm milk with a pinch of sugar for 5 to 10 minutes until bubbly before proceeding.
- How long can I store leftovers? Keep leftovers wrapped at room temperature for up to two days, or freeze cooled loaf slices for up to 3 months.
- Can I make this dairy-free? Use a firm melting vegan cheese and a plant-based butter substitute to mimic the garlic-butter coating; texture will be slightly different but tasty.
- What pan size should I use? A 9×5-inch loaf pan is recommended to achieve the bricklike shape; if you use a different pan, watch proofing and baking times closely.
- Can I prepare parts of this ahead? Yes, you can shape the cheese-coated balls, freeze them single-layer on a tray, then transfer to a bag. Thaw and proof before baking for nearly fresh results.

Cheese Pull Apart Bread Recipe
Make the Cheese Pull Apart Bread Recipe for gooey, pull-apart cheese goodness—bake, brush with garlic butter, and serve warm.
Ingredients
Instructions
Step 1: Activate the yeast and combine the warm liquids
Warm the milk until it feels pleasantly warm to the wrist, whisk in the sugar, then sprinkle the yeast over the surface and let it rest until the mixture looks slightly foamy and creamy around the edges. Whisk the room-temperature egg into that warm, fragrant base, then stir in the very soft butter so the wet mixture reads as a pale, silky, slightly aerated batter ready to accept flour.
Step 2: Combine dry ingredients and bring the dough together
Stir the flour and fine sea salt together in a separate bowl, then add most of that flour to the wet bowl and mix until a thick batter forms. Gradually fold in the remaining flour until you have a shaggy dough that just starts pulling away from the sides — soft and slightly tacky but workable. If it clings excessively, add flour a tablespoon at a time until manageable, keeping the dough tender.
Step 3: Knead until smooth and perform the first rise
Turn the dough onto a lightly floured surface and knead until the texture changes from rough to smooth and elastic: a pliable, uniform ball that yields and slowly springs back when pressed. Lightly oil a clean bowl, nest the dough ball inside, cover, and let it rise in a warm spot until doubled and puffy, the surface slightly domed with a springy indentation when touched.
Step 4: Divide, shape and set up the assembly line
After deflating gently, shape the dough into a rough log and divide it into 30–32 walnut-sized pieces. Roll each piece between your palms to form smooth, tight balls and arrange them nearby on the work surface. In a tidy assembly line place a shallow glass bowl of warm garlic-butter, a matte ceramic bowl of the mixed shredded cheeses and parsley, and the greased rectangular 9×5-inch loaf pan ready to receive the coated balls.
Step 5: Coat each ball, arrange in the loaf pan, and let the final rise
Working a few at a time, dip each dough ball into the garlic-butter so it is evenly coated (let excess drip back), then roll it gently in the cheese-herb mixture so the surface wears a light, even crust of shreddy cheese and flecks of parsley. Nestle the coated balls into the loaf pan in staggered, bricklike layers, sprinkle any remaining cheese across the top, and cover to proof until the balls puff nearly to the pan edges — pillowy, glossy, and ready to bake.
Step 6: Bake, finish, and serve warm
Bake the pan until the top is deep golden brown, the cheese melted and bubbly and the loaf feels set. Let it rest briefly, brush with a little melted butter for sheen if you like, then loosen and lift the rectangular loaf out so it keeps its straight, bricklike profile. Garnish with extra finely chopped parsley and serve immediately so guests can pull apart warm, glossy pieces with long, melty cheese pulls.
Notes
- Test milk temperature with your wrist or a thermometer to keep yeast happy.
- Add flour gradually to avoid a dry dough; a slightly tacky feel is okay.
- Freeze unbaked, coated balls on a tray for easy future bakes.
- Brush with melted butter after baking for extra shine and flavor.
- Warm leftovers in foil at 350F for 10 to 15 minutes to revive texture.
