I always have a soft spot for hybrid treats that feel a little indulgent but are still anchored in nostalgia. The first time I tried the Korean Cream Cheese Garlic Bread Recipe, I was hooked by the contrast of pillowy bread and the slightly sweet, silky cream cheese ribbon. Over years of tweaking, I learned how the custard soak and the right bun texture make all the difference. This recipe is perfect for weekend baking or for impressing friends at brunch when you want something both familiar and a little bit unexpected.
How This Recipe Became My Rainy-Day Comfort
The rainy afternoon I first experimented with the Korean Cream Cheese Garlic Bread Recipe is still vivid: steam fogging the kitchen window, a playlist of old jazz, and the warm, buttered smell that filled the apartment. I remember pressing my palm to a just-proofed dough ball and marveling at how soft it felt, like a small promise. When the buns came out of the oven, golden and slightly glossy, I split one open and the sweet cream cheese met the warm, garlicky custard in a way that felt like sunshine on a grey day. Serving them to a friend who sighed contentedly made me realize this was not just a snack but a mood-lifter. Since then I make these for cozy gatherings, using small tweaks to match seasons and guests, but the heart of the Korean Cream Cheese Garlic Bread Recipe always stays the same.
Main Ingredients and Why They Matter
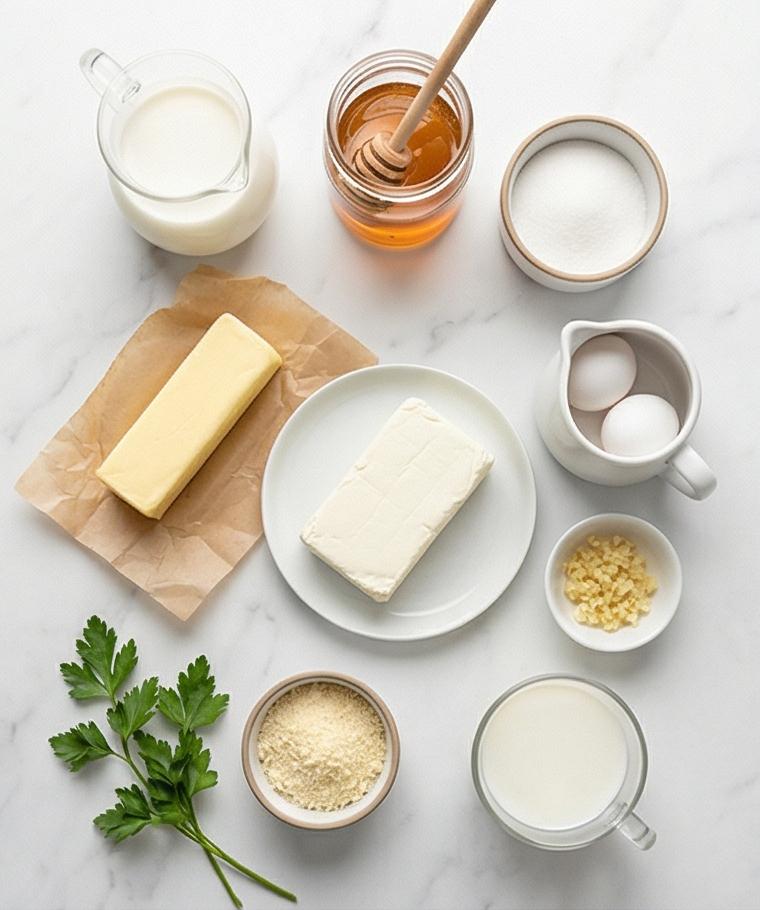
- Milk Bread or Brioche Buns: The soft, slightly sweet bun provides the structure and pillowy crumb; substitute soft dinner rolls or store-bought brioche if short on time. Choose fresh, unsliced buns for best results.
- Cream Cheese: The sweet cream cheese filling gives a cool, tangy contrast; full-fat block-style produces the creamiest texture. Low-fat options can be used but may be less silky.
- Butter: Unsalted butter enriches both dough and custard; use high-quality butter for flavor. For dairy-free swaps, try a neutral-tasting vegan butter.
- Garlic and Eggs: Garlic flavors the custard, while eggs emulsify to create a set, custardy coating. Fresh garlic is best; powdered garlic won’t be as lively.
Essential Kitchen Tools
A short intro: a few reliable tools make this recipe smooth and joyful to prepare.
- Mixing bowl: A sturdy bowl for kneading and mixing; a ceramic or steel bowl works well. If you have a stand mixer with a dough hook, it speeds kneading.
- Piping bag and round tip: For neat cream cheese ribbons; use a zip-top bag with a corner snipped as an easy alternative.
- Sharp serrated knife: Essential for cutting buns cleanly into wedges without squashing them; a serrated knife is gentler than a chef’s knife.
- Baking sheet and parchment: Prevents sticking and helps even browning; a rimmed baking tray keeps any custard from spilling into your oven.
- Wire cooling rack: Lets buns cool evenly so the filling stays creamy and does not melt away.
Step-by-Step Preparation Guide
Step 1: Knead, proof and shape the milk bread (or use store-bought brioche)
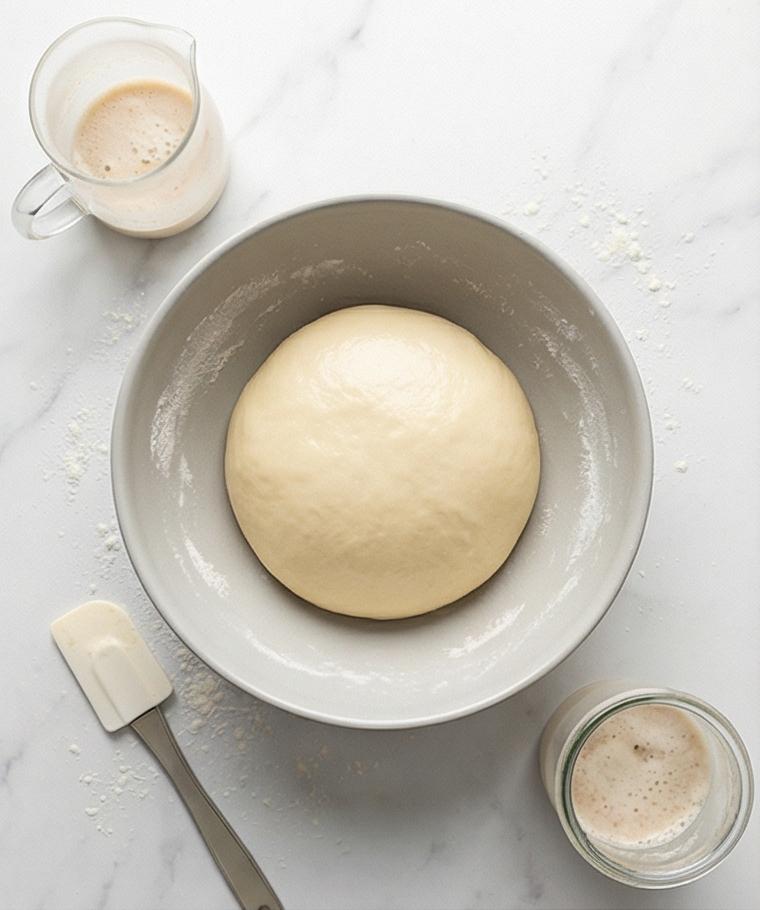
Begin by waking the yeast: whisk warm whole milk with instant yeast and a touch of sugar until the surface becomes foamy and fragrant. In a single matte light-grey ceramic mixing bowl, combine bread flour and fine sea salt, add the foamy milk-yeast and the room-temperature egg, and work into a shaggy mass. Gradually incorporate very soft butter while kneading until the dough is smooth, elastic and slightly tacky — a glossy, stretchable surface that yields a soft “windowpane” when pulled. Shape into a smooth ball, lightly oil the same bowl, turn to coat, and let it double in a warm spot; punch down, divide into six even pieces and roll tight smooth buns. If using store-bought brioche, choose unsliced buns and bring them to room temperature.
Step 2: Proof, bake and cool the buns until golden
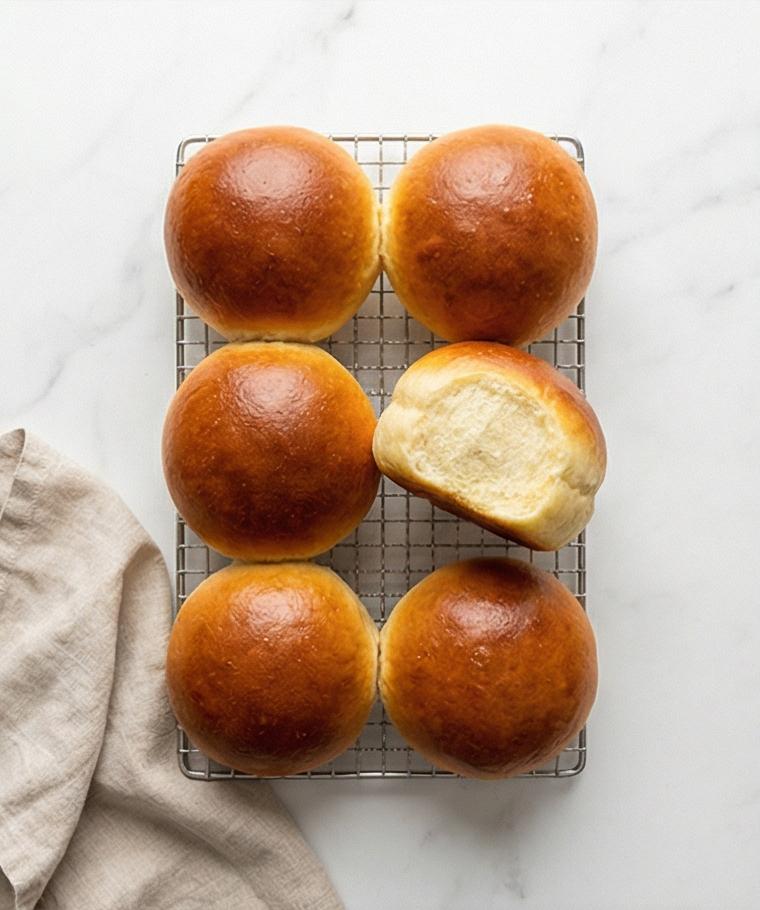
Arrange the dough balls on parchment on a tray, cover and let them puff until very airy and nearly doubled, then bake in a hot oven until the tops are deep golden brown and the bottoms sound hollow. Transfer the just-baked buns to a wire cooling rack on the same Carrara surface and let them cool until only slightly warm — still soft but not steaming, the crust thin and satiny so the cream cheese filling won’t melt on contact. This panel captures the clear transformation from shaped dough to finished baked bun, golden, pillowy, with faint flour dusting.
Step 3: Whip the sweet cream cheese filling until pipeable
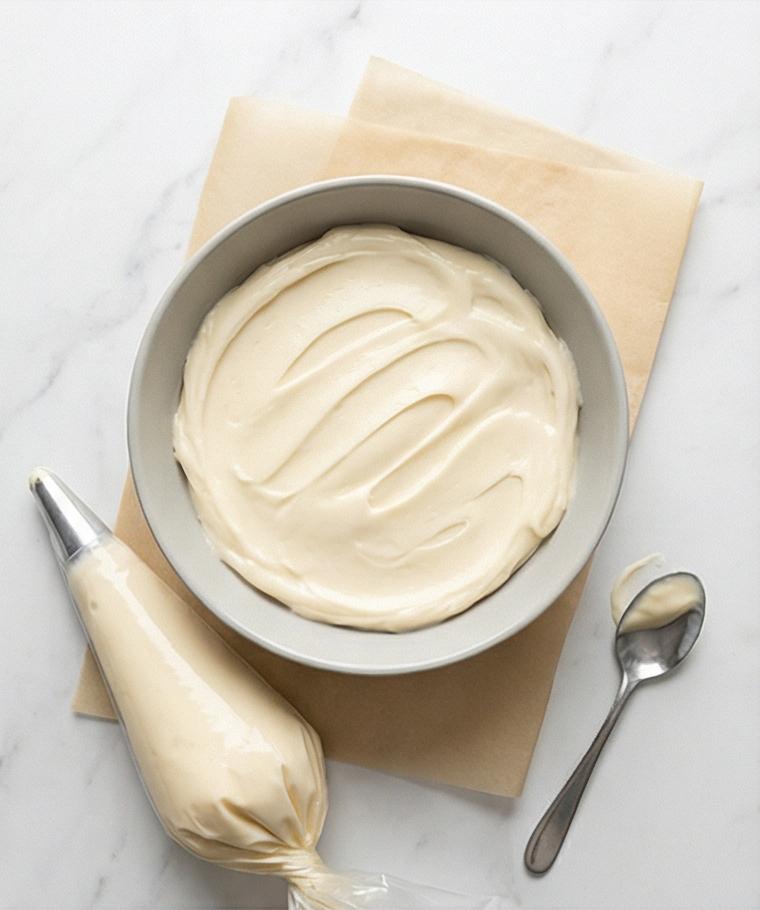
In the same matte grey ceramic bowl, beat room-temperature cream cheese with granulated sugar and honey (or sweetened condensed milk) until completely smooth and just fluffy. Add heavy cream (or milk), vanilla and a pinch of salt and beat briefly more until the mixture is thick, satin-smooth and pipeable — think soft frosting that holds a ribbon but is still creamy when squeezed. Load the filling into a clear piping bag fitted with a round tip (or a zip-top bag with a corner snipped) and refrigerate briefly if it needs to firm. This frame emphasizes the glossy, velvety texture of the filling and the neat piping bag ready for assembly.
Step 4: Emulsify the garlic-butter custard and assemble the buns
Whisk melted, slightly cooled butter with minced garlic, milk, cream (if using), sugar, honey, salt and pepper until homogenous, then stream in lightly beaten eggs while whisking vigorously to form a smooth, glossy custard-emulsion. Stir in finely minced parsley and a little grated Parmesan for savory lift. Using a sharp serrated knife, cut each bun into 6–8 wedges from top to near the base, gently open the segments and pipe generous ribbons of cream cheese into each gap. Working one bun at a time, either dip each filled bun into the garlic-butter custard to saturate the crevices or spoon and brush the custard thoroughly between the segments until saturated but not swimming in liquid. Place the saturated, filled buns back on a parchment-lined rectangular baking sheet (retain this tray shape for the final shot). This image shows the glossy custard in the same ceramic bowl, the piping bag at rest, the serrated knife, and the assembled, custard-soaked buns poised for their final bake.
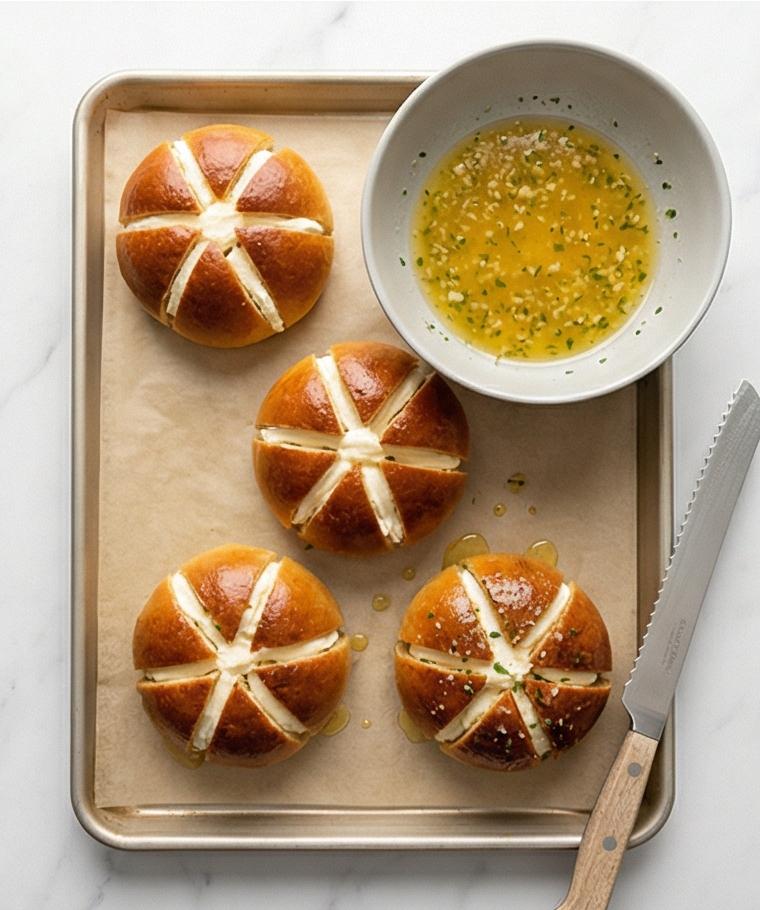
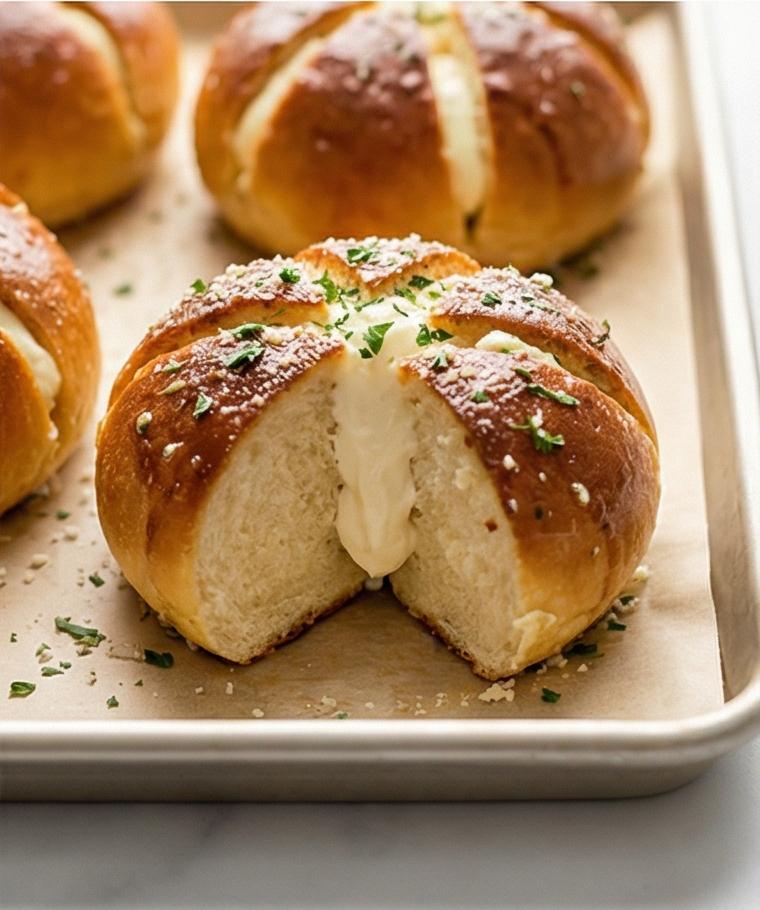
Step 5: Bake briefly, finish and serve warm
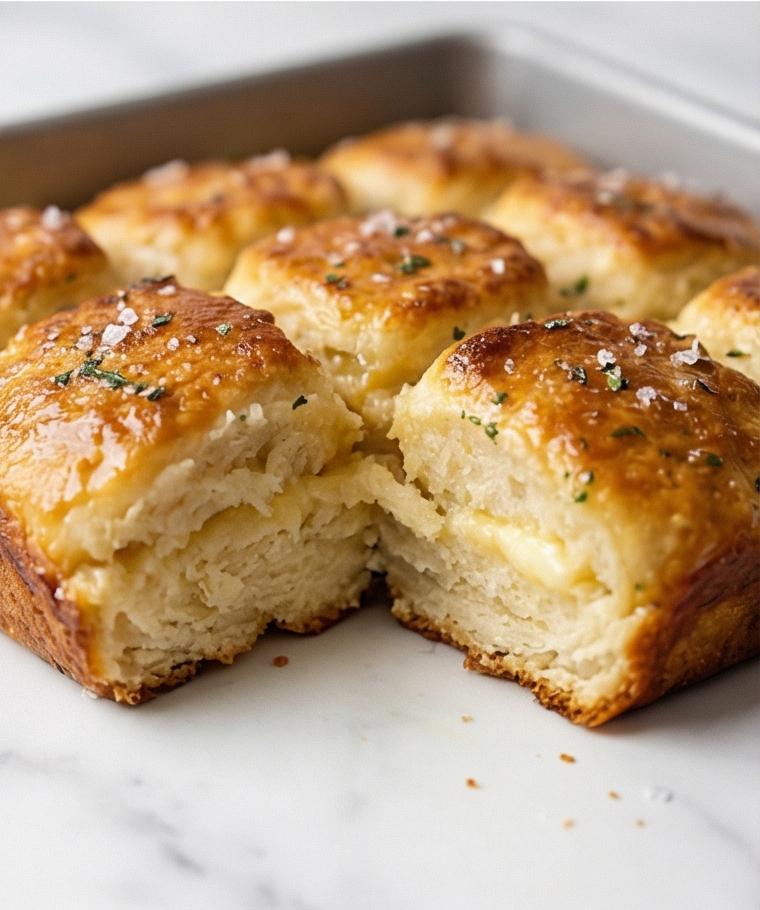
Bake the coated, filled buns until the tops are a deep bronzed-golden and the custard has set — edges crisp, interiors pillowy and the cream cheese warmed but not molten. Let them rest briefly on the baking sheet, then transfer to the Carrara marble for finishing. Lightly scatter finely chopped fresh parsley and a dusting of finely grated Parmesan for contrast. Serve slightly warm so each bite yields a crisp outer edge, a soft inner crumb and a creamy, cool-sweet cheese ribbon in the slit.
Making It Your Own
I like to treat this Korean Cream Cheese Garlic Bread Recipe as a template. For a nutty twist, fold a tablespoon of toasted sesame seeds into the cream cheese or sprinkle them on the finished buns for texture. To make it vegan, swap to a plant-based cream cheese and a vegan butter; note the custard will be looser without eggs, so reduce milk slightly and chill well before baking. In spring, mix minced chives into the custard and use ricotta with a touch of lemon zest instead of some cream cheese for a lighter filling. For a spicy regional spin, add a pinch of gochugaru to the butter-custard for subtle heat.
How to Serve
If I am hosting, I arrange the warm buns on a wooden board with small ramekins of extra Parmesan and chopped parsley so guests can customize. For a formal dinner, serve two wedges per person alongside a crisp green salad dressed with a bright vinaigrette to cut the richness. For a brunch, pair these with soft scrambled eggs and a fruit compote to balance sweet and savory. To scale for larger groups, bake batches on multiple sheets and keep them loosely tented with foil in a low oven (about 200F/95C) so they stay warm without overbrowning.
Storage and Reheating Tips
Store cooled buns in an airtight container in the refrigerator for up to 3 days; the texture softens a bit but the flavor develops. If you make extra custard or filling, keep it chilled in a sealed container and use within 2 days.
To reheat, pull the buns from the fridge and bake in a preheated 350F (175C) oven for 8 to 10 minutes until warmed through and the edges re-crisp. For a softer interior, wrap loosely in foil for the first few minutes, then uncover to restore the crust. Avoid microwaving for long stretches; it makes the bread chewy and the cream cheese may become overly soft.
Common Slip-Ups and How to Dodge Them
One frequent mistake is over-saturating the buns with custard so they become soggy. Work one bun at a time, and spoon or brush slowly so the liquid absorbs rather than pools. Let the filled buns rest briefly on the tray before baking so excess drips away.
Another is piping a filling that’s too loose; chill the cream cheese mix if it will not hold its shape. Conversely, do not over-chill to the point where it will not pipe evenly. Little adjustments in cream or chilling time fix most problems.
Final Thoughts
This Korean Cream Cheese Garlic Bread Recipe is a cozy, shareable treat that rewards a little attention to technique. Give it a go on a weekend, and tweak it once or twice to make it yours. I promise the first warm bite will be worth the effort.
Frequently Asked Questions.
- Can I make the Korean Cream Cheese Garlic Bread Recipe ahead of time?
Yes, you can assemble the buns a few hours ahead and refrigerate them, or fully prepare and keep them chilled overnight; bake from chilled and add a few extra minutes in the oven. - What substitutes work for full-fat cream cheese?
Light cream cheese will work but the filling may be thinner. For dairy-free, use a firm vegan cream cheese and add a touch more powdered sugar to mimic the texture. - Can I use frozen buns?
You can use frozen brioche or milk bread buns; thaw them completely and bring to room temperature before filling to prevent the cream cheese from melting. - How do I prevent the custard from curdling?
Use room-temperature eggs and stream them into the butter-milk mix while whisking steadily to create a smooth emulsion. Avoid very high oven temperatures during the short bake. - Is this recipe suitable for serving to a crowd?
Absolutely. The Korean Cream Cheese Garlic Bread Recipe scales well—bake in batches and keep finished buns warm in a low oven or on a warming tray.
Korean Cream Cheese Garlic Bread Recipe
Make Korean Cream Cheese Garlic Bread Recipe: pillowy buns filled with sweet cream cheese and brushed with garlicky custard.
Ingredients
Instructions
Step 1: Knead, proof and shape the milk bread (or use store-bought brioche)
Begin by waking the yeast: whisk warm whole milk with instant yeast and a touch of sugar until the surface becomes foamy and fragrant. In a single matte light-grey ceramic mixing bowl, combine bread flour and fine sea salt, add the foamy milk-yeast and the room-temperature egg, and work into a shaggy mass. Gradually incorporate very soft butter while kneading until the dough is smooth, elastic and slightly tacky — a glossy, stretchable surface that yields a soft "windowpane" when pulled. Shape into a smooth ball, lightly oil the same bowl, turn to coat, and let it double in a warm spot; punch down, divide into six even pieces and roll tight smooth buns. If using store-bought brioche, choose unsliced buns and bring them to room temperature.
Step 2: Proof, bake and cool the buns until golden
Arrange the dough balls on parchment on a tray, cover and let them puff until very airy and nearly doubled, then bake in a hot oven until the tops are deep golden brown and the bottoms sound hollow. Transfer the just-baked buns to a wire cooling rack on the same Carrara surface and let them cool until only slightly warm — still soft but not steaming, the crust thin and satiny so the cream cheese filling won’t melt on contact. This panel captures the clear transformation from shaped dough to finished baked bun, golden, pillowy, with faint flour dusting.
Step 3: Whip the sweet cream cheese filling until pipeable
In the same matte grey ceramic bowl, beat room-temperature cream cheese with granulated sugar and honey (or sweetened condensed milk) until completely smooth and just fluffy. Add heavy cream (or milk), vanilla and a pinch of salt and beat briefly more until the mixture is thick, satin-smooth and pipeable — think soft frosting that holds a ribbon but is still creamy when squeezed. Load the filling into a clear piping bag fitted with a round tip (or a zip-top bag with a corner snipped) and refrigerate briefly if it needs to firm. This frame emphasizes the glossy, velvety texture of the filling and the neat piping bag ready for assembly.
Step 4: Emulsify the garlic-butter custard and assemble the buns
Whisk melted, slightly cooled butter with minced garlic, milk, cream (if using), sugar, honey, salt and pepper until homogenous, then stream in lightly beaten eggs while whisking vigorously to form a smooth, glossy custard-emulsion. Stir in finely minced parsley and a little grated Parmesan for savory lift. Using a sharp serrated knife, cut each bun into 6–8 wedges from top to near the base, gently open the segments and pipe generous ribbons of cream cheese into each gap. Working one bun at a time, either dip each filled bun into the garlic-butter custard to saturate the crevices or spoon and brush the custard thoroughly between the segments until saturated but not swimming in liquid. Place the saturated, filled buns back on a parchment-lined rectangular baking sheet (retain this tray shape for the final shot). This image shows the glossy custard in the same ceramic bowl, the piping bag at rest, the serrated knife, and the assembled, custard-soaked buns poised for their final bake.
Step 5: Bake briefly, finish and serve warm
Bake the coated, filled buns until the tops are a deep bronzed-golden and the custard has set — edges crisp, interiors pillowy and the cream cheese warmed but not molten. Let them rest briefly on the baking sheet, then transfer to the Carrara marble for finishing. Lightly scatter finely chopped fresh parsley and a dusting of finely grated Parmesan for contrast. Serve slightly warm so each bite yields a crisp outer edge, a soft inner crumb and a creamy, cool-sweet cheese ribbon in the slit.
Notes
- Use unsliced, fresh buns for best texture and appearance.
- Chill the cream cheese filling briefly if it is too loose for piping.
- Work one bun at a time when soaking with custard to avoid sogginess.
- Reheat in a 350F oven for best texture; avoid microwaving.
- Substitute plant-based butter and cream cheese for a vegan version.
